

Table of Contents
Crocheting Amigurumi Lion an amigurumi lion brings a touch of the wild into your home in the most adorable way possible. This comprehensive guide walks you through creating a charming crocheted lion with a luxurious mane. Perfect for beginners who have mastered basic stitches, this amigurumi pattern creates a cuddly lion that’s sure to become a treasured handmade item, whether as a gift or a special addition to your own collection.
Essential Materials for Your Amigurumi Lion
Before you begin your crocheting adventure, gather these materials:
Amigurumi Lion Materials List
- DK/light worsted weight cotton yarn in caramel or light brown for the head and body
- DK/light worsted weight cotton yarn in darker brown shades for the mane (recommended: soft fudge and coffee bean colors)
- 2.5mm (C-2 or B-1) crochet hook
- 5mm (0.2″) safety eyes
- Fiberfill stuffing
- Darning needle or tapestry needle
- Black embroidery floss
- Large-eyed sewing needle
- Stitch marker
- Sewing pins
- Scissors
Understanding Amigurumi Lion Abbreviations
For those new to crochet patterns, here’s a quick reference guide:
- St – Stitch
- Ch – Chain
- Sc – Single crochet (double crochet in British terminology)
- Inc – Single crochet increase (2 single crochet in the same stitch)
- Dec – Invisible single crochet decrease
- Hdc – Half double crochet (half treble crochet in British terminology)
- Dc – Double crochet (treble crochet in British terminology)
- BLO – Back loops only
- (…) – Stitches that are repeated in the round
- *… – Number of repetitions
Creating Your Amigurumi Lion Step by Step
The Forelegs (Make 2)
Round 1: Create a magic ring and work 8 single crochet stitches into it using your body color yarn. Pull the ring tight to close the circle. (8 stitches)
Round 2: Working in back loops only for this round: Work the following pattern twice: [single crochet in 2 stitches, decrease]. (6 stitches)
Round 3: Single crochet in each stitch around the entire round. (6 stitches)
Round 4: Work the following pattern twice: [single crochet in 2 stitches, increase in the next stitch]. (8 stitches)
Round 5: Work the following pattern twice: [single crochet in 2 stitches, decrease]. (6 stitches)
Round 6: Single crochet in each stitch around the entire round. (6 stitches)
Fasten off the first leg, leaving a short tail. For the second leg, leave a longer tail for sewing later.
The Hind Legs (Make 2)
Round 1: Create a magic ring and work 8 single crochet stitches into it using your body color yarn. Pull the ring tight to close the circle. (8 stitches)
Round 2: Working in back loops only for this round: Work the following pattern twice: [single crochet in 2 stitches, decrease]. (6 stitches)
Round 3: Single crochet in each stitch around the entire round. (6 stitches)
Round 4: Work the following pattern twice: [single crochet in 2 stitches, increase in the next stitch]. (8 stitches)
Round 5: Work the following pattern twice: [single crochet in 2 stitches, decrease]. (6 stitches)
Round 6: Single crochet in each stitch around the entire round. (6 stitches)
Round 7: Work the following pattern twice: [single crochet in 2 stitches, increase in the next stitch]. (8 stitches)
Fasten off the first hind leg, leaving a short tail. For the second hind leg, leave a longer tail for sewing later.
Creating the Belly and Attaching the Legs
Start: Chain 4 stitches using your body color yarn.
Round 1: Starting in the 2nd chain from your hook, single crochet in 2 chains, work 4 single crochet into the last chain, single crochet in 1 stitch on the other side of the chain, work 3 single crochet in the last chain. This creates an oval shape for the base of your lion’s body. (10 stitches)
Round 2: This critical round connects all four legs to the body:
- Work 8 single crochet stitches around the first hind leg
- Single crochet in the next 3 stitches of the belly
- Work 6 single crochet stitches around the first foreleg
- Single crochet in the next 2 stitches of the belly
- Work 6 single crochet stitches around the second foreleg
- Single crochet in the next 3 stitches of the belly
- Work 8 single crochet stitches around the second hind leg
- Single crochet in the next 2 stitches of the belly (38 stitches total)
Round 3: Shape the body with these precise decreases:
- Decrease once
- Single crochet in the next 5 stitches
- Decrease once
- Single crochet in the next stitch
- Decrease once
- Single crochet in the next 4 stitches
- Decrease twice
- Single crochet in the next 4 stitches
- Decrease once
- Single crochet in the next stitch
- Decrease once
- Single crochet in the next 5 stitches
- Decrease once
- Single crochet in the next 2 stitches (30 stitches)
Rounds 4-5: Single crochet in all 30 stitches for two rounds. (30 stitches per round)
Round 6: This round creates the neck opening:
- Single crochet in the first 10 stitches
- Chain 4 stitches
- Skip 10 stitches
- Single crochet in the next 10 stitches (24 stitches including your chain)
Continuing with the Back
Round 7: Work the following pattern 6 times: [single crochet in 2 stitches, decrease once]. (18 stitches)
At this point, begin filling the body with fiberfill, making sure to stuff firmly but not overstuffing.
Round 8: Work the following pattern 6 times: [single crochet in 1 stitch, decrease once]. (12 stitches)
Round 9: Decrease 6 times around the entire round to close the back. (6 stitches)
Fasten off and weave in the end securely.
Creating the Neck
For the neck, join your yarn at the left corner of the neck opening (where you created the chain in Round 6 of the body).
Round 7: Single crochet in 10 stitches, then work 4 single crochet into the chain stitches on the other side. (14 stitches)
Round 8: Single crochet in the first 4 stitches, decrease once, single crochet in the next 5 stitches, decrease once, single crochet in the last stitch. (12 stitches)
Round 9: Work the following pattern 4 times: [single crochet in 1 stitch, decrease once]. (8 stitches)
Fasten off, leaving a long tail for sewing the head to the neck later.
Creating the Head
Round 1: Create a magic ring and work 6 single crochet stitches into it. Pull the ring tight to close the circle. (6 stitches)
Round 2: Increase in all 6 stitches around. (12 stitches)
Round 3: Single crochet in all 12 stitches around. (12 stitches)
Round 4: Single crochet in the first 8 stitches, then increase in each of the next 4 stitches. (16 stitches)
Round 5: Single crochet in the first 9 stitches, increase in each of the next 5 stitches, single crochet in the last 2 stitches. (21 stitches)
Rounds 6-7: Single crochet in all 21 stitches for two rounds. (21 stitches per round)
Face Details: At this point, embroider the nose with black embroidery floss. Then insert the safety eyes at an appropriate distance apart (typically between rounds 5-6, with 6-7 stitches between them).
Round 8: Work the following pattern 3 times: [single crochet in 5 stitches, decrease once]. (18 stitches)
Begin filling the head with fiberfill.
Round 9: Work the following pattern 3 times: [single crochet in 4 stitches, decrease once]. (15 stitches)
Round 10: Work the following pattern 3 times: [single crochet in 3 stitches, decrease once]. (12 stitches)
Add more fiberfill if needed, but be careful not to overstuff.
Round 11: Decrease 6 times around to close the head. (6 stitches)
Fasten off, close the opening securely, and weave in the yarn end.
Creating the Ears (Make 2)
Start: Chain 4 stitches.
Row 1: Starting in the 2nd chain from hook:
- Single crochet in the first chain
- Half double crochet in the next chain
- Double crochet in the next chain
- Half double crochet in the same chain as the double crochet
- Single crochet in the last chain
This creates a rounded ear shape. Fasten off, leaving a long tail for sewing.
Creating the Tail
Start: Chain 12 stitches.
Row 1: Starting in the 2nd chain from hook, single crochet in each of the 11 chains. (11 stitches)
Fasten off, leaving a long tail for sewing.
Assembling Your Amigurumi Lion
Now it’s time to bring all the pieces together:
- Tail Finishing: Cut 4 pieces of dark brown yarn, each about 7cm/3″ long. Attach them to the end of the tail by folding them in half, pulling the folded middle through the end of the tail with your hook, and then pulling the loose ends through the loop created. Trim them to your desired length.
- Attach the Ears: Sew the ears onto the head at round 8, with approximately 4 stitches space between them. Position them so they curve slightly forward for a more natural look.
- Join Head and Neck: Using the long tail from the neck, sew the head securely to the neck opening. Make sure it’s positioned straight and centered.
- Attach the Tail: Sew the tail centered at the back of the lion, making sure it’s securely attached.
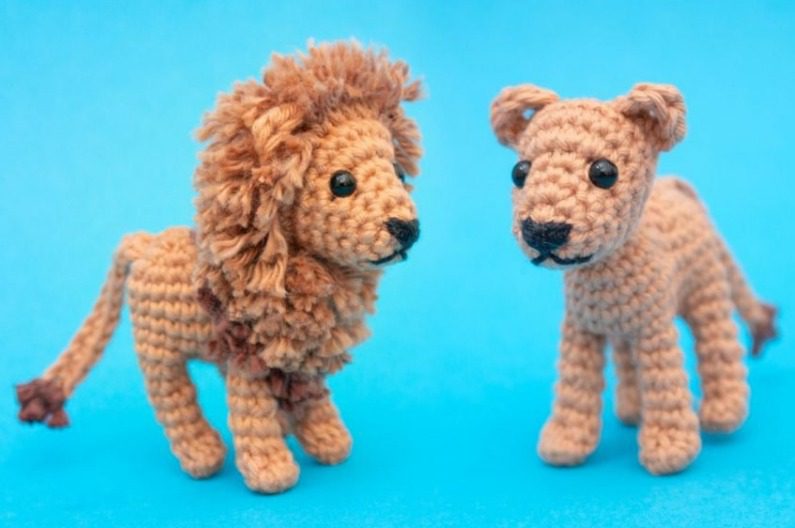
- Creating the Magnificent Mane:
- Cut approximately 30 pieces of dark brown yarn, each about 10cm/4″ long
- Cut approximately 120 pieces of caramel/light brown yarn, each about 10cm/4″ long
- Begin attaching the mane by starting with the dark brown pieces around the neck area:
- Fold each piece of yarn in half
- Use your hook to pull the folded middle through a stitch at the base of the neck
- Pull the loose ends through the loop created and tighten
- Continue adding dark brown yarn in 2 complete rounds around the neck
- Next, begin attaching the caramel/light brown yarn in the same manner, working your way up the neck and onto the head
- Continue adding yarn until you’ve created a full, lush mane
- Finally, trim the mane to create the desired shape and fluff the fibers to add volume
Your amigurumi lion is now complete! Stand back and admire your handmade creation, ready to add charm to any shelf or to become a child’s treasured companion.
Customizing Your Amigurumi Lion
Want to make your lion unique? Here are some creative variations:
- Color Variations: Change the body color to white for a white lion, or use gray for a more mature lion look
- Mane Styling: Try different mane lengths or mix in more colors for a multi-toned effect
- Facial Expression: Experiment with different nose shapes or add whiskers for added personality
- Size Adjustments: Use thicker yarn and a larger hook for a bigger lion, or finer yarn and a smaller hook for a tiny version
- Accessories: Add a crown for a lion king, or a small scarf for a seasonal touch
Common Questions About Amigurumi Lions
How long does it take to make this amigurumi lion?
Most intermediate crocheters can complete this project in 3-5 hours, though the mane attachment may take additional time.
Can I use different yarn types?
Yes! While DK cotton yarn gives a clean, defined look to amigurumi, you can also use acrylic yarn. Just be aware that different yarns may affect the size and appearance of your finished lion.
Is this pattern suitable for beginners?
This pattern is best suited for advanced beginners who are comfortable with basic stitches and can follow a pattern. The most challenging part is likely the mane attachment, which requires patience more than technical skill.
How big is the finished amigurumi lion?
The completed lion stands approximately 5-6 inches tall, making it the perfect size for display or play.

Check this out : Nostalgic Amigurumi Troll Doll Pattern
Conclusion
Creating your own amigurumi lion is a rewarding process that combines simple crochet techniques to produce a charming result. Whether you’re making this adorable lion as a gift or for yourself, the detailed instructions in this pattern ensure that you’ll create a handmade treasure with personality and character. The cuddly lion with its magnificent mane will surely bring joy for years to come.
Happy crocheting!
