

Table of Contents
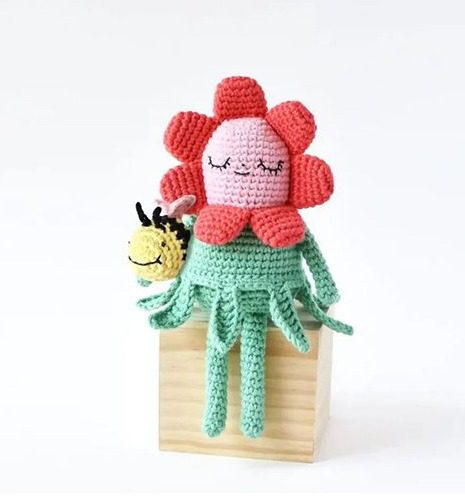
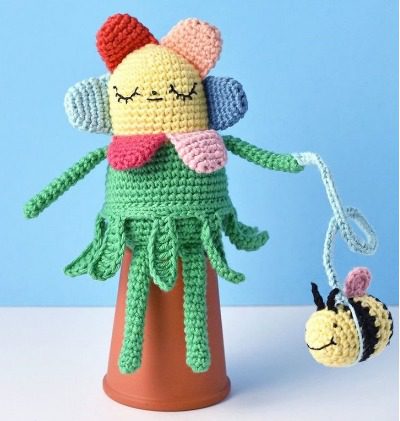
Creating Flower Gal a charming amigurumi Flower Gal brings together the delightful elements of nature in a sweet, huggable doll form. This comprehensive pattern will guide you through crafting a precious flower-themed doll complete with a coordinating bee friend. Perfect for spring décor, gifts for plant lovers, or adding whimsy to any space, this crochet project combines simple techniques to create a wonderfully detailed finished piece.
Materials Needed for Your Flower Gal Amigurumi
Before beginning your crochet journey, gather these essential supplies:
Flower Gal Yarn Requirements
- Light weight yarn (DK or light worsted) in 5 colors:
- Color A – Head & bee wing color (suggested: blush pink)
- Color B – Body & skirt color (suggested: grass green)
- Color C – Petal color (suggested: rose red)
- Color D – Bee main color (suggested: daffodil yellow)
- Color E – Bee stripe color (suggested: pure black)
Flower Gal Tools and Notions
- 2.75mm (C) crochet hook
- Toy stuffing
- Stitch marker
- Black embroidery floss (six-strand)
- Embroidery/sewing needle
- Tapestry needle (size 16 recommended)
- Scissors
- Sewing pins
Flower Gal Understanding Gauge and Size
Gauge isn’t critical for this pattern, but ensure your stitches are tight enough to prevent stuffing from showing through. The finished Flower Gal stands approximately 7.5 inches (19 cm) tall.
Flower Gal Crochet Terminology (US Terms)
- ch – chain
- rnd(s) – round(s)
- mr – magic ring
- st(s) – stitch(es)
- sl st – slip stitch
- sc – single crochet
- inc – single crochet increase (two single crochet in same stitch)
- inv dec – invisible decrease
- hdc – half double crochet
- dc – double crochet
- tr – treble crochet
- sm – stitch marker
- x – times (indicates number of times to repeat)
- [ ] – repeat steps between brackets for the specified number of times
- ( ) – the number of stitches you should have at the end of each round
Creating Your Flower Gal Step by Step
Flower Gal Head & Body
Round 1: Using Color A (pink), create a magic ring and work 6 single crochet into it. Pull tight to close. (6 stitches)
Round 2: Increase in each stitch around by working 2 single crochet in each stitch. (12 stitches)
Round 3: Work the following pattern 6 times: [single crochet in 1 stitch, increase in next stitch]. (18 stitches)
Round 4: Work the following pattern a times: [single crochet in 2 stitches, increase in next stitch]. (24 stitches)
Round 5: Single crochet in each stitch around. (24 stitches)
Round 6: Work the following pattern 6 times: [single crochet in 3 stitches, increase in next stitch]. (30 stitches)
Round 7: Work the following pattern 6 times: [single crochet in 4 stitches, increase in next stitch]. (36 stitches)
Rounds 8-16: Single crochet in each stitch around for 9 rounds. (36 stitches per round)
Round 17: Work the following pattern 6 times: [single crochet in 4 stitches, invisible decrease]. (30 stitches)
Round 18: Single crochet in 1 stitch, change to Color B (green), single crochet in 3 stitches, increase in next stitch, then work the following pattern 5 times: [single crochet in 4 stitches, increase in next stitch]. (36 stitches)
Round 19: Single crochet in each stitch around. (36 stitches)
Face Embroidery: At this point, embroider the face using 4 strands of black embroidery floss. Place the face on the side opposite the color changes. Create:
- A French knot for the nose at the center of round 10
- Backstitch for the eyes on rounds 9-11, spaced 4 stitches apart
- Backstitch for the mouth at round 11
- After completing the embroidery, gently pull on the mouth to create a natural smile shape
Round 20: Work the following pattern 6 times: [single crochet in 5 stitches, increase in next stitch]. (42 stitches)
Round 21: Work the following pattern 6 times: [single crochet in 6 stitches, increase in next stitch]. (48 stitches)
Rounds 22-28: Single crochet in each stitch around for 7 rounds. (48 stitches per round)
Round 29: Work the following pattern 6 times: [single crochet in 6 stitches, invisible decrease]. (42 stitches)
Round 30: Work the following pattern 6 times: [single crochet in 5 stitches, invisible decrease]. (36 stitches)
Round 31: Single crochet in each stitch around. (36 stitches)
Round 32: Work the following pattern 6 times: [single crochet in 4 stitches, invisible decrease]. (30 stitches)
Begin stuffing the body now and continue stuffing until closing.
Round 33: Work the following pattern 6 times: [single crochet in 3 stitches, invisible decrease]. (24 stitches)
Round 34: Work the following pattern 6 times: [single crochet in 2 stitches, invisible decrease]. (18 stitches)
Round 35: Work the following pattern 6 times: [single crochet in 1 stitch, invisible decrease]. (12 stitches)
Round 36: Invisible decrease 6 times to close the opening. (6 stitches)
Fasten off, leaving a 12-inch tail. Weave in ends securely.
Creating the Legs (Make 2)
Round 1: Using Color B (green), create a magic ring and work 7 single crochet into it. Pull tight to close. (7 stitches)
Rounds 2-16: Single crochet in each stitch around for 15 rounds. (7 stitches per round)
Fasten off, leaving a 12-inch tail for attaching. Do not stuff the legs.
Creating the Arms (Make 2)
Round 1: Using Color B (green), create a magic ring and work 6 single crochet into it. Pull tight to close. (6 stitches)
Rounds 2-13: Single crochet in each stitch around for 12 rounds. (6 stitches per round)
Fasten off, leaving a 12-inch tail for attaching. Do not stuff the arms.
Creating the Flower Petals (Make 7)
Row 1: Using Color C (rose red), chain 4 stitches. Single crochet in 2nd chain from hook, single crochet in next stitch, 3 single crochet in the last chain. Turn to work down the opposite side of the chain, single crochet in next stitch, increase in last stitch. (8 stitches)
Row 2: Increase in first stitch, single crochet in next stitch, increase 3 times in next stitch, single crochet in next stitch, increase twice in last stitch. (14 stitches)
Rows 3-5: Single crochet in each stitch across for 3 rows. (14 stitches per row)
Row 6: Chain 1, fold petal in half, single crochet through both layers 7 times to close the petal. (7 stitches)
Fasten off, leaving a 10-inch tail for attaching.
Creating the Skirt
Round 1: Using Color B (green), chain 48 stitches and slip stitch into the first chain to form a loop. (48 stitches)
Round 2: Chain 1, single crochet in each of the next 47 stitches, slip stitch into the first chain. (48 stitches)
Round 3: Work the following pattern 8 times around:
- Chain 10 stitches
- Single crochet in 2nd chain from hook
- Double crochet in next chain
- 5 treble crochet in next 5 chains
- Double crochet in next chain
- Half double crochet in next chain
- Skip 1 stitch on the skirt base
- Slip stitch into next stitch
- Slip stitch in next 4 stitches
Fasten off, leaving a 16-inch tail for attaching to the body.
Creating the Bee Companion
Bee Body
Round 1: Using Color D (yellow), create a magic ring and work 6 single crochet into it. Pull tight to close. (6 stitches)
Round 2: Increase in each stitch around. (12 stitches)
Round 3: Work the following pattern 6 times: [single crochet in 1 stitch, increase in next stitch]. (18 stitches)
Rounds 4-6: Single crochet in each stitch around for 3 rounds. (18 stitches per round)
Round 7: Change to Color E (black), single crochet in each stitch around. (18 stitches)
Round 8: Single crochet in each stitch around. (18 stitches)
Bee Face Embroidery: At this point, embroider the bee’s face using 4 strands of black embroidery floss:
- Create French knots for the eyes at round 4
- Make a long stitch for the mouth across the center of the bee
- Add 2 small stitches for cheeks at the corners of the mouth
Round 9: Change back to Color D (yellow), single crochet in each stitch around. (18 stitches)
Rounds 10-11: Single crochet in each stitch around for 2 rounds. (18 stitches per round)
Round 12: Change to Color E (black), single crochet in each stitch around. (18 stitches)
Begin stuffing now and continue until closing.
Round 13: Work the following pattern 6 times: [single crochet in 1 stitch, invisible decrease]. (12 stitches)
Round 14: Invisible decrease 6 times to close. (6 stitches)
Fasten off and weave in ends.
Bee Wings (Make 2)
Round 1: Using Color A (pink), create a magic ring and work 6 single crochet into it. (6 stitches)
Round 2: Increase in next 3 stitches, slip stitch in next stitch, fasten off. You won’t complete the entire round. (9 stitches)
Make a second wing following the same pattern. Sew the flat edges of the wings together, then attach to the bee body along the center of rounds 9-11.
Bee Antennae (Make 2)
Start with a slipknot on your hook. Insert hook into a stitch between rounds 5 and 6 of the bee body. Chain 4 stitches and fasten off. Weave in the tail. Repeat for the second antenna.
Assembly Instructions
Follow these steps to bring all the components together:
Attaching the Limbs
- Leg Placement: Using your tapestry needle and the yarn tails from the legs, position them at the base of the body. Place a pin in round 31, centered with the face. Attach the legs to rounds 31-32 on either side of this pin.
- Arm Placement: Using the yarn tails from the arms, attach them under rounds 18-19 of the body.
Attaching the Skirt
- Insert your tapestry needle under a stitch between rounds 25 and 26 of the body
- Insert the needle into a stitch of the skirt
- Insert the needle back through the same hole from step 1 and out through the next hole
- Repeat this process until you’ve secured the skirt all the way around the body
Attaching the Flower Petals
- Position the first petal under round 16 with one end centered with the face
- Insert your needle under a stitch between rounds 16 and 17
- Insert the needle through the next stitch of the petal from front to back
- Insert the needle in the same hole you came out of in step 2 and up through the next hole
- Repeat steps 3 and 4 five more times
- Weave in the end and trim
- Continue attaching the remaining petals in the same manner, spacing them evenly around the head
Customization Ideas
Make your Flower Gal unique with these creative variations:
- Color Combinations: Try different flower colors like purple, yellow, or blue for the petals
- Facial Expressions: Adjust the mouth and eye placement for different expressions
- Accessorize: Add small crocheted accessories like a watering can or gardening tools
- Seasonal Themes: Change colors to match seasons – pastels for spring, bright colors for summer
- Multiple Bees: Create additional bee friends in various sizes
Common Questions About the Flower Gal Amigurumi
How difficult is this pattern for beginners?
This pattern is suitable for intermediate beginners who understand basic crochet stitches and can follow a pattern. The most challenging aspects are the embroidery and assembly.
Can I use different weight yarn?
Yes, but be aware that changing yarn weight will affect the size of your finished doll. If using heavier yarn, you may need to adjust the hook size accordingly.
How do I prevent my amigurumi from looking lopsided?
Ensure consistent tension throughout your work and stuff evenly. When attaching limbs, use pins to position them before sewing to ensure symmetry.
How can I make the petals stand up more?
For stiffer petals, consider using a slightly smaller hook for the petal sections or adding a touch of fabric stiffener after completion.
Check this out :Crocheting an Adorable Amigurumi Horse
Conclusion
Creating your own Flower Gal amigurumi doll combines simple crochet techniques to produce a charming character full of personality and whimsy. The detailed flower petals and adorable bee companion add special touches that make this project both enjoyable to create and delightful to display. Whether you’re making this sweet garden-inspired doll as a gift or for your own collection, following these detailed instructions will ensure a successful and satisfying crochet project.
Happy crocheting!
