

Table of Contents
Bring a touch of farmyard charm to your handmade collection with this delightful amigurumi rooster. Perfect for Amigurumi Rooster brightening up your home décor or as a thoughtful gift, this colorful crochet rooster combines simple techniques with detailed embellishments. Follow our comprehensive guide to create your own adorable feathered friend with personality and character.
Introduction to Your Amigurumi Rooster Project
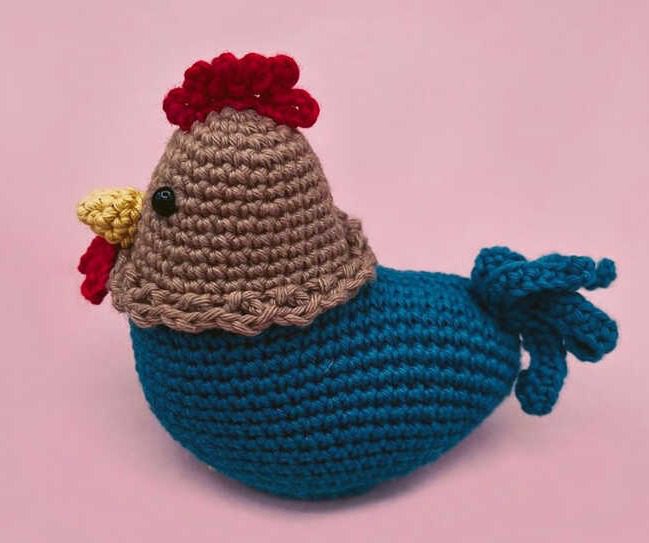
This charming rooster design, originally created by @les.mailles.du.rocher, features a rounded body, vibrant comb and wattle, and decorative tail feathers that capture the essence of this barnyard favorite. The pattern uses a combination of colors and special stitches to create a distinctive character that stands out in any amigurumi collection.
Essential Materials for Your Crochet Rooster
Before beginning your amigurumi journey, gather these supplies:
- Cotton Ricorumi yarn in four colors:
- Brown (for body and head)
- Blue (for lower body and tail feathers)
- Yellow (for beak and feet)
- Red (for comb and wattle)
- 3mm crochet hook
- Yarn needle
- Fiberfill for stuffing
- Safety eyes (5 or 6 mm)
- Stitch marker to track rounds
- Scissors
Understanding Amigurumi Roosterr Terminology
To successfully follow the pattern, familiarize yourself with these abbreviations:
- Rnd – Round
- MR – Magic ring
- Ch – Chain
- Slst – Slip stitch
- Sc – Single crochet
- Inc – Increase (2 single crochets in the same stitch)
- Dec – Decrease (2 single crochets worked together)
- Hdc – Half double crochet
- BLO – Back loops only
- FLO – Front loops only
- ( )* – Repeat instructions in brackets around the entire round
Creating Your Amigurumi Rooster Step by Step
Head and Body Pattern
Start with brown yarn:
Rnd 1. MR, 6 sc [6] Rnd 2. (inc)* [12] Rnd 3. (1sc, inc)* [18] Rnd 4. (2sc, inc)* [24] Rnd 5-6. 24 sc [24]
Rnd 7. (3sc, inc)* [30] Rnd 8-9. 30 sc [30] Rnd 10. (9sc, inc)* [33] Rnd 11. 33 sc [33] Rnd 12. (10sc, inc)* [36] Rnd 13. BLO 36 sc [36]
Change color to blue:
Rnd 14. Ch 9, crochet the first sc on the 2nd ch from hook (mark this stitch as the beginning of the round): 8sc, 1sc in the stitch where the foundation chain starts, 36sc on the body, 7sc, inc [54] Rnd 15. 2inc, 50sc, 2inc [58] Rnd 16. 3inc, 53sc, 2inc [63] Rnd 17-19. 63 sc [63]
Insert the safety eyes between rounds 7 and 8.
Rnd 20. 4sc, dec, 52sc, dec, 3sc [61] Rnd 21. 4sc, dec, 50sc, dec, 3sc [59] Rnd 22. 4sc, dec, 48sc, dec, 3sc [57]
Rnd 23. 24sc, dec, 6sc, dec, 23sc [55] Rnd 24. 4sc, dec, 44sc, dec, 3sc [53] Rnd 25. 22sc, dec, 6sc, dec, 21sc [51] Rnd 26. 4sc, dec, 19sc, dec, 19sc, dec, 3sc [48]
Begin stuffing the body.
Rnd 27. (3sc, dec, 3sc)* [42] Rnd 28. (5sc, dec)* [36] Rnd 29. BLO (2sc, dec, 2sc)* [30] Rnd 30. (dec)* [15]
Complete stuffing the body firmly.
Rnd 31. (3sc, dec)* [12] Rnd 32. (dec)* [6]
Fasten off and close the opening securely.
Creating the Tail Section
In the front loops only of round 28, use blue yarn and crochet 36 sc all around to create a defined edge.
In the front loops only of round 12, use brown yarn: R1. (1 sl st, ch 2, 1 sl st in next stitch)* R2. (ch 3, 1 sl st in chain space of R1)*
Embroider the paws with yellow yarn on the bottom of the body.
Beak Pattern
Use yellow yarn: Rnd 1. MR, 4 sc [4] Rnd 2. (1sc, inc)* [6] Rnd 3. (1sc, inc)* [9] Rnd 4. 9 sc [9], 1 sl st
Fasten off, leaving a length of yarn for sewing the beak to the face.
Wattle Pattern
Use red yarn: Ch 2, 1 sl st in 2nd ch from hook (ch 6, 1 sl st in the foundation chain)*2
Comb Pattern
Use red yarn: Ch 7, 1 sl st in 2nd ch from hook (ch 4, 1 sl st in next stitch on ch)*6
Tail Feathers
Use blue yarn and make 2 identical feather sections: Ch 2, 1 sl st in 2nd ch from hook (ch 11, crochet along the chain: 9sc, 1 sl st, then 1 sl st in the foundation chain)*3
Fasten off and sew both feather sections at the back of the body on the top of the tail.
Assembly Instructions
- Sew the beak to the front of the head, centered between the eyes.
- Attach the wattle below the beak.
- Sew the comb to the top of the head.
- Secure the tail feathers to the back of the body at the top portion of the blue section.
- Check that all components are firmly attached and adjust as needed.
Tips for a Perfect Amigurumi Rooster
- Use stitch markers to keep track of your rounds, especially when working the body decreases.
- When changing colors, weave in the ends securely to prevent them from showing through.
- For the best shape, stuff the body firmly but evenly, focusing on creating a rounded form.
- Take time with the embroidered feet to ensure they’re symmetrical.
- The comb and wattle can be shaped slightly after attachment to create a more natural appearance.
Customization Ideas for Your Amigurumi Rooster
While the pattern creates a colorful traditional rooster, consider these creative variations:
- Create a rainbow rooster by using different colors for the body sections
- Add embroidered wing details on the sides of the body
- Create a smaller or larger version by changing hook and yarn size
- Add a small scarf or hat for a seasonal or themed rooster
- Embroider additional details like feather texture on the body
Check this out :Crochet an Adorable Flying Whale Amigurumi with Balloons
Conclusion
Congratulations on completing your amigurumi rooster! This colorful barnyard friend showcases a variety of crochet techniques and adds a touch of rural charm to any collection. The combination of a brown head, blue body, and vibrant red accents creates a distinctive character that’s sure to delight crafters and recipients alike.
For crochet enthusiasts who enjoy animal patterns, this rooster makes an excellent addition to a farm-themed amigurumi collection. Consider creating companion pieces like hens, chicks, or other farm animals to complete your handmade barnyard scene.
Remember to share your creation with fellow crafters and the original designer to inspire others in their amigurumi adventures. Happy crocheting!
