

Table of Contents
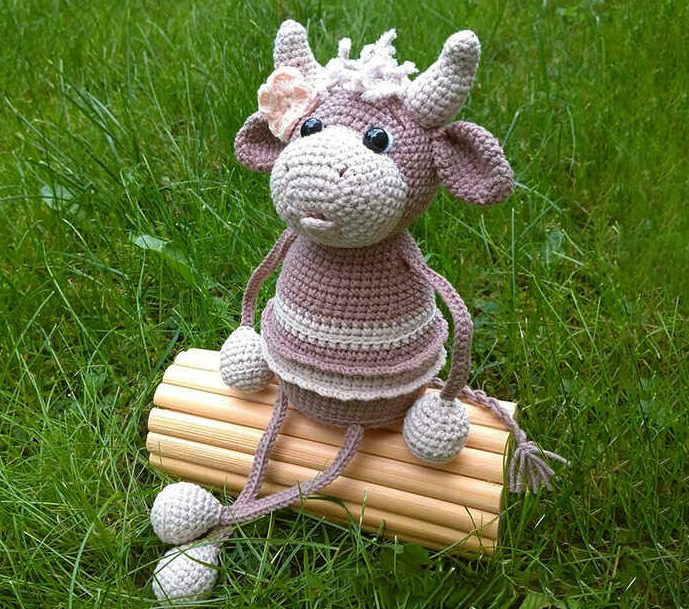
Are you looking for a delightful crochet project? This adorable amigurumi cow pattern creates an irresistibly cute plushie with a charming expression and wonderful details. Designed with care, this cow features a distinctive two-tone body, adorable horns, and expressive face that will capture hearts. Perfect Amigurumi Cow for gifting or adding to your handmade collection, this amigurumi cow combines simple techniques with charming details that make it a rewarding project for crocheters of all skill levels.
Essential Materials for Your Amigurumi Cow
Before beginning your cow project, gather these supplies:
- YarnArt Jeans yarn in:
- Color #71 (cocoa/brown)
- Color #87 (light beige)
- 2.0 mm crochet hook
- Holofiber filler or synthetic stuffing
- Alize Softy yarn (or similar fluffy yarn) for the bangs/tuft
- Sewing needle with a wide eye
- 10 mm safety eyes
- Plastic disc (to create a stable base for the cow)
- White felt or white thread for eye details
- Clear craft glue (such as Moment Crystal) if needed for securing eyes
- Optional: 4 small rattle balls for inside the limbs if you want a sound feature
Understanding Amigurumi Cow Terminology
This pattern uses standard crochet abbreviations:
- sc = single crochet
- inc = increase (2 single crochets in one stitch)
- dec = decrease (2 single crochets worked together)
- ch = chain
- sl st = slip stitch
- dc = double crochet
- (…) x6 = repeat instructions within parentheses 6 times
Detailed Amigurumi Cow Crochet Pattern
Amigurumi Cow Body
Start with cocoa/brown yarn (color #71): Round 1: Create 6 single crochets in a magic ring [6 stitches] Round 2: Increase in each stitch around [12 stitches] Round 3: Single crochet 1, increase 1, repeat 6 times around [18 stitches] Round 4: Single crochet 2, increase 1, repeat 6 times around [24 stitches] Round 5: Single crochet 3, increase 1, repeat 6 times around [30 stitches] Round 6: Single crochet 4, increase 1, repeat 6 times around [36 stitches]
Round 7: Single crochet 5, increase 1, repeat 6 times around [42 stitches] Round 8: Single crochet 6, increase 1, repeat 6 times around [48 stitches] Round 9: Single crochet 7, increase 1, repeat 6 times around [54 stitches] Round 10: Single crochet 8, increase 1, repeat 6 times around [60 stitches] Rounds 11-12: Work 60 single crochets for two complete rounds, working in back loops only for round 11 [60 stitches per round] Rounds 13-15: Work 60 single crochets for three complete rounds [60 stitches per round]
Cut a circle from the plastic disc and insert it into the base of the body for stability.
Switch to light beige yarn (color #87): Round 16: Single crochet 8, decrease 1, repeat 6 times around [54 stitches] Round 17: Work 54 single crochets in back loops only [54 stitches] Round 18: Work 54 single crochets [54 stitches]
Switch back to cocoa/brown yarn (color #71): Round 19: Work 54 single crochets [54 stitches] Round 20: Work 54 single crochets in back loops only [54 stitches] Round 21: Single crochet 7, decrease 1, repeat 6 times around [48 stitches]
Switch to light beige yarn (color #87): Round 22: Work 48 single crochets [48 stitches] Round 23: Work 48 single crochets in back loops only [48 stitches] Round 24: Work 48 single crochets [48 stitches]
Switch back to cocoa/brown yarn (color #71): Round 25: Work 48 single crochets [48 stitches] Round 26: Single crochet 6, decrease 1, repeat 6 times around [42 stitches] Rounds 27-30: Work 42 single crochets for four complete rounds [42 stitches per round] Round 31: Single crochet 5, decrease 1, repeat 6 times around [36 stitches]
Rounds 32-33: Work 36 single crochets for two complete rounds [36 stitches per round] Round 34: Single crochet 10, decrease 1, repeat 3 times around [33 stitches] Round 35: Work 33 single crochets, then fasten off.
Special detail: For the decorative edge, work single crochets along the edges of rounds 17 and 20, making 3 single crochets in one stitch at regular intervals to create a scalloped effect.
Fill the body firmly with holofiber stuffing.
Amigurumi Cow Arms and Legs (Make 4)
Start with light beige yarn (color #87) for the lower part of each limb: Round 1: Create 6 single crochets in a magic ring [6 stitches] Round 2: Increase in each stitch around [12 stitches] Round 3: Single crochet 1, increase 1, repeat 6 times around [18 stitches] Round 4: Single crochet 5, increase 1, repeat 3 times around [21 stitches] Round 5: Work 21 single crochets in back loops only [21 stitches] Round 6: Work 21 single crochets [21 stitches] Round 7: Single crochet 5, decrease 1, repeat 3 times around [18 stitches]
Round 8: Work 18 single crochets [18 stitches] Round 9: Single crochet 1, decrease 1, repeat 6 times around [12 stitches] Round 10: Work 12 single crochets [12 stitches]
Fill with holofiber stuffing (add a rattle ball if desired).
Round 11: Decrease 6 times around [6 stitches] Slip stitch to close, but leave a length of yarn for sewing the upper part of the limb.
For the colored band on each limb: Using cocoa/brown yarn (color #71), chain 30. Starting from the 2nd chain from the hook, work 29 single crochets. Insert this strip inside the lower part of the limb and sew it in place using the yarn tail you left earlier.
Use the yarn tails from the upper part of each limb to attach them to the body.
Head
Start with light beige yarn (color #87) for the muzzle: Row 1: Chain 7, then work 5 single crochets starting from the 2nd chain from the hook, work 4 single crochets into the last chain, then work 4 single crochets along the opposite side of the foundation chain, increase once [15 stitches] Row 2: Increase 1, work 4 single crochets, increase 4 times in a row, work 4 single crochets, increase 2 times [22 stitches]
Readjust your starting point: Increase 2 times, work 9 single crochets. Place a marker here to mark the new beginning of the round.
Round 3: Single crochet 3, increase 1, repeat 6 times around [30 stitches] Round 4: Single crochet 4, increase 1, repeat 6 times around [36 stitches] Round 5: Single crochet 5, increase 1, repeat 6 times around [42 stitches] Rounds 6-8: Work 42 single crochets for three complete rounds [42 stitches per round]
Switch to cocoa/brown yarn (color #71): Round 9: Working in back loops only, single crochet 5, decrease 1, repeat 6 times around [36 stitches] Round 10: Work 2 single crochets, place marker, increase 12 times in a row, place marker, work 22 single crochets [48 stitches]
Insert safety eyes between rounds 10 and 11, positioning them 10 stitches apart. The markers will help you find the center of the muzzle.
Round 11: Single crochet 7, increase 1, repeat 6 times around [54 stitches] Rounds 12-19: Work 54 single crochets for eight complete rounds [54 stitches per round] Round 20: Single crochet 7, decrease 1, repeat 6 times around [48 stitches] Round 21: Single crochet 6, decrease 1, repeat 6 times around [42 stitches] Round 22: Single crochet 5, decrease 1, repeat 6 times around [36 stitches] Round 23: Single crochet 4, decrease 1, repeat 6 times around [30 stitches] Round 24: Single crochet 3, decrease 1, repeat 6 times around [24 stitches] Round 25: Single crochet 2, decrease 1, repeat 6 times around [18 stitches] Round 26: Single crochet 1, decrease 1, repeat 6 times around [12 stitches] Round 27: Decrease 6 times around [6 stitches]
Pull yarn through to close the opening and secure.
Ears (Make 2)
Using cocoa/brown yarn (color #71): Round 1: Create 6 single crochets in a magic ring [6 stitches] Round 2: Single crochet 1, increase 1, repeat 3 times around [9 stitches] Round 3: Single crochet 2, increase 1, repeat 3 times around [12 stitches] Round 4: Work 12 single crochets [12 stitches]
Round 5: Single crochet 1, increase 1, repeat 6 times around [18 stitches] Round 6: Single crochet 5, increase 1, repeat 3 times around [21 stitches] Rounds 7-9: Work 21 single crochets for three complete rounds [21 stitches per round] Round 10: Single crochet 5, decrease 1, repeat 3 times around [18 stitches] Round 11: Single crochet 4, decrease 1, repeat 3 times around [15 stitches]
Fold the ear edges together and join with 7 single crochets through both layers. Fold the remaining edges together again and join with 3 single crochets. Leave a yarn tail for attaching to the head.
Horns (Make 2)
Using light beige yarn (color #87): Round 1: Create 6 single crochets in a magic ring [6 stitches] Round 2: Work 5 single crochets, increase 1 [7 stitches] Round 3: Work 6 single crochets, increase 1 [8 stitches] Round 4: Work 7 single crochets, increase 1 [9 stitches] Round 5: Work 8 single crochets, increase 1 [10 stitches] Round 6: Work 9 single crochets, increase 1 [11 stitches] Round 7: Work 10 single crochets, increase 1 [12 stitches]
Round 8: Work 11 single crochets, increase 1 [13 stitches] Round 9: Work 12 single crochets, increase 1 [14 stitches] Round 10: Work 13 single crochets, increase 1 [15 stitches] Round 11: Work 14 single crochets, increase 1 [16 stitches] Round 12: Work 9 single crochets, decrease 1, work 5 single crochets [15 stitches]
Leave a yarn tail for attaching to the head.
Tail
Take 3 strands of cocoa/brown yarn (color #71), fold them in half, and twist them together to create a cord. Add a small tuft at the end to create a tassel. Attach the tail at the bottom back of the body.
Muzzle Detail
Make 2 chain stitches using light beige yarn. In the first chain, work 7 double crochets. Attach this piece at the nose area, positioning it at the tightening point for the mouth, being careful not to pull the corners down (which would make the cow look sad).
Assembling Your Amigurumi Cow
Once all the pieces are complete, follow these assembly steps:
- Attach the horns to the head, positioning them 9 stitches apart
- Attach the ears to the head, positioning them 20 stitches apart
- Create eye details by adding white felt or white thread for the whites of the eyes
- Create a tightening point for the mouth, positioning it 3 rows below the center of the muzzle
- Embroider nostrils
- Add decorative elements to the horns, such as a small flower if desired
- Attach the head to the body
- Attach the limbs to the body
- Attach the tail
Why Create an Amigurumi Cow?
Cows have a special charm with their gentle eyes and distinctive features. This amigurumi cow pattern captures their friendly essence while transforming it into an adorable plushie. The two-tone design gives this cow character and visual interest, while the carefully crafted details like the horns, ears, and expressive face create a finished piece with tremendous personality.

Check this out :Little Otter Amigurumi Crochet Pattern
Conclusion: The Joy of Creating Your Amigurumi Cow
Completing this amigurumi cow brings together multiple crochet techniques that showcase your skills and creativity. From the distinctive color changes that create the cow’s pattern to the carefully shaped facial features, each element contributes to a character full of charm and personality. The pattern provides clear instructions that make it accessible to intermediate crocheters, while the finished product has enough complexity to satisfy experienced crafters.
This cow design includes thoughtful functional elements, like the plastic disc in the base that helps it stand steadily. The optional rattle elements add an interactive dimension if you’re creating this as a toy for a child. These practical considerations elevate the design beyond simply being decorative.
You can further personalize your cow by changing the color combination. While the traditional brown and beige create a realistic cow, you might experiment with more playful colors for a whimsical version. Adding decorative elements like a flower between the horns, a tiny bell, or even a miniature bandana can give your cow additional character.
As a gift, this amigurumi cow makes a delightful present for animal lovers, farm enthusiasts, or anyone who appreciates handmade crafts. Its substantial size creates a satisfying plush toy, while the adorable expression ensures it will be treasured by whoever receives it.
As you complete your amigurumi cow, take pride in the skills you’ve developed and the unique creation you’ve brought to life. Each stitch represents your dedication to the craft, resulting in a one-of-a-kind cow with personality and charm that mass-produced toys simply cannot match.
Happy crocheting, and may your cow bring joy to you or whoever receives this charming handmade creation!
