

Looking for an adorable amigurumi project that’s perfect for Easter or year-round crafting? This free cube bunny rabbit pattern creates an irresistibly cute companion complete with a matching carrot! The simple geometric design makes it perfect for crocheters of all skill levels.
What makes this pattern special is its versatility—it shares the same basic cube body structure as my kitty, puppy, birdie, batty, and piggy patterns. Once you master one cube animal, you can easily create the entire collection!
Cube Bunny Rabbit Amigurumi Size Options & Materials
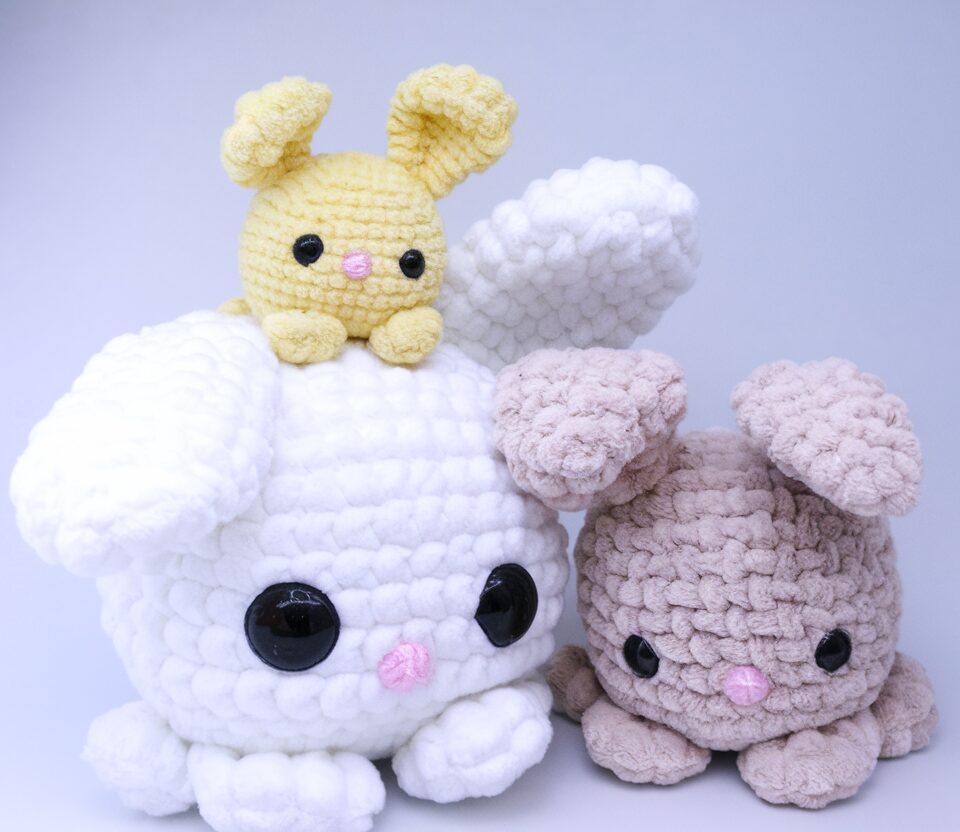
One of the wonderful aspects of this Cube Bunny Rabbit pattern is its adaptability to different sizes. Simply change your yarn weight and hook size to create bunnies of various dimensions. Here are the materials I used for the sizes shown:
Cube Bunny Rabbit Amigurumi Extra Large Bunny
- 7mm crochet hook
- Chunky chenille yarn in your preferred color
- 25mm button eyes
- Heart-shaped nose (needle felted in this example)
Medium Bunny
- 5mm crochet hook
- Medium chenille yarn in your preferred color
- 20mm safety eyes
- Small (12mm) pink nose
Small Bunny
- 3mm crochet hook
- DK weight yarn in your preferred color
- 8mm safety eyes
- Small heart-shaped pink nose
Abbreviations (US Terms)
- MC: magic circle
- sc: single crochet
- 2-sc inc: 2 sc in next stitch (increase by 1)
- 3-sc inc: 3 sc in next stitch (increase by 2)
- sc2tog: 2 sc together (decrease by 1)
- sc3tog: 3 sc together (decrease by 2)
Important Note
This pattern is worked in a spiral of continuous rounds without joining. I recommend using a stitch marker to keep track of the beginning of each round.
Detailed Instructions
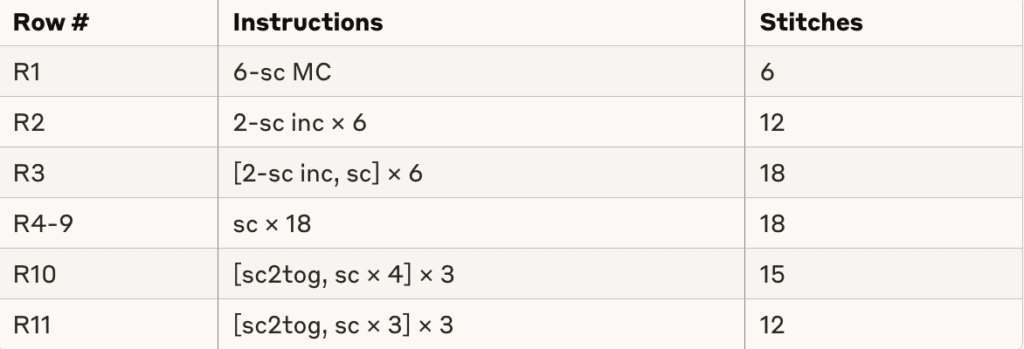
Body (Make 1)
| Row # | Instructions | Stitches |
| Row 1 | 4-sc MC | 4 |
| Row 2 | 3-sc inc × 4 | 12 |
| Row 3 | sc, 3-sc inc, [sc × 2, 3-sc inc] × 3, sc | 20 |
| Row 4 | sc × 2, 3-sc inc, [sc × 4, 3-sc inc] × 3, sc × 2 | 28 |
| Row 5 | sc × 3, 3-sc inc, [sc × 6, 3-sc inc] × 3, sc × 3 | 36 |
| Row 6 | sc × 4, 3-sc inc, [sc × 8, 3-sc inc] × 3, sc × 4 | 44 |
| Row 7 | sc × 5, sc2tog, [sc × 9, sc2tog] × 3, sc × 4 | 40 |
| R8-13 | sc × 40 | 40 |
| R14 | sc × 4, sc3tog, [sc × 7, sc3tog] × 3, sc × 3 | 32 |
| R15 | sc × 3, sc3tog, [sc × 5, sc3tog] × 3, sc × 2 | 24 |
At this point, stuff the body firmly. Proper stuffing gives your bunny its cube shape and ensures it sits properly.
Eye and Nose Placement:
- Position the nose between R11 and R12 (you may need to place it one row higher depending on how firmly you stuffed the body)
- For large eyes (larger than 15mm): Place at the same level as the nose (between R11 and R12)
- For smaller eyes: Place one row above the nose (between R10 and R11)
- Eyes look best when positioned approximately 2-3 stitches away from the nose on each side
Once you’re happy with the placement, secure the safety eyes and nose firmly.
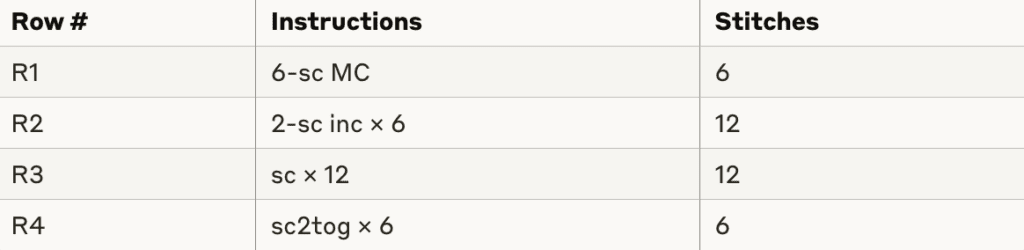
| Row # | Instructions | Stitches |
| R16 | sc × 2, sc3tog, [sc × 3, sc3tog] × 3, sc | 16 |
| R17 | [sc, sc3tog] × 4 | 8 |
Finish off, leaving a long tail. Use this tail to sew the opening closed with a few neat stitches.
Legs (Make 4)

Finish off, leaving a long tail for sewing. Do not stuff the legs—they should remain flat.
Ears (Make 2)
Finish off, leaving a long tail. Do not stuff the ears. Sew the end of each ear together to create a flat, closed shape as shown in the reference photos.
Tail (Make 1)
Finish off, leaving a long tail for sewing. Lightly stuff the tail to give it a round, fluffy appearance.
Carrot (Make 1)
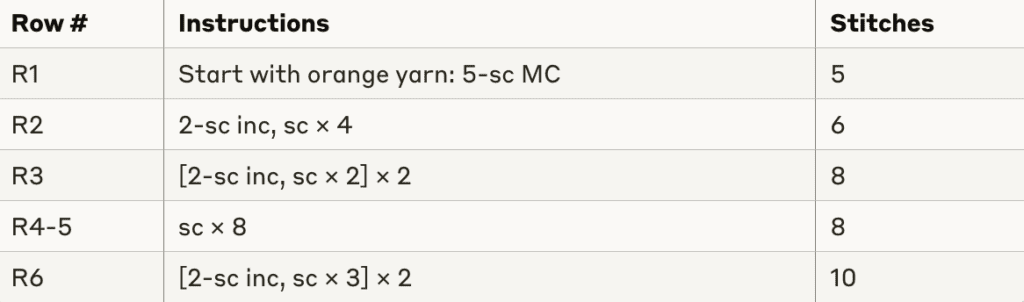
At this point, stuff the carrot body. You may need a narrow tool like a pencil or crochet hook to push the stuffing into the narrow space.

Changing to Green Yarn:
- Use orange yarn to do the first yarn over in the next sc
- Use green yarn to do the last yarn over
- Draw through both loops on hook to complete the stitch
- Continue with green yarn for remaining stitches
Do one more sc after the last stitch, then finish off. Use a sewing needle to hide the remaining tail inside the carrot.

Assembly Instructions
Now comes the fun part—bringing your cube bunny to life! Using a sewing needle and the long tails you left on each piece:
- Attach the legs: Position the unstuffed legs at the bottom of the bunny body. I recommend using pins to test the placement before sewing. Typically, the legs look best when placed at the corners of the “cube” for stability.
- Add the ears: Sew the ears to each side of the head, positioning them closer to the front than the back. For proper placement, I attach one end around R4 and the other end around R6. This gives the bunny its characteristic upright ear position.
- Attach the tail: Sew the stuffed tail at the back and bottom of the body (around R15). The tail should be centered and add a cute round accent to your bunny’s backside.
- Include the carrot: While optional, the carrot makes a perfect accessory for your bunny. You can either sew it permanently to one of the paws or leave it separate for more versatile play.
Creative Variations
Don’t be afraid to personalize your bunny! Here are some ideas to make your creation unique:
- Color choices: Traditional bunny colors include white, gray, and brown, but pastels work beautifully for Easter-themed bunnies
- Facial expressions: Experiment with different eye placements for varied expressions—closer together for a sweeter look, further apart for a more surprised appearance
- Yarn textures: Fuzzy yarns create an extra-cuddly finish, while cotton yarns offer crisp stitch definition
- Accessories: Add a tiny bow tie, flower crown, or even miniature clothes for a dressed-up bunny
Tips for Success
- Tension matters: Keep your tension consistent for the best cube shape
- Stuff firmly: Proper stuffing is essential for achieving and maintaining the cube shape
- Count carefully: The increases and decreases create the geometric shape, so accurate stitch counting is important
- Pin before sewing: Always test the placement of ears, legs, and tail with pins before committing with your needle
- Safety first: If making this for small children, ensure all parts are securely attached, and consider embroidering the eyes instead of using safety eyes
Join the Cube Amigurumi Family!
Once you’ve mastered this bunny pattern, why not create more cube friends? This pattern shares the same basic structure as my other cube animals:
- Cube Kitty Cat
- Cube Puppy Dog
- Cube Birdie
- Spooky Batty Bat
- Cube Piggy Pig
- Cube Little Unicorn
- Cube Squirrel
- Cube Foxy Fox
Each animal uses the same core body technique with unique modifications for ears, tails, and features. They’re designed to sit perfectly together as an adorable collection!
Pattern License Information
This pattern is licensed under Creative Commons Attribution-ShareAlike 4.0.
You’re welcome to sell any items you create using this pattern, provided you clearly credit “CraftyBunnyBun” as the original pattern designer. Sharing your creations on social media with proper attribution is also greatly appreciated!
Final Thoughts
There’s something wonderfully satisfying about creating these geometric animals. Their simple shape makes them perfect for beginners, while the customization options appeal to experienced crocheters looking for a quick, rewarding project.
I hope this cube bunny brings as much joy to your home as it has to mine! Whether made as an Easter decoration, a special gift, or a personal project, these bunnies have a way of hopping right into everyone’s hearts.
Happy crocheting, and don’t forget to share your finished bunnies! I’d love to see how your creations turn out and what personal touches you add to make them uniquely yours.
