

Looking for the perfect spooky decoration this Halloween season? This Free Crochet Spider Pattern creates an adorable eight-legged friend that captures all the charm of a spider without any of the creepy-crawly factor! Whether you’re decorating your home, preparing for a craft fair, or just looking for a fun weekend project, this pattern is sure to delight crocheters of all skill levels.
Why You’ll Love This Crochet Spider Pattern
When I designed this spider pattern, I wanted to create something versatile that would work for various Halloween decorating styles. What makes this pattern special is how quickly it works up – I finished two spiders in just a few hours, making them perfect projects for craft fairs and Halloween markets!
The beauty of this design lies in its adaptability. You can create classic spooky black spiders for traditional Halloween decor, or bright colorful ones for a more whimsical touch. The pattern works beautifully with different yarn weights too – use standard worsted weight for tabletop decorations or chunky yarn to create statement pieces that make a dramatic impact in your Halloween displays.
These crocheted arachnids also make thoughtful handmade gifts or party favors, adding a personal touch to any fall celebration. Kids especially love these non-threatening spider friends, and they’re a wonderful way to help little ones who might be afraid of real spiders develop a more positive association.
Things To Note Before You Begin
Yarn Options: I used acrylic yarn for this free crochet spider pattern, but feel free to experiment with different fibers. Wool blends create a cozy, rustic look, while cotton yields a more defined stitch definition. Remember that using chunky yarn will significantly increase the size of your finished spider.
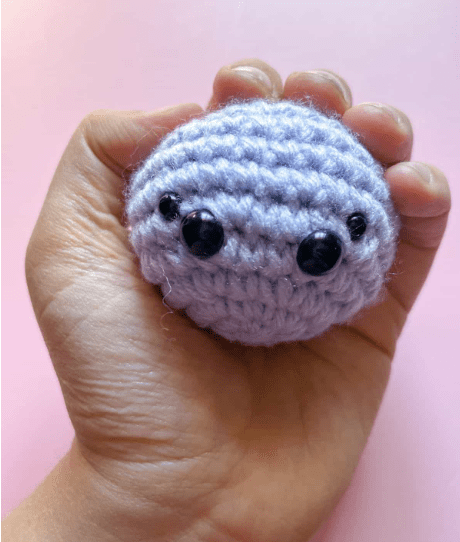
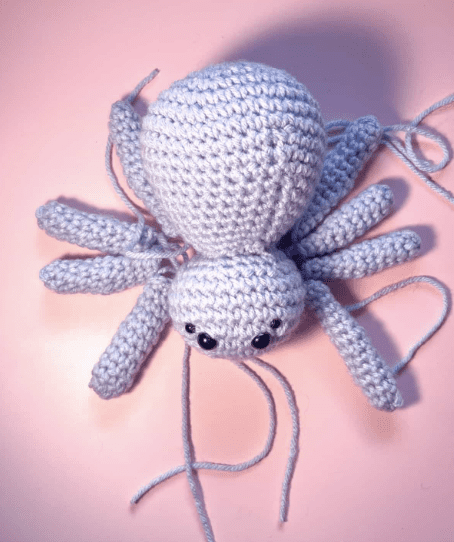
Safety Eyes: This pattern features two different pairs of safety eyes to create visual interest. The specific sizes aren’t critical – what matters is using two different sizes to give your spider character. If making these for young children, consider using embroidered eyes instead of plastic safety eyes.
Finished Size: When using the recommended materials, your completed spider plushie will measure approximately 6 inches long – the perfect size for Halloween decorating!
Materials Needed
- Caron One Pound yarn in lilac (or color of your choice)
- H hook (5mm)
- Tapestry needle for assembly
- Polyester fiberfill stuffing
- 2 sets of safety eyes in different sizes
- Scissors
Abbreviations (US Terms)
- Magic ring (mr)
- Single Crochet (sc)
- Increase (inc) – 2 stitches in 1 stitch
- Decrease (dec) – 1 stitch in 2 stitches
Creative Variations to Try
The basic pattern creates a wonderful classic spider, but don’t be afraid to experiment with these creative variations:
- Size Options: Use chunky yarn and a larger hook for impressively large spiders, or fine weight yarn for delicate, miniature versions.
- Eye Experiments: Play with different safety eye sizes and placements to create various expressions – from cute and friendly to mysterious and spooky.
- Multi-Eyed Creations: For a more realistic or alien-looking spider, add extra safety eyes in various sizes.
- Texture Play: Try fuzzy or velvet yarns for a different tactile experience.
- Color Combinations: Create striped bodies or multi-colored legs for a playful twist.
- Accessories: Add tiny witch hats, bowls, or spider web attachments for themed displays.
- Glow Features: Incorporate glow-in-the-dark yarn or thread for an extra spooky nighttime effect.
Step-by-Step Instructions for the Crochet Spider Pattern
This pattern is worked in continuous rounds without joining. Use a stitch marker to keep track of the beginning of each round.
Crochet Spider Head
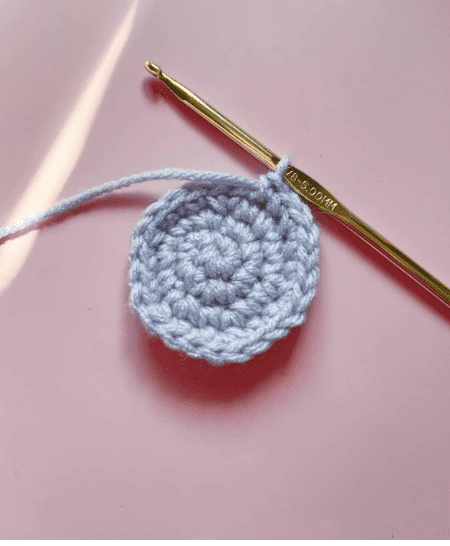
Round 1: Using light purple yarn, make a MR and make sc x6 in the circle. If you find it difficult making a magic ring you can chain 2 and then crochet sc x6 in the second chain from the hook. (6)
Round 2: Inc in every sc. (12)
Round 3: Inc, sc, inc, sc and repeat until end of round (18)
Round 4: Inc, sc x2, inc, sc x2 and repeat until end of round (24)
Round 5: Inc, sc x3, inc, sc x3 and repeat until end of round (30)
Rounds 6-8: Sc in every stitch (30)
Round 9: Dec, sc x3 and repeat for the rest of the round (24) Put in eyes for the spider on the top of the head. Begin to stuff the spider head.
Round 10: Dec, sc x2, repeat for the rest of the round (18)
Round 11: Dec, sc repeat for the rest of the round (12)
Round 12: Dec and repeat for the rest of the round (6). Fasten off and weave in the tail.
Crochet Spider Body
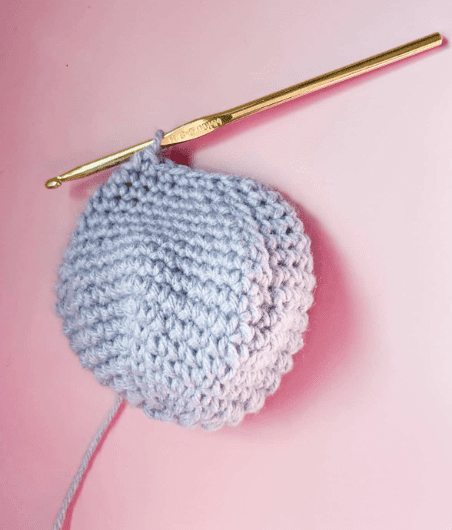
Round 1: Using light purple yarn, make a MR and make sc x6 in the circle. If you find it difficult making a magic ring you can chain 2 and then crochet sc x6 in the second chain from the hook. (6)
Round 2: Inc in every sc. (12)
Round 3: Inc, sc, inc, sc and repeat until end of round (18)
Round 4: Inc, sc x2, inc, sc x2 and repeat until end of round (24)
Round 5: Inc, sc x3, inc, sc x3 and repeat until end of round (30)
Round 6: Inc, sc x4, inc, sc x4 and repeat until end of round (36)
Round 7: Inc, sc x5, inc, sc x5 and repeat until end of round. (42)
Rounds 8-9: Sc for the entire round (42)
Round 10: Dec, sc x12, repeat for the entire round (39)
Round 11: Dec, sc x11, repeat for the entire round (36)
Round 12: Dec, sc x10, repeat for the entire round (33)
Round 13: Dec, sc x9, repeat for the entire round (30)
Round 14: Dec, sc x8, repeat for the entire round (27)
Round 15: Dec, sc x7, repeat for the entire round (24) Begin stuffing the body.
Round 16: Dec, sc x6, repeat for the entire round (21)
Round 17: Dec, sc x5, repeat for the entire round (18)
Round 18: Dec, sc x4, repeat for the entire round (15). Fasten off and leave a tail for sewing.
Sew the head and body together.
Crochet Spider Legs
Shorter Legs (Make 4):
Round 1: Using light purple yarn, make a MR and make sc x6 in the circle. If you find it difficult making a magic ring you can chain 2 and then crochet sc x6 in the second chain from the hook. (6)
Rounds 2-5: Sc in every stitch. (6)
Round 6: Inc, sc x2 and repeat for the rest of the round (8)
Round 7: Dec, sc x2 and repeat for the rest of the round (6)
Rounds 8-11: Sc in every stitch (6) Fasten off and stuff. Make sure to only stuff the first half of the legs and not the top part where it will connect to the spider body.
Longer Legs (Make 4):
Round 1: Using light purple yarn, make a MR and make sc x6 in the circle. If you find it difficult making a magic ring you can chain 2 and then crochet sc x6 in the second chain from the hook. (6)
Rounds 2-6: Sc in every stitch. (6)
Round 7: Inc, sc x2 and repeat for the rest of the round (8)
Round 8: Dec, sc x2 and repeat for the rest of the round (6)
Rounds 9-13: Sc in every stitch (6) Fasten off (for 2 of these legs leave long tails for sewing) and stuff. Make sure to only stuff the first half of the legs and not the top part where it will connect to the spider body.
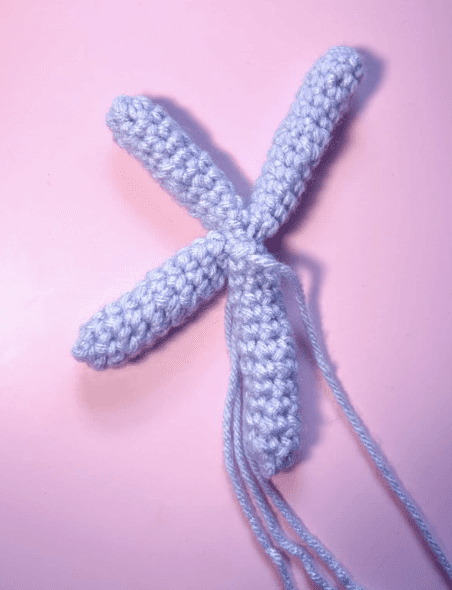
Assembly Instructions
For the most natural-looking spider, proper assembly is key:
- Take 2 shorter legs and sandwich them between 2 longer legs.
- Sew through all 4 legs at once until they’re securely joined together.
- Attach this leg bundle to one side of the spider’s body, at the point where the head and body connect.
- Secure the attachment by stitching through the neck and then back through to the original side several times.
- Fasten off and weave in the end.
- Repeat the process with the remaining 4 legs on the opposite side of the spider.
Congratulations! You’ve completed your crochet spider using this free pattern!
IF YOU WANT TO TRY THE Adorable Girl in Yellow Dress Crochet
🐌 Expert Tips for Spider Success
Mastering the Magic Ring: If you’re new to magic rings, practice a few times before starting. This technique creates a tight center that prevents stuffing from showing through.
Choosing Yarn and Hook: Softer acrylic or cotton yarns create a plush, huggable finish. Larger hooks paired with chunky yarns make statement pieces, while smaller hooks give you detailed, compact spiders.
Eye Placement: Experiment with safety eye placements to create various expressions. For a more playful look, position the eyes closer together; for a more realistic spider appearance, space them further apart on the head.
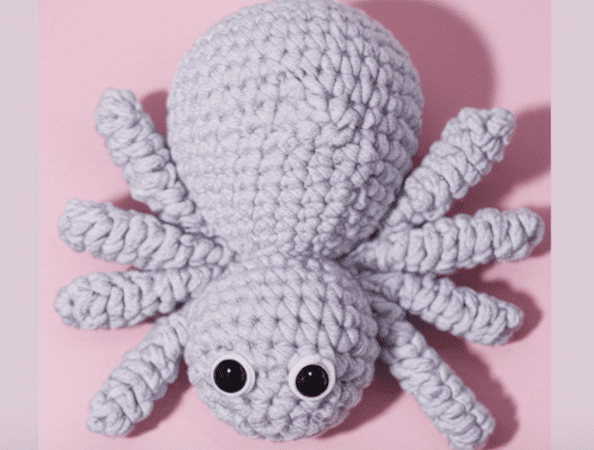
Color Combinations: Don’t feel limited to traditional black! Consider purple (like this example), orange for Halloween vibes, or even rainbow colors for a whimsical touch.
Stuffing Technique: For more realistic leg positioning, only stuff the ends of the legs as directed. This allows for natural bends and flexibility when posing your spider.
Assembly Secrets: When attaching legs, take your time to position them symmetrically. This small attention to detail makes a big difference in the finished appearance.
Creating Spider Families: Make spiders in graduated sizes by simply changing your hook size and yarn weight – this creates an adorable display of spider “families” for your Halloween decor.
Pattern FAQs
If I use chunky yarn for the spider, how much bigger will it be?
When using chunky yarn (typically a #5 or #6 weight) with an appropriately sized hook (8-9mm), your spider will be approximately 1.5-2 times larger than the original pattern. This size increase makes for dramatic decorations perfect for entryways or mantels. Remember that you’ll need more stuffing for larger projects!
Can I customize the spider beyond what’s in the pattern?
Absolutely! This pattern serves as a wonderful foundation for creativity. Consider adding embroidered details like smiles or eyebrows, attaching small accessories like hats or bows, or even creating themed spiders (like a witch spider with a tiny hat or a vampire spider with a cape). The basic structure remains the same – let your imagination run wild with the embellishments!
Can I yarn under instead of over?
Yes, you can use the yarn under technique if that’s your preferred method. This will create a slightly tighter, more defined stitch that can work well for this project. Just be consistent throughout the entire pattern to maintain an even appearance. Note that yarn under may slightly reduce the overall size of your spider.
Why This Pattern Works for Halloween
What makes this crochet spider pattern particularly appealing for Halloween decorating is its perfect balance between spooky and cute. The pattern creates recognizable spiders without the fear factor, making them appropriate for households with young children or those who prefer their Halloween decor on the friendlier side.
The quick-to-work nature of this pattern also makes it ideal for last-minute Halloween preparations. Need to whip up some decorations for a party tomorrow? These spiders work up quickly and make a big impact!
Additionally, these spiders are incredibly versatile in how you can display them. Hang them from doorways or light fixtures with invisible thread for a surprise effect, arrange them crawling up a wall, or create a charming tablescape with spiders of various sizes. They also pair beautifully with other crochet Halloween decor like pumpkins, ghosts, or witch hats.
Create Your Own Spider Family
Once you’ve mastered this basic pattern, why not create an entire spider family? Make daddy long-legs with extended limbs, tiny baby spiders using thread and micro hooks, or mama spiders with attached baby spiders riding on their backs. A collection of coordinated spiders in various sizes creates a striking Halloween display that showcases your crochet skills.
For an interactive children’s display, consider creating a spider “puppet” by adding a finger pocket to the underside of the body, allowing the spider to “crawl” around to delight (or spook) friends and family.
The endless possibilities make this pattern a Halloween decorating staple you’ll return to year after year. Each time you create a new spider, you can experiment with different colors, sizes, and embellishments to expand your growing arachnid collection.
Final Thoughts
This free crochet spider pattern offers endless possibilities for Halloween decorating and beyond. From its adaptable size to the opportunity for creative color choices, each spider you make can be unique while still maintaining that characteristic eight-legged charm.
Whether you’re an experienced crocheter looking for a quick seasonal project or a beginner seeking an approachable pattern with impressive results, this spider design checks all the boxes. The simple construction techniques combined with the high-impact finished product make it a pattern you’ll want to keep in your regular rotation.
So grab your hook, select your favorite yarn, and start creating your own friendly arachnid army! Your Halloween decorations will never be the same once these charming crochet spiders crawl into your heart and home.
Happy crocheting !
