

Table of Contents
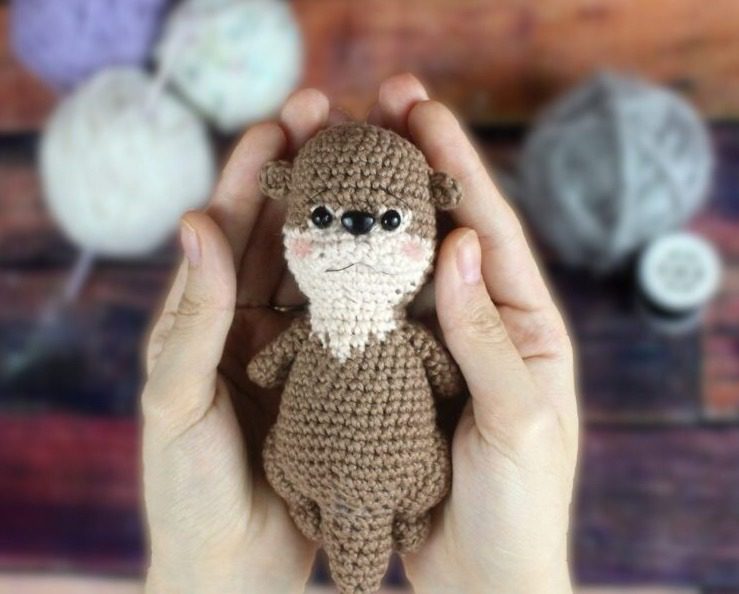
Looking to create Otter Amigurumi an adorable little otter amigurumi? This comprehensive pattern guides you through making a charming 5.5-inch (14 cm) otter with a sweet face, curved tail, and realistic features. Perfect for intermediate crocheters, this detailed pattern creates a lovable aquatic companion that’s sure to make a splash in your amigurumi collection or as a thoughtful handmade gift for animal lovers.
Introduction to Little Otter Amigurumi
This delightful otter amigurumi features a clever one-piece construction for the head, body, and tail, creating a seamless, sturdy finished toy. The pattern incorporates color changes to create the otter’s distinctive facial markings and includes details like tiny ears, expressive embroidered features, and perfectly proportioned limbs. The result is a realistic yet utterly adorable representation of one of nature’s most playful creatures.
Otter Amigurumi Skill Level and Requirements
This pattern is rated as intermediate due to the frequent color changes and specialized techniques. To successfully complete this otter amigurumi, you should be comfortable with:
- Working in continuous rounds
- Making color changes, including during decrease stitches
- Front loop only stitches
- Basic increases and decreases
- Working around a foundation chain (for the mouth)
- Basic embroidery techniques
- Assembly and stuffing techniques
Otter Amigurumi Materials Needed
Before beginning your otter amigurumi project, gather these supplies:
- Medium weight (4) yarn in:
- Brown (main color – suggested: Hobbii Rainbow 8/4 Light Brown)
- Cream (for face and mouth – suggested: Hobbii Rainbow 8/4 Almond)
- 3mm crochet hook
- 6mm safety eyes (one pair)
- 6mm safety nose
- Thin black embroidery thread (for smile and eyebrows)
- Tapestry needle
- Scissors
- Polyester fiberfill stuffing
- Stitch markers (optional but helpful)
Otter Amigurumi Finished Size
When completed, your otter amigurumi will measure approximately:
- Length: 5.5 inches (14 cm) from head to tail
Otter Amigurumi Crochet Terminology
This pattern uses standard US crochet terminology:
- Sc: Single crochet – the main stitch used throughout
- Inc: Increase – making two stitches in the same stitch
- Dec: Decrease – combining two stitches into one
- Ch: Chain – used for creating extended sections
- FLO: Front loop only – creates texture and definition
- St: Stitch
Special Techniques: Color Change During Decreases
This pattern includes color changes during decrease stitches. Here’s how to execute this technique:
- Insert your hook into the first stitch and yarn over with the current color
- Pull up a loop
- Insert your hook into the next stitch and yarn over with the new color
- Pull up a loop (you’ll now have three loops on your hook – one in the original color and two in the new color)
- Yarn over with the new color and pull through all three loops
- Continue working with the new color
This technique ensures clean color transitions even during decreases.
Otter Amigurumi Head and Body Instructions
Using brown yarn:
Round 1: Create a magic ring and work 6 single crochet into it. (6 stitches) Round 2: Increase in each stitch around. (12 stitches) Round 3: Work [1 single crochet, 1 increase] 6 times. (18 stitches) Round 4: Work [2 single crochet, 1 increase] 6 times. (24 stitches) Round 5: Single crochet in each stitch around. (24 stitches) Round 6: Work [3 single crochet, 1 increase] 6 times. (30 stitches) Rounds 7-10: Single crochet in each stitch around. (30 stitches)
Now we’ll begin adding the cream-colored facial markings:
Round 11: Single crochet in 11 stitches with brown. Change to cream and single crochet in 3 stitches. Change to brown and single crochet in 2 stitches. Change to cream and single crochet in 3 stitches. Change to brown and single crochet in 11 stitches. (30 stitches) Round 12: Using brown, single crochet in 3 stitches. Work [1 increase, 1 single crochet] 4 times. Change to cream and single crochet in 3 stitches. Change to brown and single crochet in 2 stitches. Change to cream and single crochet in 3 stitches. Change to brown and work [1 single crochet, 1 increase] 4 times. Single crochet in 3 stitches. (38 stitches) Rounds 13-15: Using brown, single crochet in 10 stitches. Change to cream and single crochet in 18 stitches. Change to brown and single crochet in 10 stitches. (38 stitches)
Insert 6mm safety eyes between Rounds 11-12, about 5 stitches apart, positioning them in the cream-colored facial area. Insert the 6mm safety nose between Rounds 12-13, centered between the eyes.
Round 16: Using brown, single crochet in 3 stitches. Work [1 decrease, 1 single crochet] 2 times. For the next decrease, you’ll change color: Insert hook into next stitch, yarn over with brown and pull up a loop. Insert hook into next stitch, yarn over with cream and pull up a loop. Yarn over with cream and pull through all three loops on hook. Now working with cream, single crochet in 1 stitch, decrease once, single crochet in 9 stitches. Decrease once, single crochet in 1 stitch. For the next decrease, you’ll change color again: Insert hook into next stitch, yarn over with cream and pull up a loop. Insert hook into next stitch, yarn over with brown and pull up a loop. Yarn over with brown and pull through all three loops on hook. Now working with brown, work [1 single crochet, 1 decrease] 2 times. Single crochet in 4 stitches. (30 stitches)
Round 17: Using brown, decrease once, single crochet in 3 stitches, decrease once, single crochet in 1 stitch. Change to cream and single crochet in 2 stitches. Work [1 decrease, 3 single crochet] 2 times. For the next decrease, change to brown by working the decrease with the final yarn over in brown. Now working with brown, single crochet in 3 stitches, decrease once, single crochet in 3 stitches. (24 stitches)
Round 18: Using brown, decrease once, single crochet in 2 stitches. For the next decrease, change to cream by working the decrease with the final yarn over in cream. Now working with cream, single crochet in 2 stitches. Work [1 decrease, 2 single crochet] 2 times. For the next decrease, change to brown by working the decrease with the final yarn over in brown. Now working with brown, single crochet in 2 stitches, decrease once, single crochet in 2 stitches. (18 stitches)
Round 19: Working in front loops only, using brown, single crochet in 5 stitches. Change to cream and single crochet in 8 stitches. Change to brown and single crochet in 5 stitches. (18 stitches)
Round 20: Working in both loops, using brown, single crochet in 5 stitches. Change to cream and single crochet in 8 stitches. Change to brown and single crochet in 5 stitches. (18 stitches)
Round 21: Using brown, single crochet in 6 stitches. Change to cream and single crochet in 7 stitches. Change to brown and single crochet in 5 stitches. (18 stitches)
Round 22: Using brown, work [1 increase, 2 single crochet] 3 times. Change to cream, increase in next stitch, single crochet in 1 stitch. Change to brown, single crochet in 1 stitch. Work [1 increase, 2 single crochet] 2 times. (24 stitches)
Begin stuffing the head at this point.
Round 23: Using brown, single crochet in 13 stitches. Change to cream and single crochet in 1 stitch. Change to brown and single crochet in 10 stitches. (24 stitches)
You can now cut the cream yarn as it won’t be needed anymore.
Rounds 24-25: Using brown, single crochet in each stitch around. (24 stitches) Round 26: Work [3 single crochet, 1 increase] 6 times. (30 stitches) Rounds 27-28: Single crochet in each stitch around. (30 stitches) Round 29: Work [4 single crochet, 1 increase] 6 times. (36 stitches) Rounds 30-32: Single crochet in each stitch around. (36 stitches) Round 33: Work [4 single crochet, 1 decrease] 6 times. (30 stitches)
Stuff the body firmly at this point and continue adding stuffing as you work.
Round 34: Work [3 single crochet, 1 decrease] 6 times. (24 stitches) Round 35: Work [2 single crochet, 1 decrease] 6 times. (18 stitches) Round 36: Work [1 single crochet, 1 decrease] 6 times. (12 stitches)
Now we’ll create the tail:
Rounds 37-42: Single crochet in each stitch around. (12 stitches) Round 43: Work [1 single crochet, 1 decrease] 4 times. (8 stitches) Rounds 44-45: Single crochet in each stitch around. (8 stitches)
Fasten off, leaving a long tail for closing. Sew the tail closed and weave in the end.
Otter Amigurumi Ear Instructions (Make 2)
Using brown yarn:
Round 1: Create a magic ring and work 6 single crochet into it. (6 stitches)
Fasten off, leaving a long tail for attaching to the head. Position the ears on the head between Rounds 8-9 and sew in place. Weave in the ends.
Otter Amigurumi Mouth Instructions
Using cream yarn:
Round 1: Chain 7. Work 3 single crochet into the 2nd chain from hook. Single crochet in next 4 chains. Work 3 single crochet into the last chain. Now turn to work along the opposite side of the foundation chain. Single crochet in 4 stitches. (14 stitches) Round 2: Work 3 increases, single crochet in 4 stitches, work 3 increases, single crochet in 4 stitches. (20 stitches)
Fasten off, leaving a long tail for attaching to the face. Fold the oval shape in half and gently bend the sides to create a curved mouth shape. Position the mouth on the face with the lower edges between Rounds 14-15 and the upper part between Rounds 11-12. Sew in place and weave in the ends. Note that the mouth doesn’t need to be stuffed.
Arm Instructions (Make 2)
Using brown yarn:
Round 1: Create a magic ring and work 6 single crochet into it. (6 stitches) Round 2: Single crochet in each stitch around. (6 stitches) Round 3: Work [1 single crochet, 1 increase] 3 times. (9 stitches) Rounds 4-8: Single crochet in each stitch around. (9 stitches)
Fasten off, leaving a long tail for attaching to the body. Position the arms on the body between Rounds 20-21. You can stuff the arms very lightly if desired, though it’s not necessary. Sew in place and weave in the ends.
Leg Side Instructions (Make 2)
Using brown yarn:
Round 1: Create a magic ring and work 6 single crochet into it. (6 stitches) Round 2: Increase in each stitch around. (12 stitches) Round 3: Work [1 single crochet, 1 increase] 6 times. (18 stitches) Rounds 4-5: Single crochet in each stitch around. (18 stitches)
Fasten off, leaving a long tail for attaching to the body. Position the top part of each leg between Rounds 30-31 and the bottom part between Rounds 37-38. Place the otter on a flat surface to ensure the legs are positioned to help the otter sit properly. Lightly stuff each leg before completely sewing it closed. Secure in place and weave in the ends.
Foot Instructions (Make 2)
Using brown yarn:
Round 1: Create a magic ring and work 6 single crochet into it. (6 stitches) Round 2: Work [1 single crochet, 1 increase] 3 times. (9 stitches) Rounds 3-5: Single crochet in each stitch around. (9 stitches)
Fasten off, leaving a long tail for attaching to the legs. Position each foot at the end of a leg and sew in place. Since the feet are small, they don’t need to be stuffed. Secure and weave in the ends.
Facial Details Instructions
Using thin black embroidery thread:
For the Smile:
- Insert the needle one stitch away from the left side of the mouth and bring it out at the middle of the mouth
- Insert the needle at the left corner of the mouth and bring it out at the right corner
- Insert the needle back into the middle of the mouth and bring it out at your starting point
- Insert the needle at the same point and bring it up about 5 stitches directly above
For the Eyebrows:
- Insert the needle where indicated in the pattern photo (above each eye) and bring it out about 3 stitches away
- Insert the needle as shown and bring it out at the original starting point
Tie the thread ends in a secure knot, hide them inside the amigurumi, and trim any excess.
Assembly Tips
- Before attaching safety features, check their placement by holding them against the face
- When positioning the mouth, ensure it’s centered beneath the nose
- Stuff the head and body firmly for the best shape, but avoid overstuffing which can distort the stitches
- When attaching the legs, ensure they’re evenly placed so the otter sits well
- The ears should be positioned symmetrically on either side of the head
- For the embroidered facial features, use pins to mark placement before stitching
Color Change Tips
This pattern features numerous color changes, which create the otter’s distinctive face markings. Here are some tips for clean color changes:
- When changing colors in a regular stitch, work the stitch until the last yarn over, then complete it with the new color
- For the special color change decreases, follow the detailed instructions provided in the pattern
- Keep yarn tension consistent when changing colors to avoid holes or gaps
- Weave in ends as you go to minimize finishing work at the end
- Consider using bobbins for the cream yarn during the facial section to manage the yarn more easily
Customization Ideas
Make your otter amigurumi uniquely yours with these creative variations:
- Create a sea otter by adding a small shell or starfish that it can hold in its paws
- Make a family of otters in different sizes by adjusting your hook size
- Add a small fish accessory made from colorful yarn
- Use variegated brown yarn for a more textured coat effect
- Create a scarf or hat for a dressed-up otter
- Embroider small whiskers for added detail
- Make the otter in different colors for a fantasy version
- Add a small pocket or pouch on the belly where otters often carry stones
Troubleshooting Tips
- If your color changes create gaps, try working the first stitch after a color change slightly tighter
- For a smoother shape, stuff gradually as you go rather than all at once at the end
- If the otter won’t sit properly, check that the legs are evenly placed and properly stuffed
- For neater decreases, try using the invisible decrease technique (working through front loops only)
- If the embroidered facial features seem uneven, use pins to mark placement first, or temporary thread as guidelines
Care Instructions
To keep your otter amigurumi looking its best:
- Spot clean with a damp cloth and mild soap as needed
- Allow to air dry completely
- For dusty spots, use a soft brush or compressed air
- Avoid machine washing or drying which could damage the structure
- Store in a clean, dry place away from direct sunlight to prevent color fading
- If the stuffing becomes compressed over time, gently reshape by hand
Educational Aspects of Your Otter Amigurumi
Your finished otter amigurumi is not just a cute toy but can be an educational tool to teach children about:
- Otters’ role in aquatic ecosystems
- The importance of wetland conservation
- Otter behavior and characteristics, like their playful nature
- How otters use tools (like rocks) to open shellfish
- The differences between river otters and sea otters
Consider including a small fact card if giving your otter as a gift to a child.

Check this out :Owl and Snow Owl Amigurumi Crochet Pattern
Conclusion
Congratulations on completing your little otter amigurumi! With its adorable face, curved tail, and realistic proportions, your handcrafted otter makes a charming addition to any collection or a wonderful gift for animal lovers. The techniques you’ve practiced—from color changes during decreases to creating the perfect facial expression—will serve you well in future amigurumi projects.
The joy of amigurumi comes not just from the finished product but from the creative process itself. Each stitch brings your little otter to life, resulting in a one-of-a-kind creation with personality and charm. Happy crocheting!
