

Table of Contents
Looking for a versatile farm animal amigurumi pattern that Turkey Amigurumi offers twice the value? This comprehensive guide walks you through creating both an adorable chicken and a festive turkey using the same base pattern with simple variations. Perfect for intermediate crocheters, these charming birds make wonderful decorations for your home, gifts for farm animal enthusiasts, or cute additions to a child’s toy collection. The pattern includes special details like the turkey’s colorful feather display and optional holiday sign, making it adaptable for seasonal decorating.
Introduction to Chicken and Turkey Amigurumi
This pattern provides excellent value by allowing you to create two distinct barnyard birds from a single set of instructions. The head and body are worked as one continuous piece, creating a sturdy and well-proportioned finished toy. What makes this pattern special is its versatility – with simple color changes and a few additional elements, you can transform the basic design into either a classic white chicken or a festive brown turkey complete with colorful tail feathers.
Turkey Amigurumi Skill Level and Requirements
This pattern is rated as intermediate level. To successfully complete these amigurumi birds, you should be comfortable with:
- Working in continuous rounds
- Basic increases and decreases
- Back loop only stitches
- Special stitches (popcorn stitch for toes)
- Color changes
- Creating textured elements (feathers)
- Basic assembly techniques
Turkey Amigurumi Materials Needed
Before beginning your bird amigurumi project, gather these supplies:
For Both Birds:
- 4mm crochet hook
- 6mm safety eyes (one pair)
- Tapestry needle
- Scissors
- Polyester fiberfill stuffing
- Cardboard for bottom stabilizer (and sign for turkey)
Yarn Colors – Medium Weight (4):
For Chicken:
- White (main body, wings, tail)
- Red (comb/wattle)
- Yellow (beak, legs)
For Turkey:
- Brown (main body, tail)
- Dark Brown (wings)
- Yellow, Red, Orange (feathers)
- Yellow (beak, legs)
- Red (wattle)
Turkey Amigurumi Recommended Yarn Brands
For best results, consider using:
- JoAnn Fabric’s “Big Twist” Yarn
- Red Heart Super Saver Yarn
- Hobby Lobby’s “I Love This Yarn!”
Turkey Amigurumi Crochet Terminology
This pattern uses standard US crochet terminology:
- Sc: Single crochet – the main stitch used throughout
- Inc: Increase – making two stitches in the same stitch
- Dec: Decrease – combining two stitches into one
- Dc: Double crochet – used for feathers and textured elements
- BLO: Back loop only – creates texture and shaping
- Ch: Chain – used for creating extended sections
- SlSt: Slip stitch – used for joining and finishing
- St: Stitch
- Popcorn stitch: A textured stitch used for the toes
Turkey Amigurumi Head and Body Instructions
Using your main color (white for chicken, brown for turkey):
Round 1: Create a magic ring and work 6 single crochet into it. (6 stitches) Round 2: Increase in each stitch around. (12 stitches) Round 3: Work [1 single crochet, 1 increase] 6 times. (18 stitches) Round 4: Work [2 single crochet, 1 increase] 6 times. (24 stitches) Rounds 5-12: Single crochet in each stitch around. (24 stitches)
Insert 6mm safety eyes between rounds 7-8, approximately 2 stitches apart.
Round 13: Work [3 single crochet, 1 increase] 6 times. (30 stitches) Rounds 14-15: Single crochet in each stitch around. (30 stitches) Round 16: Work [4 single crochet, 1 increase] 6 times. (36 stitches) Rounds 17-18: Single crochet in each stitch around. (36 stitches) Round 19: Work [5 single crochet, 1 increase] 6 times. (42 stitches) Rounds 20-21: Single crochet in each stitch around. (42 stitches) Round 22: Work [6 single crochet, 1 increase] 6 times. (48 stitches) Rounds 23-26: Single crochet in each stitch around. (48 stitches)
Now we’ll start decreasing to form the bottom of the body:
Round 27: Working in back loops only, work [6 single crochet, 1 decrease] 6 times. (42 stitches) Round 28: Working in both loops, work [5 single crochet, 1 decrease] 6 times. (36 stitches) Round 29: Work [4 single crochet, 1 decrease] 6 times. (30 stitches)
Turkey Amigurumi Cardboard Base for Stability
Before continuing with the final decreases, prepare a cardboard circle to help your bird sit flat:
- Place the partially completed body on a piece of cardboard
- Trace around the bottom opening to create a circle outline
- Cut out the cardboard circle
- Finish stuffing the body firmly
- Insert the cardboard circle into the bottom of the body
Continue decreasing to close the bottom:
Round 30: Work [3 single crochet, 1 decrease] 6 times. (24 stitches) Round 31: Work [2 single crochet, 1 decrease] 6 times. (18 stitches) Round 32: Work [1 single crochet, 1 decrease] 6 times. (12 stitches) Round 33: Decrease around. (6 stitches)
Fasten off, leaving a tail. Sew the opening closed and weave in the end.
Turkey Amigurumi Beak Instructions
Using yellow yarn:
Round 1: Create a magic ring and work 6 single crochet into it. (6 stitches) Round 2: Single crochet in each stitch around. (6 stitches) Round 3: Work [1 single crochet, 1 increase] 3 times. (9 stitches)
Fasten off, leaving a long tail for attaching to the face. Position the beak so the top aligns with Round 8 and the bottom with Round 12. Sew in place securely.
Turkey Amigurumi Wattle Instructions
Using red yarn:
Row 1: Chain 9. Work 3 slip stitches into the 2nd chain from hook. Slip stitch in the next 2 stitches, work 2 slip stitches into the next stitch, slip stitch in the next 5 stitches. (10 stitches)
Fasten off, leaving a long tail for attaching to the face. Position the wattle above and to the right of the beak. Sew in place.
Turkey Amigurumi Arms/Wings Instructions (Make 2)
Using white yarn for chicken or dark brown for turkey:
Row 1: Chain 5. Single crochet in 2nd chain from hook and in each of the next 3 chains. (4 stitches) Row 2: Chain 1 and turn. Increase in first stitch, single crochet in next 2 stitches, increase in last stitch. (6 stitches) Row 3: Chain 1 and turn. Single crochet in each stitch across. (6 stitches) Row 4: Chain 1 and turn. Increase in first stitch, single crochet in next 4 stitches, increase in last stitch. (8 stitches) Row 5: Chain 1 and turn. Single crochet in each stitch across. (8 stitches) Row 6: Chain 1 and turn. Repeat [5 single crochet into next stitch, slip stitch in next stitch] 4 times.
Fasten off, leaving a long tail for attaching to the body. Weave this tail up to the first row. Position the wings so the top edge aligns with the area between Rounds 14-15 and the bottom edge aligns with the area between Rounds 16-17. Sew in place.
Turkey Amigurumi Legs Instructions (Make 2)
Using yellow yarn:
When beginning the magic ring for the feet, leave an extra-long tail as you’ll use this later to sew the foot closed.
Round 1: Create a magic ring and work 6 single crochet into it. (6 stitches) Round 2: Increase in each stitch around. (12 stitches)
For Round 3, we’ll create textured toes using the popcorn stitch:
Round 3: Work [1 single crochet, 1 popcorn stitch] 3 times, then single crochet in the remaining 6 stitches. (12 stitches)
Popcorn Stitch Technique:
- Work 3 double crochet into the specified stitch
- Remove your hook from the current loop
- Insert hook into the first double crochet of the group
- Place hook back into the dropped loop
- Yarn over and pull through both loops
This creates a small, rounded bump that forms the toe.
Round 4: Decrease around. (6 stitches)
After completing Round 4, slip stitch into the same stitch you just worked in. This positions your hook correctly for the leg.
Chain 20 for the leg. Fasten off.
To finish the foot, use the long tail from the beginning magic ring to sew the opening at the bottom of the foot closed. Position the legs at the base of the body around Round 29, approximately 7 stitches apart. Sew securely in place.
Turkey Amigurumi Tail Instructions
Using white yarn for chicken or brown for turkey:
Row 1: Chain 8. Single crochet in 2nd chain from hook and in each chain across. (7 stitches) Row 2: Chain 1 and turn. Increase in first stitch, single crochet in next 5 stitches, increase in last stitch. (9 stitches) Row 3: Chain 1 and turn. Single crochet in each stitch across. (9 stitches) Row 4: Chain 1 and turn. Increase in first stitch, single crochet in next 7 stitches, increase in last stitch. (11 stitches) Row 5: Chain 1 and turn. Single crochet in each stitch across. (11 stitches) Row 6: Chain 1 and turn. Repeat [5 single crochet into next stitch, single crochet in next stitch] 5 times. Work 5 single crochet into the last stitch. (35 stitches)
Fasten off, leaving a long tail for attaching to the body. Sew the tail end of yarn to the first row of the tail to secure it. For the chicken, attach the tail to the back of the body now. For the turkey, wait until after completing the feathers before attaching the tail.
Turkey Amigurumi Feathers Instructions (For Turkey Only)
Starting with yellow yarn:
Row 1: Chain 26. Single crochet in 2nd chain from hook. Skip next 2 stitches, work 5 double crochet into next stitch. Skip next 2 stitches, single crochet in next stitch. Repeat [skip 2 stitches, 5 double crochet in next stitch, skip 2 stitches, single crochet in next stitch] 3 more times. (25 stitches)
Row 2: Chain 3 (counts as first double crochet) and turn. Work 2 double crochet into first stitch. Skip next 2 stitches, single crochet in next stitch. Repeat [skip 2 stitches, 5 double crochet in next stitch, skip 2 stitches, single crochet in next stitch] 3 times. Skip next 2 stitches, work 2 double crochet in last stitch. Work 1 more double crochet in last stitch, changing to orange yarn as you complete this stitch. (25 stitches)
Row 3: Chain 1 and turn. Single crochet in first stitch. Skip next 2 stitches, work 5 double crochet into next stitch. Skip next 2 stitches, single crochet in next stitch. Repeat [skip 2 stitches, 5 double crochet in next stitch, skip 2 stitches, single crochet in next stitch] 3 more times. (25 stitches)
Row 4: Chain 3 (counts as first double crochet) and turn. Work 4 double crochet into first stitch. Skip next 2 stitches, single crochet in next stitch. Repeat [skip 2 stitches, 5 double crochet in next stitch, skip 2 stitches, single crochet in next stitch] 3 times. Skip next 2 stitches, work 4 double crochet in last stitch. Work 1 more double crochet in last stitch, changing to red yarn as you complete this stitch. (29 stitches)
Row 5: Chain 1 and turn. Skip next 2 stitches, single crochet in next stitch. Skip next 2 stitches, work 5 double crochet into next stitch. Skip next 2 stitches, single crochet in next stitch. Repeat [skip 2 stitches, 5 double crochet in next stitch, skip 2 stitches, single crochet in next stitch] twice. Skip next 2 stitches, 5 double crochet in next stitch. Skip next 4 stitches, single crochet in last stitch. (25 stitches)
Row 6: Chain 3 (counts as first double crochet) and turn. Work 4 double crochet into first stitch. Skip next 2 stitches, single crochet in next stitch. Repeat [skip 2 stitches, 5 double crochet in next stitch, skip 2 stitches, single crochet in next stitch] 3 times. Skip next 2 stitches, work 4 double crochet in last stitch. Work 1 more double crochet in last stitch, changing to brown yarn as you complete this stitch. (29 stitches)
Row 7: Chain 1 and turn. Skip next 2 stitches, single crochet in next stitch. Skip next 2 stitches, work 5 double crochet into next stitch. Skip next 2 stitches, single crochet in next stitch. Repeat [skip 2 stitches, 5 double crochet in next stitch, skip 2 stitches, single crochet in next stitch] twice. Skip next 2 stitches, 5 double crochet in next stitch. Skip next 4 stitches, single crochet in last stitch. (25 stitches)
Row 8: Chain 3 (counts as first double crochet) and turn. Work 4 double crochet into first stitch. Skip next 2 stitches, single crochet in next stitch. Repeat [skip 2 stitches, 5 double crochet in next stitch, skip 2 stitches, single crochet in next stitch] 3 times. Skip next 2 stitches, work 4 double crochet in last stitch. Work 1 more double crochet in last stitch, changing to brown yarn as you complete this stitch. (29 stitches)
Fasten off, leaving a long tail for attaching to the body. Position the feathers at the back of the turkey at Round 19, and sew in place using the yellow yarn at the first row of feathers. After attaching the feathers, position and sew the tail in place above them.
Turkey Amigurumi Hair/Comb Instructions
Using red yarn:
- Thread a length of red yarn onto a yarn needle
- Insert the needle into the top of the head and pull the needle one stitch up
- Reinsert the needle into the original insertion point and pull out one stitch up and to the right
- Don’t pull the yarn all the way through, leaving a loop to form the comb
- Reinsert the needle one stitch to the right and pull back through to the original insertion point
- Again, leave a loop of yarn to form another section of the comb
- Secure both ends of the yarn with a knot and weave in the ends
Turkey Amigurumi Sign Instructions (For Turkey Only)
- Cut a piece of cardboard approximately 4.5 inches (11.5 cm) long by 2.5 inches (6.5 cm) tall
- Cut a stick about 2.5 inches (6.5 cm) long
- Glue the top of the stick to the back of the cardboard sign
- Print and cut out a holiday message or design
- Glue or tape the design to the front of the cardboard sign
- Position the stick in the turkey’s wing, securing it either by positioning the wing around it or by tying it with yarn
Turkey Amigurumi Assembly Tips
- Stuff all parts firmly, especially the body, for a well-shaped final product
- When attaching the wings, position them slightly angled for a more natural look
- For the turkey’s feather display, ensure it’s centered and properly supported by the tail
- The wattle should be positioned so it appears to hang naturally from under the beak
- Make sure the legs are evenly spaced and at the same height for proper balance
- For the hair/comb, don’t pull the loops too tight – they should stand up visibly on the head
Color Variations and Customization Ideas
Make your bird amigurumi uniquely yours with these creative variations:
Chicken Variations:
- Create a rooster by making a larger, more elaborate red comb
- Make a colorful hen using speckled or variegated yarn
- Create a family of chicks using the same pattern in a smaller size
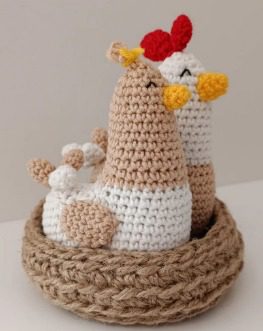
- Add a small nest made from brown yarn worked in loose stitches
Turkey Variations:
- Use rainbow colors for the feathers for a festive look
- Add more details to the face using embroidery
- Create a pilgrim hat from black yarn as an alternative to the sign
- Make a smaller baby turkey using a smaller hook and thinner yarn
Turkey Amigurumi Troubleshooting Tips
- If your bird won’t sit flat, check that the cardboard circle is properly positioned
- For floppy feathers, use slightly tighter tension when creating the feather rows
- If the legs seem unstable, reinforce the connection points with extra stitches
- For the popcorn stitch toes, make sure to pull the loops tight to create a rounded appearance
- If the turkey’s feathers don’t stand up properly, try inserting a thin piece of cardboard behind them for support
Turkey Amigurumi Care Instructions
To keep your amigurumi birds looking their best:
- Spot clean with a damp cloth and mild soap as needed
- Allow to air dry completely
- Use a soft brush to gently remove dust
- Avoid direct sunlight for extended periods to prevent color fading
- For display items, consider keeping them in a glass case or on a shelf away from high-traffic areas
- Store carefully to avoid crushing the decorative elements like the feathers or comb
Seasonal Decorating Ideas
These amigurumi birds are perfect for seasonal displays:
- Turkey: Create a Thanksgiving centerpiece with your turkey surrounded by small fabric pumpkins
- Chicken: Use as part of an Easter or spring display alongside eggs and flowers
- Farm Scene: Create a complete farmyard by adding other amigurumi animals like cows, pigs, and sheep
- Holiday Gift: Package your finished amigurumi with a recipe card for a food-themed gift

Check this out :Complete Horse, Donkey, and Zebra Amigurumi Crochet Pattern
Conclusion
Congratulations on completing your chicken or turkey amigurumi! This versatile pattern allows you to create two distinct barnyard birds with just a few variations in color and details. The continuous construction of the head and body creates a sturdy, well-shaped toy, while the special touches like the textured feathers and popcorn stitch toes bring your creation to life.
Whether you’ve made a classic white chicken for a farmhouse-themed display or a festive turkey for Thanksgiving decorating, you now have a charming handcrafted bird to enjoy. The skills you’ve developed through this project—from creating textured elements to working the special popcorn stitch—will serve you well in future amigurumi adventures. Happy crocheting!
