

Table of Contents
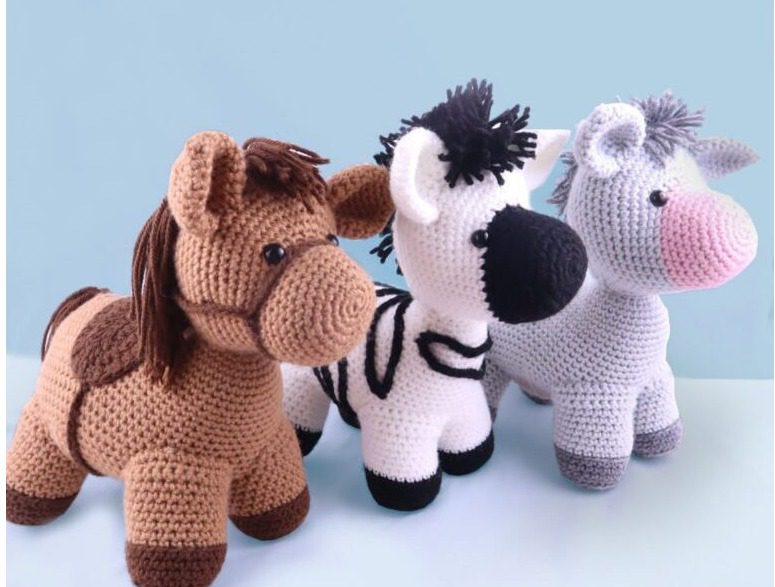
Looking for a versatile amigurumi pattern that lets you create three different equine companions with just one set of instructions? This Zebra Amigurumi comprehensive guide will walk you through creating adorable horse, donkey, and zebra amigurumi toys using the same basic pattern with specific color variations and details. Whether you’re making these as gifts, decorations, or to complete a farmyard collection, these charming creatures are sure to delight crafters and animal lovers alike.
Introduction to Equine Zebra Amigurumi
This pattern offers exceptional value by providing instructions for three distinct equine animals—a horse, donkey, and zebra—all from a single pattern base. What makes this design special is its continuous construction technique: the nose, head, neck, and body are worked as one seamless piece, creating a sturdy and well-proportioned finished toy. Each animal features distinctive details like manes, tails, and accessories that bring their unique character to life.
Zebra Amigurumi Skill Level and Requirements
This pattern is suitable for intermediate crocheters who have mastered basic amigurumi techniques. To successfully complete these equine amigurumi, you should be comfortable with:
- Working in continuous rounds
- Creating magic rings
- Front and back loop only stitches
- Increasing and decreasing
- Color changes
- Basic assembly techniques
- Basic surface embellishment (for zebra stripes)
Zebra Amigurumi Materials Needed
Before beginning your equine amigurumi project, gather these supplies:
- Medium weight (4) yarn in colors for your chosen animal:
- Horse: Light brown and dark brown
- Zebra: White and black
- Donkey: Light grey and dark grey
- 4mm crochet hook
- 12mm safety eyes (one pair)
- Tapestry needle
- Scissors
- Polyester fiberfill stuffing
- Stitch markers
Zebra Amigurumi Recommended Yarn Brands
For best results, consider using these yarn brands:
- JoAnn Fabric’s “Big Twist” Yarn
- Red Heart Super Saver Yarn
- Hobby Lobby’s “I Love This Yarn!”
Zebra Amigurumi Color Guide for Each Animal
Horse
- Light Brown (Main Color): Nose, head, neck, body, ears, and legs
- Dark Brown (Accent Color): Hooves, hair, bridle, and saddle
Zebra
- White (Main Color): Head, neck, body, ears, tail, and legs
- Black (Accent Color): Nose, hooves, hair, tail hair, and stripes
Donkey
- Light Grey (Main Color): Head, neck, body, ears, tail, and legs
- Dark Grey (Accent Color): Hooves, hair, and tail hair
Zebra Amigurumi Crochet Terminology
This pattern uses standard US crochet terminology:
- Sc: Single crochet – the main stitch used throughout most of the pattern
- Inc: Increase – making two stitches in the same stitch
- Dec: Decrease – combining two stitches into one
- Dc: Double crochet – used for the saddle
- Ch: Chain – used for creating extended sections
- FLO: Front loop only – creates texture and attachment points
- BLO: Back loop only – creates texture and attachment points
- St: Stitch
- SlSt: Slip stitch
Zebra Amigurumi Nose and Head Instructions
Using your main color (brown for horse, black for zebra, light pink/grey for donkey):
Round 1: Create a magic ring and work 6 single crochet into it. (6 stitches) Round 2: Increase in each stitch around. (12 stitches) Round 3: Work [1 single crochet, 1 increase] 6 times. (18 stitches) Round 4: Work [2 single crochet, 1 increase] 6 times. (24 stitches) Round 5: Work [3 single crochet, 1 increase] 6 times. (30 stitches) Rounds 6-11: Single crochet in each stitch around. (30 stitches) Round 12: Single crochet in 12 stitches. Working in front loops only, increase in each of the next 6 stitches. Working in both loops again, single crochet in the remaining 12 stitches. (36 stitches)
At this point, place stitch markers in the 13th stitch and the 25th stitch to mark eye positions.
Round 13: For donkey, change to grey. For zebra, change to white. For horse, continue with brown. Single crochet in 12 stitches. Work [1 increase, 1 single crochet] 6 times. Single crochet in the remaining 12 stitches. (42 stitches) Round 14: Single crochet in 12 stitches. Work [1 increase, 2 single crochet] 6 times. Single crochet in the remaining 12 stitches. (48 stitches) Round 15: Single crochet in 12 stitches. Work [1 increase, 3 single crochet] 6 times. Single crochet in the remaining 12 stitches. (54 stitches) Rounds 16-21: Single crochet in each stitch around. (54 stitches)
Insert 12mm safety eyes at the marked positions from Round 12.
Round 22: Single crochet in first stitch. Place a stitch marker in this stitch (to mark where you’ll begin the neck later). Single crochet in the next 53 stitches. When you reach the marked stitch, chain 12. Skip the next 9 stitches, single crochet in the next stitch, then single crochet in the remaining 44 stitches. (57 stitches) Round 23: When you reach the chain stitches, single crochet in the first chain. Place a stitch marker in this single crochet to mark your rounds. Single crochet in the remaining 11 chain stitches. Continuing on the head, decrease once, single crochet in the next 39 stitches, decrease twice. (54 stitches) Round 24: Work [1 decrease, 7 single crochet] 6 times. (48 stitches) Round 25: Work [1 decrease, 6 single crochet] 6 times. (42 stitches) Round 26: Work [1 decrease, 5 single crochet] 6 times. (36 stitches) Round 27: Work [1 decrease, 4 single crochet] 6 times. (30 stitches)
Begin stuffing the head firmly at this point. Continue adding stuffing after each round.
Round 28: Work [1 decrease, 3 single crochet] 6 times. (24 stitches) Round 29: Work [1 decrease, 2 single crochet] 6 times. (18 stitches) Round 30: Work [1 decrease, 1 single crochet] 6 times. (12 stitches) Round 31: Decrease around. (6 stitches)
Fasten off, leaving a tail for closing. Sew the remaining opening closed and weave in the end.
Zebra Amigurumi Neck and Body Instructions
At this point, we’ll create the neck from the opening left in the head:
Round 1: Insert your hook into the stitch where you placed the marker in Round 22 of the head. Pull through your main color yarn (brown for horse, white for zebra, grey for donkey). Chain 1, single crochet in the next stitch. Move the stitch marker to this chain 1 to mark the beginning of rounds. Single crochet in the next 8 stitches. Turn to the opposite side of the neck and single crochet in the 11 stitches there. (20 stitches total around the neck) Rounds 2-3: Single crochet in each stitch around. (20 stitches) Round 4: Work [1 increase, 1 single crochet] 10 times. (30 stitches) Round 5: Work [1 increase, 4 single crochet] 6 times. (36 stitches)
Now we’ll create the body by adding chain stitches at the back of the neck:
Round 6: Single crochet in 28 stitches. Chain 15. Single crochet 4 times into the 2nd chain from the hook. Single crochet in the next 13 chain stitches. Working back onto the neck, single crochet in the remaining 8 stitches. (53 stitches) Round 7: Single crochet in 28 stitches. Single crochet in the next 13 chain stitches from the previous round. Work [1 increase, 1 single crochet] 2 times. Single crochet in the next 13 stitches of the neck, then single crochet in the remaining 8 stitches along the body. (68 stitches) Round 8: Single crochet in 41 stitches. Work [1 increase, 2 single crochet] 2 times. Single crochet in the remaining 21 stitches. (70 stitches) Round 9: Single crochet in 41 stitches. Work [1 increase, 3 single crochet] 2 times. Single crochet in the remaining 21 stitches. (72 stitches) Round 10: Single crochet in 41 stitches. Work [1 increase, 4 single crochet] 2 times. Single crochet in the remaining 21 stitches. (74 stitches) Round 11: Single crochet in 41 stitches. Work [1 increase, 5 single crochet] 2 times. Single crochet in the remaining 21 stitches. (76 stitches) Rounds 12-21: Single crochet in each stitch around. (76 stitches) Round 22: Work [1 decrease, 17 single crochet] 4 times. (72 stitches) Round 23: Work [1 decrease, 10 single crochet] 6 times. (66 stitches) Round 24: Work [1 decrease, 9 single crochet] 6 times. (60 stitches) Round 25: Work [1 decrease, 8 single crochet] 6 times. (54 stitches) Round 26: Work [1 decrease, 7 single crochet] 6 times. (48 stitches) Round 27: Work [1 decrease, 6 single crochet] 6 times. (42 stitches) Round 28: Work [1 decrease, 5 single crochet] 6 times. (36 stitches)
Stuff the body and neck area very firmly at this point. Continue adding stuffing after each round.
Round 29: Work [1 decrease, 4 single crochet] 6 times. (30 stitches) Round 30: Work [1 decrease, 3 single crochet] 6 times. (24 stitches) Round 31: Work [1 decrease, 2 single crochet] 6 times. (18 stitches) Round 32: Work [1 decrease, 1 single crochet] 6 times. (12 stitches) Round 33: Decrease around. (6 stitches)
Fasten off, leaving a tail for closing. Sew the remaining opening closed and weave in the end.
Zebra Amigurumi Leg Instructions (Make 4)
Using accent color (dark brown for horse, black for zebra, dark grey for donkey):
Round 1: Create a magic ring and work 6 single crochet into it. (6 stitches) Round 2: Increase in each stitch around. (12 stitches) Round 3: Work [1 single crochet, 1 increase] 6 times. (18 stitches) Round 4: Work [2 single crochet, 1 increase] 6 times. (24 stitches) Round 5: Working in back loops only, single crochet in each stitch around. (24 stitches) Rounds 6-8: Working in both loops, single crochet in each stitch around. (24 stitches) Round 9: Change to main body color. Working in back loops only, single crochet in each stitch around. (24 stitches) Rounds 10-15: Working in both loops, single crochet in each stitch around. (24 stitches)
Now we’ll work in rows to create the angled top of the leg:
Row 16: Turn. Single crochet in 14 stitches. (14 stitches) Row 17: Turn. Decrease once, single crochet in 10 stitches, decrease once. (12 stitches) Row 18: Turn. Single crochet in 12 stitches. (12 stitches)
Fasten off, leaving a long tail for attaching to the body.
Zebra Amigurumi Leg Assembly
Position the legs so that the shorter side (where you worked in rows) faces toward the inside of the body and the longer side faces outward. Pin all four legs in place before sewing to ensure proper placement and balance. Stuff each leg firmly before completing the attachment. After sewing, secure the yarn tail with a knot and hide it inside the body.
Zebra Amigurumi Ear Instructions (Make 2)
Using main color:
Round 1: Create a magic ring and work 6 single crochet into it. (6 stitches) Round 2: Single crochet in each stitch around. (6 stitches) Round 3: Increase in each stitch around. (12 stitches) Round 4: Single crochet in each stitch around. (12 stitches) Round 5: Work [1 single crochet, 1 increase] 6 times. (18 stitches) Round 6: Single crochet in each stitch around. (18 stitches) Round 7: Work [2 single crochet, 1 increase] 6 times. (24 stitches) Rounds 8-10: Single crochet in each stitch around. (24 stitches) Round 11: Work [2 single crochet, 1 decrease] 6 times. (18 stitches) Round 12: Work [1 single crochet, 1 decrease] 6 times. (12 stitches)
Fasten off, leaving a long tail for attaching to the head. Fold the ears slightly inward and position them on the head about 13 stitches apart, between rounds 16-17. Sew in place and weave in ends.
Zebra Amigurumi Mane and Hair Instructions
Front Head Hair
Using accent color (dark brown for horse, black for zebra, dark grey for donkey):
- Cut several pieces of yarn approximately 4 inches long.
- Insert your hook into a stitch between the two ears.
- Fold a piece of yarn in half and place the folded end on your hook.
- Pull this folded end through the stitch, creating a loop.
- Pull the yarn ends through this loop and tighten to create a knot.
- Repeat this process for 8 stitches across the top of the head.
For zebra and donkey: Trim the hair shorter and straight across. For horse: Keep the front hair longer, but trim the sides slightly shorter. Arrange the mane so it falls forward onto the face.
Neck Hair
Using accent color:
For donkey and zebra: Continue adding 4-inch pieces of yarn to the back of the head and neck area, covering about 8 stitches across for each row. Add about 8 rows total. Trim to match the front head hair length.
For horse: Cut pieces of yarn approximately 10 inches long. Attach these longer strands behind the shorter head hair to create the flowing mane. Attach across 8 stitches for each row, continuing for about 8 rows down the back of the neck.
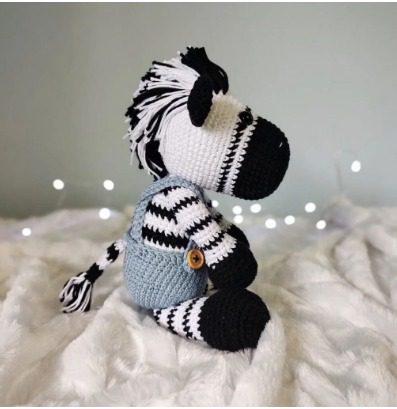
Zebra Amigurumi Tail Instructions
Horse Tail
Using dark brown yarn:
- Cut several pieces of yarn approximately 12 inches long.
- Insert your hook into the upper back of the horse.
- Fold a piece of yarn in half and pull the folded end through the stitch.
- Pull the yarn ends through this loop and tighten to create a knot.
- Repeat this process multiple times in the same area to create a thick, flowing tail.
Zebra & Donkey Tail
Using main color (white for zebra, light grey for donkey):
Row 1: Chain 17. Single crochet in the 2nd chain from hook and in each of the next 15 chains. (16 stitches) Rows 2-3: Chain 1 and turn. Single crochet in each of the 16 stitches across. (16 stitches)
Fasten off, leaving a long tail for attaching to the body. Sew the tail to the upper back of the animal.
Tail Hair (Zebra & Donkey)
Using accent color (black for zebra, dark grey for donkey):
- Cut 4 pieces of yarn approximately 4 inches long.
- Attach these pieces to the end of the tail using the same folding and knotting method used for the mane.
- Trim to create an even length.
Zebra Amigurumi Saddle Instructions (For Horse Only)
Using dark brown yarn:
Round 1: Chain 17. Skip 2 stitches, work 3 double crochet in the 3rd chain from hook. Double crochet in the next 13 chains. Work 3 double crochet in the last chain. Turn to work along the opposite side of the foundation chain. Double crochet in the next 13 stitches. (32 stitches) Round 2: Work 2 double crochet in each of the next 3 stitches. Double crochet in the next 13 stitches. Work 2 double crochet in each of the next 3 stitches. Double crochet in the remaining 13 stitches. (38 stitches) Round 3: Repeat [2 double crochet in next stitch, 1 double crochet in next stitch] 3 times. Double crochet in the next 13 stitches. Repeat [2 double crochet in next stitch, 1 double crochet in next stitch] 3 times. Double crochet in the next 13 stitches. (44 stitches) Round 4: Slip stitch in the next 6 stitches. Chain 43. Skip the next 22 stitches. Single crochet in the next stitch.
Fasten off, leaving a tail for attaching to the horse. Position the saddle on the horse’s back and sew in place.
Zebra Amigurumi Bridle Instructions (For Horse Only)
Using dark brown yarn:
Row 1: Chain 41. Connect to form a circle by making 1 single crochet into the very first chain. Chain 41 more. Skip the next 20 stitches of the circle. Single crochet in the 21st stitch.
This creates a bridle with two loops—one smaller and one larger. Place the horse’s nose through the smaller loop, and position the larger loop behind the head. Sew in place if desired.
Zebra Amigurumi Zebra Stripes Instructions
Using black yarn:
- Insert your hook into any stitch on the leg or body (choosing a starting point near the back of the body works well).
- Pull black yarn through the stitch.
- Insert your hook into a nearby stitch, yarn over and pull through. Yarn over again and pull through both loops to complete a single crochet.
- Continue creating stripes by working single crochet stitches in nearby areas.
- To change the direction of a stripe, simply insert your hook into a stitch in your desired direction.
Create stripe patterns across the body and legs, using reference images of real zebras for placement inspiration.
Assembly Tips
- Before sewing any parts together, pin them in position and view the animal from all angles to ensure proper placement.
- Stuff all parts firmly, especially the legs, to help your animal stand securely.
- For the most natural look, position the legs so that they angle slightly outward from the body.
- When attaching hair, work in small sections and check your progress frequently to maintain even distribution.
- For the horse, arrange the mane so it falls naturally to one side of the neck.
- Make sure all knots for the mane and tail are secured tightly to prevent unraveling.
Customization Ideas
Make your equine amigurumi uniquely yours with these creative variations:
Horse Variations
- Create a palomino by using a golden main color with white mane and tail
- Make a dapple grey horse using grey yarn with embroidered spots
- Add small braids to the mane for a show horse look
- Create a miniature flower garland to drape around the neck
- Use variegated yarn for an interesting coat pattern
Zebra Variations
- Try different stripe patterns, such as those of a Grevy’s zebra (thin, closely spaced stripes)
- Add a touch of brown to create a “golden zebra” effect
- Create an albino zebra using all white yarn with very light grey stripes
Donkey Variations
- Create a darker donkey by using medium and dark grey yarns
- Add a small cart or panniers that can be attached to the sides
- Make a spotted donkey with embroidered markings
Troubleshooting Tips
- If your animal won’t stand properly, check that the legs are evenly stuffed and securely attached
- For a wobbly neck, add more stuffing to create a firmer connection between head and body
- If the body shape seems uneven, try redistributing the stuffing before closing completely
- For secure hair attachment, double-knot each strand and trim only after all knots are fully tightened
- If finding it difficult to attach the legs at the correct angle, use pins or clips to hold them in position while sewing
Care Instructions
To keep your equine amigurumi looking its best:
- Spot clean with a damp cloth and mild soap as needed
- Allow to air dry completely
- Gently comb mane and tail with a small pet brush or toothbrush if they become tangled
- Avoid direct sunlight for extended periods to prevent color fading
- For long-term storage, place in a sealed container with a silica gel packet to prevent moisture damage
Check this out :Crochet an Adorable Sea Turtle Amigurumi
Conclusion
Congratulations on completing your equine amigurumi! With just one pattern, you’ve learned how to create three distinct animals—a horse, donkey, and zebra—each with its own unique characteristics and charm. These versatile techniques can be adapted and customized to create even more equine varieties, from fantasy unicorns to realistic breeds.
The continuous construction method used in this pattern creates a sturdy, well-proportioned animal with excellent stability. The distinctive manes, tails, and accessories bring each character to life, making these amigurumi perfect for display, gifting, or imaginative play.
Whether you’ve created one or all three of these equine companions, you now have a delightful handcrafted animal to enjoy. Happy crocheting!
