

Table of Contents
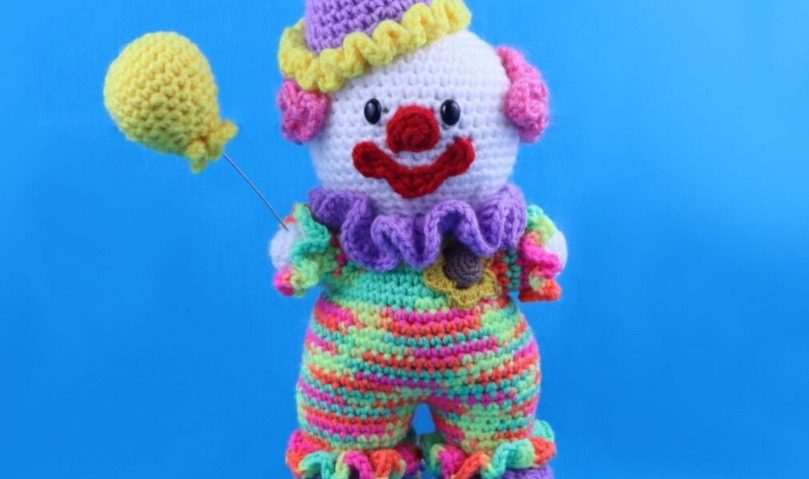
Looking to create a whimsical, circus-inspired amigurumi that brings joy and color to any space? This Clown Amigurumi comprehensive clown amigurumi pattern guides you through creating a delightful character complete with vibrant hair, a festive collar, a tilted hat, and even balloons! Perfect for experienced crocheters looking for a fun challenge, this pattern creates a playful doll that’s sure to become a conversation piece or a cherished toy.
Introduction to Clown Amigurumi
This cheerful clown amigurumi combines multiple techniques to create a character full of personality and charm. What makes this pattern special is the innovative construction—the clown’s body, including the head and legs, is worked as one continuous piece, with clever techniques used to create the distinctive hair, collar, and other features. The finished doll features a bright color scheme, expressive face, and charming accessories including a flower and balloons.
Clown Amigurumi Skill Level and Requirements
This pattern is rated for experienced crocheters. While the individual techniques aren’t complex, the pattern requires:
- Comfort with working in specified loops (front loops only, back loops only)
- Changing colors mid-round
- Working with multiple yarn weights
- Creating and attaching multiple components
- Basic wire-working skills (for balloons)
- Following detailed instructions across multiple sections
Clown Amigurumi Materials Needed
Before beginning your clown amigurumi project, gather these supplies:
Yarns:
- Medium weight (4) yarn in:
- White (for face and hands)
- Yellow (for suit, hat pom-pom and trim)
- Dark blue (for hair)
- Regular blue (for shoes and collar)
- Hot pink (for hat)
- Red (for facial features)
- Fingering weight (1) yarn in:
- Brown (for sunflower center)
- Yellow (for sunflower petals)
- Any bright colors of your choice for the balloon(s)
Tools and Notions:
- 4mm crochet hook (for most components)
- 2mm crochet hook (for flower)
- 12mm safety eyes
- Tapestry needle
- Scissors
- Polyester fiberfill stuffing
- Hot glue gun or E6000 adhesive (for balloon assembly)
- 18-gauge wire (for balloon)
- Stitch markers
Understanding Clown Amigurumi Terminology
This pattern uses standard US crochet terminology:
- Sc: Single crochet – the most common stitch used throughout
- Inc: Increase – making two stitches in the same stitch
- Dec: Decrease – combining two stitches into one
- Dc: Double crochet – used for textured elements like hair and collar
- Hdc: Half double crochet – used in the flower construction
- FLO: Front loop only – creates texture and attachment points
- BLO: Back loop only – creates texture and attachment points
- SlSt: Slip stitch – used for joining and creating contours
- Ch: Chain – used as foundation and for creating spaces
Clown Amigurumi Getting Started
The clown’s construction is unique in that we’ll be working from the head down through the body and legs in one continuous piece. While creating the head, we’ll work in back loops only for certain sections, which will later allow us to attach contrasting yarn to create the hair. A similar technique will be used to create the colorful collar.
Clown Amigurumi Head Instructions
Using white yarn and 4mm hook:
Round 1: Create a magic ring and work 6 single crochet into it. (6 stitches) Round 2: Increase in each stitch around. (12 stitches) Round 3: Work [1 single crochet, 1 increase] 6 times. (18 stitches) Round 4: Work [2 single crochet, 1 increase] 6 times. (24 stitches) Round 5: Work [3 single crochet, 1 increase] 6 times. (30 stitches) Round 6: Work [4 single crochet, 1 increase] 6 times. (36 stitches) Round 7: Work [5 single crochet, 1 increase] 6 times. (42 stitches) Rounds 8-10: Single crochet in each stitch around. (42 stitches)
This is where the pattern becomes more intricate, creating the foundation for the hair:
Rounds 11-12: Single crochet in 6 stitches, work in back loops only for 6 stitches, work in both loops for 18 stitches, work in back loops only for 6 stitches, work in both loops for 6 stitches. (42 stitches)
For Round 13, we’ll place stitch markers to indicate eye placement: Round 13: Single crochet in 4 stitches, work in back loops only for 10 stitches, work in both loops for 4 stitches, single crochet in next stitch and add a marker, single crochet in 4 stitches, single crochet in next stitch and add a marker, single crochet in 4 stitches, work in back loops only for 10 stitches, work in both loops for 4 stitches. (42 stitches)
Round 14: Single crochet in 4 stitches, work in back loops only for 10 stitches, work in both loops for 14 stitches, work in back loops only for 10 stitches, work in both loops for 4 stitches. (42 stitches) Rounds 15-17: Single crochet in each stitch around. (42 stitches) Round 18: Work [1 increase, 6 single crochet] 6 times. (48 stitches) Round 19: Single crochet in each stitch around. (48 stitches) Round 20: Work [1 decrease, 6 single crochet] 6 times. (42 stitches) Round 21: Work [1 decrease, 5 single crochet] 6 times. (36 stitches) Round 22: Work [1 decrease, 4 single crochet] 6 times. (30 stitches) Round 23: Work [1 decrease, 3 single crochet] 6 times. (24 stitches)
This is a good time to insert the 12mm safety eyes at the marked locations before continuing.
Clown Amigurumi Hair Instructions
Using dark blue yarn (or your preferred hair color) and 4mm hook:
The hair is created by working into the front loops that were left available from rounds 11-14 of the head.
- Insert your hook into the first front loop from the top row of available loops.
- Pull your hair-colored yarn through and chain 3.
- Work 3 double crochet into that same front loop.
- Continue making 4 double crochet into each of the next 5 front loops.
- Turn the head upside down to access the next row of front loops.
- Make 4 double crochet into each of the 6 front loops in this row.
- Continue to the next row of front loops, making 4 double crochet into each of the 10 front loops.
- For the final row, make 4 double crochet into each of the 10 front loops.
The hair should now cover the designated sections of the head, creating volume and texture.
Clown Amigurumi Suit and Collar Instructions
Using your chosen suit color (yellow used in sample) and 4mm hook:
Round 24: Continue from the head, changing to the suit color. Working in back loops only, single crochet in each stitch around. (24 stitches)
Now we’ll create the collar before continuing with the suit:
Collar (using regular blue or your preferred collar color):
- Insert your hook into one of the front loops left from round 24.
- Pull through your collar-colored yarn and chain 3.
- Working in the front loops only, repeat [2 double crochet in next stitch, 1 double crochet in next stitch] all around. (72 stitches)
- For round 2 of the collar, work 4 double crochet in each stitch around. (288 stitches)
- Fasten off the collar.
Continue with the Suit:
Round 25-26: Return to the suit by placing your hook back into the working loop. Single crochet in each stitch around. (24 stitches) Round 27: Work [1 increase, 3 single crochet] 6 times. (30 stitches) Rounds 28-29: Single crochet in each stitch around. (30 stitches) Round 30: Work [1 increase, 4 single crochet] 6 times. (36 stitches) Round 31: Single crochet in each stitch around. (36 stitches) Round 32: Work [1 increase, 5 single crochet] 6 times. (42 stitches) Round 33: Single crochet in each stitch around. (42 stitches) Round 34: Work [1 increase, 6 single crochet] 6 times. (48 stitches) Rounds 35-42: Single crochet in each stitch around. (48 stitches)
Clown Amigurumi Legs Instructions
Now we’ll split the work to create two separate legs:
Round 43: Place a stitch marker in the 38th stitch (this marks where we’ll create the leg). Single crochet in 13 stitches, make 1 single crochet into the marked stitch (creating your first leg), single crochet in the remaining 10 stitches. (24 stitches for this leg)
First Leg:
Rounds 44-48: Single crochet in each stitch around. (24 stitches) Round 49: Work [1 decrease, 2 single crochet] 6 times. (18 stitches) Round 50: Working in front loops only, make 4 double crochet in each stitch around. (72 stitches)
Fasten off and weave in ends. Stuff the suit through the opening for the second leg, then stuff the completed leg.
Second Leg:
- Attach your yarn to any stitch of the opening for the second leg.
- Chain 1 (counts as first single crochet). Mark this stitch.
- Rounds 1-6: Single crochet in each stitch around. (24 stitches)
- Round 7: Work [1 decrease, 2 single crochet] 6 times. (18 stitches)
- Round 8: Working in front loops only, make 4 double crochet in each stitch around. (72 stitches)
Fasten off, weave in ends, and stuff the second leg firmly.
Clown Amigurumi Shoes Instructions (Make 2)
Using regular blue (or your preferred shoe color) and 4mm hook:
Round 1: Create a magic ring and work 6 single crochet into it. (6 stitches) Round 2: Increase in each stitch around. (12 stitches) Round 3: Work [1 increase, 1 single crochet] 6 times. (18 stitches) Round 4: Work [1 increase, 2 single crochet] 6 times. (24 stitches) Round 5: Work [1 increase, 3 single crochet] 6 times. (30 stitches) Round 6: Working in back loops only, single crochet in each stitch around. (30 stitches) Rounds 7-8: Working in both loops, single crochet in each stitch around. (30 stitches) Round 9: Single crochet in 6 stitches, [1 decrease, 1 single crochet] 6 times, single crochet in 6 stitches. (24 stitches) Round 10: Single crochet in 6 stitches, decrease 6 times, single crochet in 6 stitches. (18 stitches)
Fasten off, leaving a long tail for sewing. Stuff each shoe firmly and attach to the bottom of each leg opening, sewing through both layers.
Clown Amigurumi Arms Instructions (Make 2)
Using white yarn and 4mm hook:
Round 1: Create a magic ring and work 6 single crochet into it. (6 stitches) Round 2: Increase in each stitch around. (12 stitches) Rounds 3-5: Single crochet in each stitch around. (12 stitches) Round 6: Change to suit color. Working in back loops only, single crochet in each stitch around. (12 stitches) Rounds 7-10: Working in both loops, single crochet in each stitch around. (12 stitches)
Fasten off, leaving a long tail for sewing. Stuff each arm firmly.
For the sleeve detail:
- Attach your hook to any front loop left from round 6.
- Chain 1, then make 4 single crochet into each front loop around (12 stitches).
- Fasten off and weave in ends.
Attach each arm to the sides of the body, positioning the top at round 26 and the bottom at round 31.
Clown Amigurumi Facial Features Instructions
Nose (using red yarn and 4mm hook):
Round 1: Create a magic ring and work 6 single crochet into it. (6 stitches) Round 2: Single crochet in 2 stitches, 3 single crochet in the next stitch, single crochet in 3 stitches.
Fasten off, leaving a long tail for sewing. Attach the nose between the eyes, positioning the top between rounds 13-14 and the bottom between rounds 16-17.
Mouth (using red yarn and 4mm hook):
Row 1: Chain 10. Work 4 single crochet in the 2nd chain from hook. Slip stitch in next 2 stitches. Single crochet in next stitch. Work 3 single crochet in next stitch. Single crochet in next stitch. Slip stitch in next 2 stitches. Work 4 single crochet in last stitch. (17 stitches)
Fasten off, leaving a long tail for sewing. Position the mouth with corners between rounds 16-17 and the bottom at round 21.
Face Triangle (Optional, using red yarn and 4mm hook):
Row 1: Chain 3. Single crochet in 2nd chain from hook, double crochet in next chain. (2 stitches)
Fasten off, leaving a long tail for sewing. Position the triangle above one eye and sew in place.
Clown Amigurumi Hat Instructions
Using your chosen hat color (hot pink used in sample) and 4mm hook:
Round 1: Create a magic ring and work 6 single crochet into it. (6 stitches) Round 2: Single crochet in each stitch around. (6 stitches) Round 3: Increase in each stitch around. (12 stitches) Rounds 4-5: Single crochet in each stitch around. (12 stitches) Round 6: Work [1 increase, 1 single crochet] 6 times. (18 stitches) Rounds 7-8: Single crochet in each stitch around. (18 stitches) Round 9: Work [1 increase, 2 single crochet] 6 times. (24 stitches) Rounds 10-12: Single crochet in each stitch around. (24 stitches) Round 13: Work [1 increase, 3 single crochet] 6 times. (30 stitches) Round 14: Single crochet in each stitch around. (30 stitches) Round 15: Work [1 increase, 4 single crochet] 6 times. (36 stitches) Round 16: Change to contrasting color (yellow used in sample). Working in front loops only, work 4 double crochet in each stitch around. (144 stitches)
Fasten off, leaving a long tail for sewing. Position the hat tilted to one side of the clown’s head and sew in place, stuffing firmly before completing.
Pom-Pom for Hat:
- Cut a 12-inch piece of yarn and set aside.
- Wrap yarn around three fingers about 80 times.
- Carefully slide the yarn off your fingers and use the reserved piece to tie tightly around the middle.
- Cut the loops on both sides to create a fluffy ball.
- Trim any uneven edges to shape the pom-pom.
- Sew the pom-pom to the top of the hat.
Flower Instructions
Using fingering weight yarn and 2mm hook:
Flower Back:
Using brown yarn: Round 1: Create a magic ring and work 6 single crochet into it. (6 stitches) Round 2: Increase in each stitch around. (12 stitches) Fasten off.
Flower Front:
Using brown yarn: Round 1: Create a magic ring and work 6 single crochet into it. (6 stitches) Round 2: Increase in each stitch around. (12 stitches) Round 3: Single crochet in each stitch around. (12 stitches) Round 4: Single crochet in 11 stitches. In the last stitch, start changing to yellow as you complete it. (12 stitches)
Now, align the back piece with the front piece. In the next round, you’ll be crocheting through both layers to join them:
Round 5: Using yellow yarn, repeat [Chain 4, skip next stitch, slip stitch in next stitch] 6 times. (30 stitches) Round 6: Repeat [3 half double crochet in next chain-4 space, chain 1, 3 half double crochet in same chain-4 space, slip stitch in same chain-4 space] 6 times. (48 stitches)
Fasten off, leaving a long tail for sewing. Attach the flower to the front of the clown’s suit.
Balloon Instructions
Using your chosen balloon color and 4mm hook:
Round 1: Create a magic ring and work 6 single crochet into it. (6 stitches) Round 2: Increase in each stitch around. (12 stitches) Round 3: Work [1 increase, 1 single crochet] 6 times. (18 stitches) Round 4: Work [1 increase, 2 single crochet] 6 times. (24 stitches) Rounds 5-7: Single crochet in each stitch around. (24 stitches) Round 8: Work [1 decrease, 2 single crochet] 6 times. (18 stitches) Rounds 9-10: Single crochet in each stitch around. (18 stitches) Round 11: Work [1 decrease, 1 single crochet] 6 times. (12 stitches) Rounds 12-13: Single crochet in each stitch around. (12 stitches)
Stuff the balloon firmly.
Round 14: Decrease around. (6 stitches) Round 15: Working in front loops only, work 4 single crochet in each stitch around. (24 stitches)
Fasten off, leaving a tail for sewing. Close the 6 stitches from round 14 securely.
Balloon Assembly:
There are two methods for attaching balloons:
Method 1 (More Secure, for One Balloon):
- Cut a 5-inch piece of 18-gauge wire.
- Bend one end up using pliers.
- Insert the long end of the wire from the bottom of the clown’s hand up through the top.
- Do the same with the short end so both wires are visible on top of the hand.
- Bend the tip of the short end back into the toy’s hand.
- Bend the top of the long wire, add glue to the end, and slide the balloon onto it.
- Ensure the wire is secure and won’t poke through.
Method 2 (For Multiple Balloons):
- Cut an 8-inch piece of 18-gauge wire for each balloon.
- Bend both tips of each wire to prevent poking.
- Add glue to one end of a wire and slide a balloon onto it.
- Insert the other end of the wire into the clown’s hand and thread it through the arm/body for stability.
- Repeat for each additional balloon.
Assembly and Final Touches
- Ensure all pieces are securely attached and properly stuffed.
- Check that the facial features are positioned correctly and firmly sewn.
- Verify that the hat is securely attached and tilted as desired.
- Make sure the balloon(s) are firmly attached and positioned in a pleasing arrangement.
- Fluff the collar and hair for maximum visual impact.
Customization Ideas
Make your clown amigurumi uniquely yours with these creative variations:
- Create a rainbow-colored hair or suit for an extra festive look
- Add more facial decorations like stars or hearts
- Replace the flower with a bow tie or other accessory
- Create multiple balloons in different colors for a more elaborate presentation
- Add small embroidered details to the shoes, such as stripes or dots
- Use metallic or sparkly yarn for the collar or hat trim for extra flair
- Change the color scheme to match a specific circus theme or holiday
Troubleshooting Tips
- If your clown won’t stand properly, check that the shoes are evenly stuffed and securely attached
- For floppy hair, try using slightly shorter double crochet stitches in the hair sections
- If the hat tends to fall off, sew it more securely at multiple points
- Should the balloons droop, consider using slightly thicker wire or adding a second wire for support
- If the collar seems overwhelming, you can make fewer double crochets in each stitch for a less voluminous look
Care Instructions
To keep your clown amigurumi looking its best:
- Spot clean with a damp cloth and mild soap as needed
- Allow to air dry completely
- Use a soft brush to gently detangle hair if it becomes messy
- Store away from direct sunlight to prevent color fading
- If balloons are attached, handle with care to avoid bending the wires
Safety Considerations
- This amigurumi contains small parts and wire components, so it’s not suitable for very young children
- Ensure all wire ends are properly secured to prevent poking
- Check regularly that all sewn parts remain securely attached
- If giving as a gift to a child, consider using Method 1 for balloon attachment or omitting the balloons
Check this out :Crochet an Adorable Sea Turtle Amigurumi
Conclusion
Congratulations on completing your clown amigurumi! This delightful character, with its bright colors and playful design, makes a wonderful decoration or gift for circus enthusiasts. The techniques you’ve learned in creating this complex design—from the innovative hair construction to the balloon assembly—will serve you well in future amigurumi projects.
Whether displayed on a shelf, given as a unique handmade gift, or enjoyed as a special toy, your colorful clown brings a touch of circus magic to any space. Happy crocheting!
