


Table of Contents
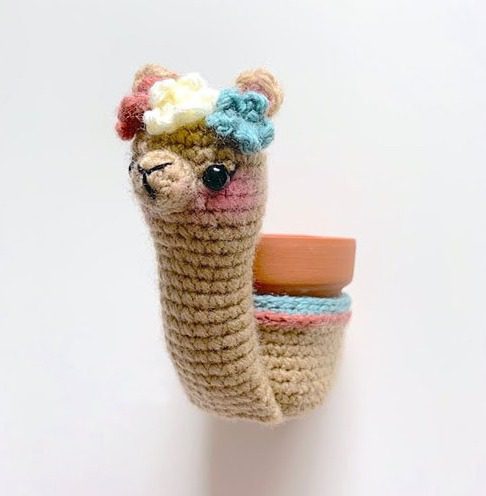
Looking for a practical and adorable crochet project that combines functionality with cuteness? This Planter Amigurumi alpaca planter amigurumi pattern creates a delightful plant cozy that perfectly fits a standard 2-inch clay pot. Ideal for beginners with basic crochet knowledge, this detailed guide walks you through creating a charming desk companion that stands approximately 6.25 inches tall (4.5 inches for the head plus 1.75 inches for the base). Perfect for succulent lovers and alpaca enthusiasts alike!
Essential Materials for Your Alpaca Planter
Before starting this versatile project, gather these supplies:
- Yarn:
- Medium weight (4) yarn in:
- Brown (for alpaca head, body, ears, muzzle, and tail)
- Pink, green, and/or white (for decorative flowers)
- Red (for decorative trim)
- Green (for planter base)
- Small amount of black yarn (for facial details)
- Medium weight (4) yarn in:
- Hook: 2.75 mm crochet hook
- Notions:
- 7 mm plastic safety eyes
- Polyester fiberfill stuffing
- Yarn needle
- Scissors
- 2-inch clay pot
- Optional: blush powder and cotton swab for rosy cheeks
Planter Amigurumi Crochet Terminology Used (US Terms)
- MR: Magic ring – starting ring that can be tightened
- Sl st: Slip stitch
- Ch: Chain stitch
- Sc: Single crochet
- Hdc: Half double crochet
- Dc: Double crochet
- Inc: Increase – two single crochet stitches in the same stitch
- Dec: Decrease – two single crochet stitches worked together
- BLO: Back loops only
- FLO: Front loops only
- FO: Fasten off
- x: Multiply/repeat
Step-by-Step Alpaca Planter Amigurumi Pattern Instructions
Planter Amigurumi Creating the Ears (Make 2 – Brown Yarn)
Round 1: In magic ring, sc, hdc, dc 2, hdc, sc (6)
Fasten off with a long tail for sewing later.
Planter Amigurumi Forming the Muzzle (Brown Yarn)
Round 1: 6 sc in magic ring (6) Round 2: (sc, inc) x 3 (9) Round 3: sc around (9)
Fasten off with a long tail for sewing later. Using black yarn, sew a “Y” shape for the nose on the muzzle.
Planter Amigurumi Crafting the Flowers (Make 3 – Pink/Green/White Yarn)
In magic ring, (ch 4, sl st) x 5. Pull the ring tight.
Fasten off with a long tail for sewing later.
Planter Amigurumi Making the Tail (Brown Yarn)
Round 1: 6 sc in magic ring (6) Round 2: (sc, inc) x 3 (9) Rounds 3-4: sc around (9)
Fasten off with a long tail for sewing later.
Forming the Head (Brown Yarn)
Round 1: 6 sc in magic ring (6) Round 2: inc around (12) Round 3: (sc, inc) x 6 (18) Round 4: (sc 2, inc) x 6 (24) Rounds 5-10: sc around (24)
At this point, sew the ears, muzzle, and flowers to the head. Attach the 7mm safety eyes and embroider eyelashes with black yarn.
Round 11: (sc 6, dec) x 3 (21) Round 12: sc around (21) Round 13: (sc 5, dec) x 3 (18) Rounds 14-27: sc around (18)
Fasten off with a long tail for sewing later. Stuff the head and upper neck well, and loosely stuff the lower neck.
Creating the Body/Planter Base (Brown and Green Yarn)
*Note: Join all rounds with a slip stitch to the first sc.
Round 1: 6 sc in magic ring, join (6) Round 2: Ch 1, inc around, join (12) Round 3: Ch 1, (sc, inc) x 6, join (18) Round 4: Ch 1, (sc 2, inc) x 6, join (24) Round 5: Ch 1, (sc 3, inc) x 6, join (30) Round 6: Ch 1, sc around in BLO, join (30) Round 7: Ch 1, (sc 9, inc) x 3, join (33) Round 8: Ch 1, (sc 10, inc) x 3, join (36) Round 9: Ch 1, sc around, join (36) Round 10: Ch 1, (sc 11, inc) x 3, join (39) Rounds 11-12: Ch 1, sc around, join (39) Round 13: Ch 1, (sc 12, inc) x 3, join (42) Round 14: Ch 1, sc around, join (42)
Switch to green yarn:
Round 15: Ch 1, sc around, join (42) Round 16: Sl st around, join (42)
Fasten off.
For a decorative trim: Between Rounds 14-15, attach red yarn and work slip stitches around. Fasten off and weave in all ends.
Final Assembly Instructions
- Attach the Head to Body:
- Pinch the last round of the head together
- Sew it to the body over the ‘Ch 1’ and ‘Join’ seam to hide it
- Ensure the face is properly aligned at the front
- Attach the Tail:
- Flatten the tail (no need to stuff)
- Sew it to the back of the body
- Add Finishing Touches:
- If desired, add blush to the cheeks and inside the ears using blush powder and a cotton swab
- Add any additional embellishments like pom-poms, tassels, buttons, beads, or appliques
- Complete the Planter:
- Place the 2-inch clay pot inside the body cozy
- Add your favorite small plant (succulents work particularly well)
Versatile Uses for Your Alpaca Planter
This adorable alpaca creation isn’t just for plants! It can also serve as:
- A cup or mug cozy for your favorite beverage
- A decorative container for small items like pens, makeup brushes, or crochet hooks
- A cute basket for tiny treasures
- A charming place setting for a South American-themed dinner
- A gift basket – fill with small treats and present to a friend
Customization Ideas for Your Alpaca Planter
- Color Variations: Create alpacas in natural tones like cream, gray, or black, or go wild with bright colors
- Size Adjustments: Modify the pattern to fit different pot sizes by adding or decreasing rounds
- Texture Options: Use fuzzy or fluffy yarn for the head and neck for a more realistic alpaca look
- Seasonal Themes: Add seasonal decorations like holly berries for winter or sunflowers for summer
- Character Adaptations: Modify the facial features to create different expressions or add glasses for a whimsical touch
Care Instructions for Your Crocheted Alpaca Planter
- Remove the plant pot before cleaning
- Spot clean with mild soap and water as needed
- Air dry thoroughly away from direct heat
- If using as a planter, be careful not to overwater your plant to prevent moisture damage to the yarn
- For longevity, consider using a plastic liner inside the clay pot to protect from water seepage
Check this out :Crochet a Buzzing Bee Amigurumi
Why Alpaca Planters Make Perfect Gifts
Alpacas are beloved for their gentle demeanor and adorable appearance, making this planter an ideal gift for various occasions:
- Housewarming presents for new homeowners
- Office desk accessories for coworkers
- Thoughtful gifts for plant enthusiasts
- Cheerful presents for alpaca and llama lovers
- Creative containers for gift cards or small items
Creating this charming alpaca planter combines practical functionality with adorable design. The project works up quickly and uses minimal materials, making it both economical and satisfying. Whether you’re making it for yourself or as a gift, this cute desk companion is sure to bring smiles and compliments.
Happy crocheting!
