

Table of Contents
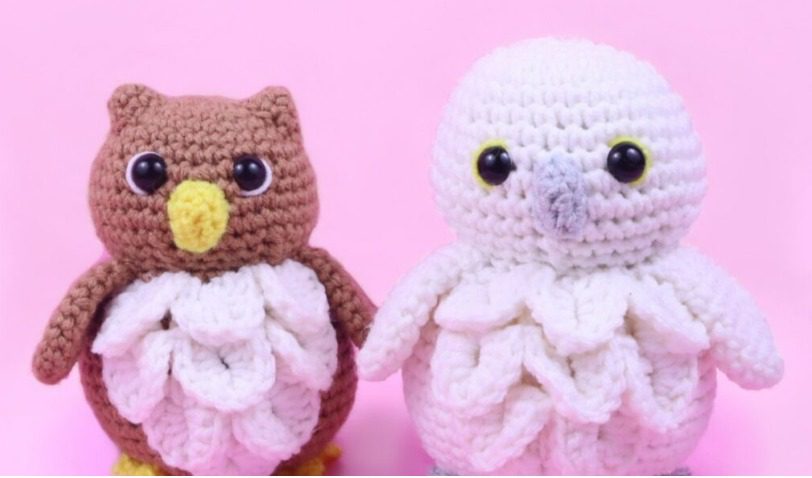
Looking to create Owl Amigurumi a wise and charming companion? This comprehensive amigurumi pattern guides you through creating two adorable owl variations—a classic brown owl and a stunning snow owl—using the same base Owl Amigurumi pattern. Perfect for beginners with some experience, these lovable birds feature textured feathers, expressive eyes, and cute details that bring them to life. Whether made as gifts, decorations, or additions to your handmade collection, these owl amigurumi are sure to be a hoot!
Introduction to Owl Amigurumi
This versatile pattern allows you to create two distinct owl varieties with minimal adjustments. What makes this design special is its seamless construction—the head and body are worked as one continuous piece, creating a well-proportioned and sturdy finished toy. The optional crocodile stitch feathers add beautiful texture and visual interest, while simple color changes transform the basic pattern into either a traditional brown owl or an elegant snow owl.
Owl Amigurumi Skill Level and Requirements
This pattern is rated as easy, though the optional feather section uses the crocodile stitch which may present a slight challenge for absolute beginners. To successfully complete these owl amigurumi, you should be comfortable with:
- Working in continuous rounds
- Basic increases and decreases
- Front loop only stitches
- Simple color changes
- Basic assembly techniques
- Crocodile stitch (for feathers – optional)
Owl Amigurumi Materials Needed
Before beginning your owl amigurumi project, gather these supplies:
- Medium weight (4) yarn in colors for your chosen owl variation:
- Brown Owl: Brown main color, white for feathers, yellow for beak, feet, and eye outline
- Snow Owl: White main color, white for feathers, grey for beak and feet, yellow for eye outline
- 4mm crochet hook
- 12mm safety eyes (one pair)
- Tapestry needle
- Scissors
- Polyester fiberfill stuffing
- Stitch markers
Owl Amigurumi Recommended Yarn Brands
For best results, consider using these yarn brands:
- JoAnn Fabric’s “Big Twist” Yarn
- Red Heart Super Saver Yarn
- Hobby Lobby’s “I Love This Yarn!”
Owl Amigurumi Crochet Terminology
This pattern uses standard US crochet terminology:
- Sc: Single crochet – the main stitch used throughout most of the pattern
- Inc: Increase – making two stitches in the same stitch
- Dec: Decrease – combining two stitches into one
- Dc: Double crochet – used for the feather sections
- Ch: Chain – used for creating extended sections and spaces
- FLO: Front loop only – creates texture and attachment points
- SlSt: Slip stitch – used for joining and creating contours
- St: Stitch
Owl Amigurumi Head and Body Instructions
Using your main color (brown for brown owl, white for snow owl):
Round 1: Create a magic ring and work 6 single crochet into it. (6 stitches) Round 2: Increase in each stitch around. (12 stitches) Round 3: Work [1 single crochet, 1 increase] 6 times. (18 stitches) Round 4: Work [2 single crochet, 1 increase] 6 times. (24 stitches) Round 5: Work [3 single crochet, 1 increase] 6 times. (30 stitches) Rounds 6-7: Single crochet in each stitch around. (30 stitches) Round 8: Work [4 single crochet, 1 increase] 6 times. (36 stitches)
At this point, place stitch markers in the 17th stitch and the 23rd stitch of Round 8 to mark eye positions.
Round 9: Single crochet in each stitch around. (36 stitches) Round 10: Work [5 single crochet, 1 increase] 6 times. (42 stitches) Round 11: Single crochet in each stitch around. (42 stitches) Round 12: Work [5 single crochet, 1 decrease] 6 times. (36 stitches) Round 13: Work [4 single crochet, 1 decrease] 6 times. (30 stitches)
Insert 12mm safety eyes at the marked positions from Round 8.
Round 14: Work [3 single crochet, 1 decrease] 6 times. (24 stitches) Round 15: Working in front loops only, single crochet in each stitch around. (24 stitches) Round 16: Working in both loops, work [3 single crochet, 1 increase] 6 times. (30 stitches) Round 17: Work [4 single crochet, 1 increase] 6 times. (36 stitches) Round 18: Work [5 single crochet, 1 increase] 6 times. (42 stitches) Rounds 19-27: Single crochet in each stitch around. (42 stitches)
Begin stuffing the head and body firmly at this point. Continue adding stuffing after each round.
Round 28: Work [5 single crochet, 1 decrease] 6 times. (36 stitches) Round 29: Work [4 single crochet, 1 decrease] 6 times. (30 stitches) Round 30: Work [3 single crochet, 1 decrease] 6 times. (24 stitches) Round 31: Work [2 single crochet, 1 decrease] 6 times. (18 stitches) Round 32: Work [1 single crochet, 1 decrease] 6 times. (12 stitches) Round 33: Decrease around. (6 stitches)
Fasten off, leaving a tail for closing. Sew the remaining opening closed and weave in the end.
Owl Amigurumi Arms Instructions (Make 2)
Using your main color (brown for brown owl, white for snow owl):
Round 1: Create a magic ring and work 6 single crochet into it. (6 stitches) Round 2: Single crochet in each stitch around. (6 stitches) Round 3: Increase in each stitch around. (12 stitches) Rounds 4-10: Single crochet in each stitch around. (12 stitches)
Fasten off, leaving a long tail for attaching to the body. Position the arms so that the top of each arm aligns with Round 16 of the body and the bottom aligns with Round 20. Sew in place.
Owl Amigurumi Beak Instructions
Using yellow yarn for brown owl or grey yarn for snow owl:
Round 1: Chain 5. Single crochet in the 2nd chain from hook. Place a stitch marker in this first single crochet. Single crochet in the next 3 chains. Turn your work to crochet along the opposite side of the foundation chain. Single crochet in 4 stitches. (8 stitches total, working around the chain) Round 2: Single crochet in each stitch around. (8 stitches)
Fasten off, leaving a long tail for attaching to the face. Position the beak centrally between the eyes and sew in place.
Ear Instructions (Make 2)
Using your main color (brown for brown owl, white for snow owl):
Round 1: Create a magic ring and work 6 single crochet into it. (6 stitches) Round 2: Single crochet in each stitch around. (6 stitches) Round 3: Work [1 single crochet, 1 increase] 3 times. (9 stitches)
Fasten off, leaving a long tail for attaching to the head. Position the ears on top of the head and sew in place.
Feathers Instructions (Optional)
Using white yarn for both owl variations:
The feathers utilize the crocodile stitch technique, which creates textured, overlapping scales that resemble feathers. This is an intermediate technique that adds beautiful dimension to your owl.
Row 1: Chain 4. Slip stitch to first chain to form a circle. Chain 3 (counts as 1 double crochet). Work 4 more double crochet into the circle. Chain 1, work 5 more double crochet into the circle.
Row 2: Chain 3. Double crochet into the side of the previous double crochet. Chain 1, double crochet into the middle space. Chain 1, double crochet into the next stitch. Double crochet into the last stitch.
Row 3: Chain 3. Without turning your work, create 4 double crochet going through the first double crochet post. Chain 1. Work 5 double crochet through the next double crochet post, turning your work so the hook goes from left to right through the post. Chain 1, slip stitch in the next double crochet. Chain 1, work 5 double crochet through the next double crochet post. Chain 1. Work 5 double crochet through the last double crochet post.
This creates your first row of crocodile stitches (also called “scales”).
Crocodile Stitch Technique Tips:
When working the first set of 5 double crochets for each scale, position your work so the current row is facing you. Work the double crochets into the double crochet post in a downward direction.
For the second set of 5 double crochets in the same scale, flip your work to the other side and work the double crochets in an upward direction. This creates the overlapping scale effect.
Continuing with the feathers:
Row 4: Chain 3. Work 1 double crochet into the side of the next double crochet. Chain 1. Double crochet into the next space. Chain 1. Double crochet 2 times in the next double crochet. Chain 1. Double crochet 1 time in the next space. Chain 1. Double crochet in the next 2 stitches.
Row 5: Chain 3 without turning. Work 4 double crochet through the first double crochet post. Chain 1. Work 5 double crochet through the next double crochet post. Slip stitch in the next double crochet. Chain 1. Create a crocodile stitch using the next 2 double crochet posts. Chain 1. Slip stitch in the next double crochet. Create another crocodile stitch using the next 2 double crochet posts.
Row 6: Chain 3. Work 2 double crochet in the next space. Chain 1. Double crochet between the next set of scales. Chain 1, work 2 double crochet into the next space. Chain 1, double crochet between the next set of scales. Chain 1, work 2 double crochet into the next space. Chain 1, double crochet into the very last stitch of the row.
Row 7: Chain 3. Skip the very first double crochet. Work 4 double crochet into the second double crochet of the row. Chain 1. Work 5 double crochet into the next double crochet. Slip stitch into the next double crochet. Create a crocodile stitch using the next 2 double crochet posts. Slip stitch in the next double crochet. Create another crocodile stitch using the next 2 double crochet posts. Slip stitch in the last double crochet.
Fasten off, leaving a long tail for attaching to the owl’s chest. Position the feathers centrally on the chest and sew in place.
Feet Instructions (Make 2)
Using yellow yarn for brown owl or grey yarn for snow owl:
Round 1: Create a magic ring and work 6 single crochet into it. (6 stitches) Round 2: Slip stitch to the first stitch. Repeat the following 3 times: [Single crochet in the next stitch, chain 2, slip stitch in 2nd chain from hook, slip stitch into the same stitch of Round 1]. Slip stitch in the next stitch. (11 stitches total)
Fasten off, leaving a long tail for attaching to the bottom of the owl. Position the feet at the bottom of the body and sew in place.
Eye Detail Instructions
Using white yarn for brown owl or yellow yarn for snow owl:
- Insert your needle with thread into the top right corner of the right eye.
- Pull the needle out 1 stitch over.
- Reinsert the needle into the bottom left corner of the right eye.
- Pull the needle out at the top left corner of the left eye.
- Reinsert the needle into the bottom right corner of the left eye.
- Pull the needle out a few stitches away.
- Tie the ends of yarn into firm knots and bring the yarn into the toy to hide the knots.
- Trim any excess yarn.
This creates a decorative outline around the eyes that gives your owl more character and expression.
Assembly Instructions
- Make sure the head and body are firmly stuffed.
- Attach the arms to the sides of the body, positioning the top of each arm at Round 16 and the bottom at Round 20.
- Sew the beak in place between the eyes.
- Attach the ears to the top of the head.
- If using the optional feathers, sew them to the center front of the owl’s chest.
- Attach the feet to the bottom of the body.
- Add the eye detail using embroidery yarn in the appropriate color.
- Check that all parts are securely attached and all yarn ends are woven in or hidden.
Color Variations for Different Owl Types
Brown Owl:
- Main body: Brown
- Feathers: White
- Beak and feet: Yellow
- Eye outline: Yellow
- Additional details: Consider adding brown speckles to the white feathers for a more realistic appearance
Snow Owl:
- Main body: White
- Feathers: White
- Beak and feet: Grey
- Eye outline: Yellow
- Additional details: You could add very light grey spots to mimic the natural patterns on snow owls
Customization Ideas
Make your owl amigurumi uniquely yours with these creative variations:
- Create a barn owl by using a warm tan color for the main body and white for the face
- Make a tiny baby owl by using a smaller hook and thinner yarn
- Add wire to the wings to make them poseable
- Embroider additional feather details on the body using a complementary color
- Create a family of owls in different sizes
- Add a small graduation cap for a “wise owl” theme
- Use glow-in-the-dark yarn for the eyes for a fun nighttime effect
- Create a holiday-themed owl with seasonal colors or small accessories
Troubleshooting Tips
- If your owl won’t sit properly, check that the bottom is stuffed firmly and evenly
- For the feathers section, practice the crocodile stitch on a small swatch before attempting it on your project
- If the eyes seem uneven, use pins to position them carefully before attaching permanently
- For a more defined chest area, stuff this section extra firmly
- If you’re struggling with the crocodile stitch, you can substitute it with regular textured stitches or even fabric feathers sewn on afterwards
Care Instructions
To keep your owl amigurumi looking its best:
- Spot clean with a damp cloth and mild soap as needed
- Allow to air dry completely
- For stubborn dirt, use a soft toothbrush to gently scrub
- Avoid machine washing or drying
- Store in a clean, dry place away from direct sunlight
- If feathers become flattened, gently reshape them with your fingers
Beyond the Basic Pattern
Once you’ve mastered this owl amigurumi pattern, consider these advanced options:
- Create a woodland scene with multiple owls in different poses
- Design a nest using brown yarn worked in loose, textured stitches
- Add LED lights inside (before stuffing) for a glowing nightlight owl
- Experiment with textured yarns for different feather effects
- Scale the pattern up to create a larger decorative owl
- Add sound elements, such as a small bell or crinkle material inside

Check this out :Colorful Clown Amigurumi Doll Crochet Pattern
Conclusion
Congratulations on completing your owl amigurumi! Whether you chose the classic brown owl or the majestic snow owl, you’ve created a charming character with personality and charm. The versatility of this pattern allows you to experiment with colors, textures, and details to create a unique handcrafted owl that’s perfect for display, gifting, or play.
The skills you’ve developed through this project—especially if you tackled the crocodile stitch feathers—will serve you well in future amigurumi projects. Each handmade owl has its own character and expression, making it a one-of-a-kind creation to treasure. Happy crocheting!
