

Table of Contents
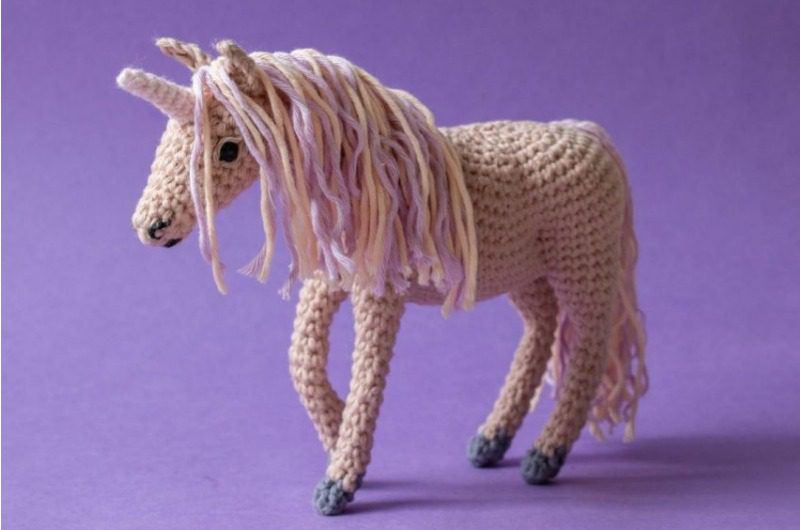
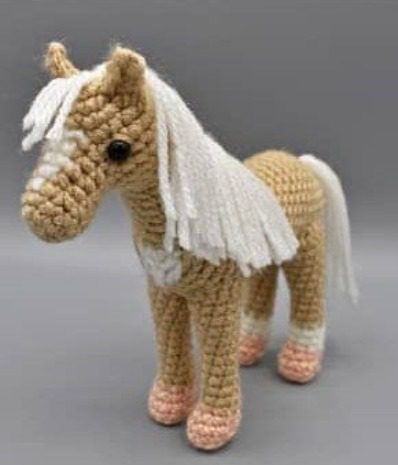
Creating Amigurumi Horse your own handmade toys brings a special joy, especially when you can craft something as charming as an amigurumi horse. This detailed guide walks you through every step of making your own cuddly equine friend that can stand on its own four hooves. Perfect for beginners and experienced crocheters alike, this pattern creates a delightful horse that can also be transformed into a magical unicorn with just a few additional steps.
What You Will Need for Your Amigurumi Horse
Before starting your crochet journey, gather these essential materials:
Amigurumi Horse Materials List
- Worsted weight yarn in 2-4 colors (main body color, hooves, and mane)
- DK/light worsted weight yarn for unicorn horn (optional)
- 3.5mm (E-4) crochet hook
- 2.5mm (B-1 or C-2) crochet hook for unicorn horn
- Yarn needle with bent tip
- Black embroidery floss
- Large-eyed sewing needle
- 7mm safety eyes
- Fiberfill stuffing
- Stitch marker
- Sewing pins
- 4 pipe cleaners or craft wire with PVC tape
- Small flat pliers (optional)
- Scissors
Understanding Amigurumi Horse Abbreviations
For those new to crochet patterns, here’s what the abbreviations mean:
- St – Stitch
- Sl st – Slip stitch
- Ch – Chain
- Sc – Single crochet
- Hdc – Half double crochet
- Inc – Single crochet increase (2 single crochet in same stitch)
- Dec – Invisible single crochet decrease
- BLO – Back loops only
Creating Your Amigurumi Horse Step by Step
Amigurumi Horse The Forelegs (Make 2)
The front legs provide stability and character to your horse. Note that these legs aren’t stuffed:
Round 1: Create a magic ring and work 8 single crochet stitches into it using your hoof color yarn. Pull the ring tight to close the circle. (8 stitches)
Round 2: Working in back loops only for this round: Make 2 decreases, single crochet in the next 3 stitches, then change to your body color yarn in the next stitch. (6 stitches)
Round 3: Single crochet in each stitch around the entire round. (6 stitches)
Round 4: Single crochet in the first 4 stitches, then increase in each of the next 2 stitches by working 2 single crochet into the same stitch. (8 stitches)
Round 5: Single crochet in the first 4 stitches, then work 2 decreases. (6 stitches)
Rounds 6-8: For each of these rounds, simply single crochet in every stitch around. (6 stitches per round)
Round 9: Work the following pattern twice: [single crochet in 2 stitches, increase in the next stitch]. (8 stitches)
Round 10: Work the following pattern twice: [single crochet in 2 stitches, decrease]. (6 stitches)
Round 11: Single crochet in every stitch around the entire round. (6 stitches)
Round 12: Single crochet in the first 5 stitches, then increase in the next stitch. (7 stitches)
Round 13: Single crochet in the first 6 stitches, then increase in the next stitch. (8 stitches)
Round 14: Single crochet in the first 7 stitches, then increase in the next stitch. (9 stitches)
Round 15: Single crochet in the first 8 stitches, then increase in the next stitch. (10 stitches)
Finishing: Slip stitch into the next stitch and fasten off. You don’t need a particularly long yarn end here.
Amigurumi Horse The Hind Legs (Make 2)
The hind legs follow a similar pattern to the forelegs at first but become larger toward the top:
Round 1: Create a magic ring and work 8 single crochet stitches into it using your hoof color yarn. Pull the ring tight to close the circle. (8 stitches)
Round 2: Working in back loops only for this round: Make 2 decreases, single crochet in the next 3 stitches, then change to your body color yarn in the next stitch. (6 stitches)
Round 3: Single crochet in each stitch around the entire round. (6 stitches)
Round 4: Single crochet in the first 4 stitches, then increase in each of the next 2 stitches by working 2 single crochet into the same stitch. (8 stitches)
Round 5: Single crochet in the first 4 stitches, then work 2 decreases. (6 stitches)
Rounds 6-8: For each of these rounds, simply single crochet in every stitch around. (6 stitches per round)
Round 9: Work the following pattern twice: [single crochet in 2 stitches, increase in the next stitch]. (8 stitches)
Round 10: Work the following pattern twice: [single crochet in 2 stitches, decrease]. (6 stitches)
Round 11: Single crochet in every stitch around the entire round. (6 stitches)
Round 12: Work the following pattern twice: [single crochet in 2 stitches, increase in the next stitch]. (8 stitches)
Round 13: Work the following pattern twice: [single crochet in 3 stitches, increase in the next stitch]. (10 stitches)
Round 14: Work the following pattern twice: [single crochet in 4 stitches, increase in the next stitch]. (12 stitches)
Round 15: Work the following pattern twice: [single crochet in 5 stitches, increase in the next stitch]. (14 stitches)
Round 16: Single crochet in all 14 stitches around the entire round. (14 stitches)
Finishing: Slip stitch into the next stitch and fasten off, leaving a slightly longer yarn end for later attachment.
Amigurumi Horse Creating the Belly
The belly connects all four legs and forms the foundation of your amigurumi horse:
Start: Chain 10 stitches using your body color yarn.
Round 1: Working along your chain, single crochet in the next 8 chains (starting from the second chain from your hook). When you reach the end chain, work 4 single crochet into this same chain to turn the corner. Then work along the opposite side of your starting chain, placing single crochet in the other side of the next 7 chains, and finish with 3 single crochet in the other side of the last chain. (22 stitches)
Round 2: Work the following pattern twice: [single crochet in 9 stitches, then increase in each of the next 2 stitches]. This shapes the oval base of your horse’s belly. (26 stitches)
Round 3: This critical round connects all four legs to the body. Work carefully:
- Single crochet in the first 10 stitches of the belly
- Attach the first foreleg by working single crochet through all 10 stitches of the leg
- Single crochet in the next 2 stitches of the belly
- Attach the second foreleg by working single crochet through all 10 stitches of that leg
- Single crochet in the next 11 stitches of the belly
- Attach the first hind leg by working single crochet through all 14 stitches of that leg
- Single crochet in the next 2 stitches of the belly
- Attach the second hind leg by working single crochet through all 14 stitches of that leg
- Single crochet in the final stitch of the belly This completes the attachment of all four legs to create the body framework. (74 stitches)
Round 4: Shape the body with strategic decreases:
- Single crochet in the next 9 stitches
- Work 3 stitches together (a triple decrease)
- Single crochet in the next 7 stitches
- Work 2 decreases
- Single crochet in the next 7 stitches
- Work 3 stitches together
- Single crochet in the next 9 stitches
- Work 3 stitches together
- Single crochet in the next 11 stitches
- Work 2 decreases
- Single crochet in the next 11 stitches
- Work 3 stitches together These decreases create the proper shaping for your horse’s body. (62 stitches)
Round 5: Begin strategic increases to continue shaping:
- Single crochet in the next 13 stitches
- Increase in the next stitch
- Single crochet in the next 8 stitches
- Increase in the next stitch
- Single crochet in the next 19 stitches
- Increase in the next stitch
- Single crochet in the next 2 stitches
- Increase in the next stitch
- Single crochet in the next 6 stitches
- Increase in the next stitch
- Single crochet in the next 2 stitches
- Increase in the next stitch
- Single crochet in the next 6 stitches (68 stitches)
Round 6: Continue shaping with precisely placed increases:
- Single crochet in the next 13 stitches
- Increase in the next stitch
- Single crochet in the next 10 stitches
- Increase in the next stitch
- Single crochet in the next 19 stitches
- Increase in the next stitch
- Single crochet in the next 4 stitches
- Increase in the next stitch
- Single crochet in the next 6 stitches
- Increase in the next stitch
- Single crochet in the next 4 stitches
- Increase in the next stitch
- Single crochet in the next 6 stitches (74 stitches)
Round 7: Final round of belly shaping:
- Single crochet in the next 14 stitches
- Increase in the next stitch
- Single crochet in the next 10 stitches
- Increase in the next stitch
- Single crochet in the next 21 stitches
- Increase in the next stitch
- Single crochet in the next 4 stitches
- Increase in the next stitch
- Single crochet in the next 8 stitches
- Increase in the next stitch
- Single crochet in the next 4 stitches
- Increase in the next stitch
- Single crochet in the next 7 stitches (80 stitches)
After completing round 7, secure your stitch and use the yarn ends from the legs to close any small gaps between the legs and belly with 1 or 2 stitches. Then weave in the yarn ends on the inside of the body.
Amigurumi Horse Strengthening the Legs
To ensure your horse stands firmly:
- Use pipe cleaners or craft wire to reinforce each leg
- For extra stability, double up pipe cleaners by twisting two pieces together
- Measure against the horse legs, adding an extra inch on each side to form loops for the hooves
- If using craft wire, wrap the sharp ends and loops with PVC tape for safety
- Insert the reinforcement into each leg, using your hook to navigate yarn ends if needed
Amigurumi Horse Completing the Body
After reinforcing the legs, continue shaping the body with precise decreases:
Round 8: Begin reducing the width of the body:
- Single crochet in the next 19 stitches
- Work 2 decreases
- Single crochet in the next 36 stitches
- Work 2 decreases
- Single crochet in the next 17 stitches (76 stitches)
Round 9: This round creates the neck opening:
- Single crochet in the next 15 stitches
- Chain 14 stitches
- Skip 10 stitches
- Single crochet in the next 31 stitches
- Work 2 decreases
- Single crochet in the next 16 stitches (78 stitches including your chain)
Round 10: Continue the body shaping:
- Single crochet in the next 4 stitches
- Decrease once
- Single crochet in the next 8 stitches
- Decrease once
- Single crochet in the next 12 chain stitches
- Decrease once
- Work the following pattern 3 times: [single crochet in the next 8 stitches, decrease once]
- Single crochet in the next 2 stitches
- Decrease once
- Single crochet in the next 8 stitches
- Decrease once
- Single crochet in the next 4 stitches (70 stitches)
Round 11: Further refine the body shape:
- Single crochet in the next 11 stitches
- Work the following pattern 4 times: [decrease once, single crochet in the next 2 stitches]
- Decrease once
- Single crochet in the next 25 stitches
- Decrease once
- Single crochet in the next 14 stitches (64 stitches)
Round 12: Continue decreasing:
- Single crochet in the next 3 stitches
- Decrease once
- Work the following pattern 7 times: [single crochet in the next 6 stitches, decrease once]
- Single crochet in the next 3 stitches (56 stitches)
Round 13: Evenly decrease around:
- Work the following pattern 8 times: [single crochet in the next 5 stitches, decrease once] (48 stitches)
Round 14: Further refine the shape:
- Single crochet in the next 2 stitches
- Decrease once
- Work the following pattern 7 times: [single crochet in the next 4 stitches, decrease once]
- Single crochet in the next 2 stitches (40 stitches)
Round 15: Continue decreasing evenly:
- Work the following pattern 8 times: [single crochet in the next 3 stitches, decrease once] (32 stitches)
Stuffing: At this point, fill the body with fiberfill, making sure to fill the top of the hind legs first. Don’t worry about properly filling the front of the body yet.
Round 16: Decrease for closing:
- Single crochet in the next stitch
- Decrease once
- Work the following pattern 7 times: [single crochet in the next 2 stitches, decrease once]
- Single crochet in the next stitch (24 stitches)
Round 17: Continue closing:
- Work the following pattern 8 times: [single crochet in the next stitch, decrease once] (16 stitches)
Round 18: Final closing round:
- Decrease 8 times around (8 stitches)
Fasten off, leaving an extra long yarn end for sewing. Don’t close the round yet – this will be done later when giving the body more definition.
Creating the Neck and Head
The neck extends directly from the body opening:
Neck Round 1-2: Single crochet in all 24 stitches for two rounds (includes 10 single crochet stitches and 14 chain stitches from the body opening). (24 stitches per round)
Neck Round 3: Single crochet in the first 5 stitches, decrease once, single crochet in the remaining 17 stitches. (23 stitches)
Stuffing: At this point, fill the front of the body properly, ensuring the tops of the forelegs are slightly filled as well.
Neck Round 4-5: Single crochet in all 23 stitches for two rounds. (23 stitches per round)
Neck Round 6: Single crochet in the first 5 stitches, decrease once, single crochet in the remaining 16 stitches. (22 stitches)
Neck Round 7: Single crochet in the first 4 stitches, decrease once, single crochet in the remaining 16 stitches. (21 stitches)
Neck Round 8: Work the following pattern 3 times: [single crochet in the next 5 stitches, decrease once]. (18 stitches)
Fasten off, leaving a long yarn end for sewing the head to the neck.
Head Creation:
Before beginning the head, set aside two 20cm/8″ pieces of yarn in the same color as the body for the eyelids.
Head Round 1: Create a magic ring and work 6 single crochet into it. (6 stitches)
Head Round 2: Increase in all 6 stitches around. (12 stitches)
Head Round 3: Single crochet in the first 6 stitches, decrease 3 times. (9 stitches)
Head Round 4: Single crochet in the first 6 stitches, increase in each of the next 3 stitches. (12 stitches)
Head Round 5: Work the following pattern 3 times: [single crochet in the next 3 stitches, increase in the next stitch]. (15 stitches)
Head Round 6-7: Single crochet in all 15 stitches for two rounds. (15 stitches per round)
Head Round 8: Work the following pattern 3 times: [single crochet in the next 4 stitches, increase in the next stitch]. (18 stitches)
Head Round 9: Single crochet in all 18 stitches. (18 stitches)
Head Round 10: Work the following pattern 3 times: [single crochet in the next 5 stitches, increase in the next stitch]. (21 stitches)
Head Round 11-12: Single crochet in all 21 stitches for two rounds. (21 stitches per round)
Head Round 13: Work the following pattern 3 times: [single crochet in the next 5 stitches, decrease once]. (18 stitches)
Eye Placement: Insert the safety eyes between rounds 9 and 10 with about 5 stitches space between them. Don’t secure them completely yet.
Eyelid Embroidery: Using the reserved yarn pieces, create eyelids by stitching from inside the head to the outer corner of each eye, then to the inner corner, moving below the eye for the lower eyelid. Repeat above the eye for the upper eyelid. Tie the yarn ends together inside the head and trim.
Secure the safety eyes completely, ensuring they don’t cover the eyelids. Fill the head with fiberfill before continuing.
Head Round 14: Work the following pattern 3 times: [single crochet in the next 4 stitches, decrease once]. (15 stitches)
Head Round 15: Work the following pattern 3 times: [single crochet in the next 3 stitches, decrease once]. (12 stitches)
Head Round 16: Decrease 6 times around. (6 stitches)
Fasten off, close the round securely, and weave in the yarn end.
Adding Final Details
Finish your amigurumi horse with these important details:
Creating the Ears (Make 2):
- Chain 5 stitches using your body color yarn
- Slip stitch in the 2nd chain from hook
- Single crochet in the next chain
- Half double crochet in the final 2 chains (4 stitches total)
- Fasten off, leaving a long yarn end for sewing
Creating the Horn (Optional for Unicorn Version): Using DK/light worsted weight yarn and your 2.5mm hook:
- Horn Round 1: Create a magic ring and work 4 single crochet into it. (4 stitches)
- Horn Round 2: Single crochet in all 4 stitches. (4 stitches)
- Horn Round 3: Increase in first stitch, single crochet in remaining 3 stitches. (5 stitches)
- Horn Round 4: Single crochet in all 5 stitches. (5 stitches)
- Horn Round 5: Increase in first stitch, single crochet in remaining 4 stitches. (6 stitches)
- Horn Round 6: Single crochet in all 6 stitches. (6 stitches)
- Horn Round 7: Increase in first stitch, single crochet in remaining 5 stitches. (7 stitches)
- Fasten off, leaving a long yarn end for sewing
Assembly Process:
- Attach the Ears: Sew the ears onto the head between rounds 12 and 13, with approximately 2 stitches space between them. Weave in the yarn ends securely.
- Attach the Horn (for Unicorn): If making a unicorn, sew the horn centered on the head between rounds 9 and 11. Stitch the yarn end through to the back of the head and weave it in where it will be covered by the neck.
- Joining Head and Neck: Fill the neck with fiberfill and sew the head onto the neck. Position the head at a slightly wider than 90-degree angle to the neck for a natural pose.
- Finishing the Body: Close the opening on the back of the body and use the long yarn end to shape the body with strategic stitches for definition.
- Creating the Tail:
- Cut 16 pieces of mane-colored yarn, each slightly more than twice the length you want for the finished tail
- Divide into 4 groups of 4 strands each
- Attach each group just above the horse’s rump in a row:
- Use your hook to pull the center of each strand group through a stitch
- Pull the ends of the yarn through the loop created
- Pull tight to secure
- Creating the Mane:
- Cut approximately 30 pieces of mane-colored yarn, each slightly more than twice the desired finished length
- Divide into 15 groups of 2 strands each
- Attach along the top of the neck in a row:
- Use your hook to pull the center of each strand group through a stitch
- Pull the ends of the yarn through the loop created
- Pull tight to secure
- Finishing Touches: Trim the mane and tail to your desired length. For a fluffier effect, you can split the yarn strands.
Your amigurumi horse or unicorn is now complete and ready for display or play!
Customizing Your Amigurumi Horse
Get creative with your equine friend:
- Choose different yarn colors for traditional horses or fantasy-colored unicorns
- Vary the mane and tail lengths for different looks
- Split the yarn strands for a fluffier mane and tail texture
- Add small accessories like a saddle or bridle for even more personality
Common Questions About Amigurumi Horses
How long does it take to make an amigurumi horse?
Most crocheters can complete this project in 4-6 hours, though beginners might need additional time to master some of the techniques.
Can I make this amigurumi horse without wire supports?
While possible, the wire supports help your horse stand independently. Without them, your horse will be more suited for display rather than play.
What skill level is required for this pattern?
This pattern is suitable for intermediate crocheters who understand basic stitches and can follow a pattern. Beginners can attempt it with patience and perhaps some video guidance.
How big is the finished amigurumi horse?
The completed horse stands approximately 9-10 inches tall, making it perfect for display or gentle play.
Check this out :Classic Smurf Amigurumi Pattern
Conclusion
Creating your own amigurumi horse brings together creativity, craftsmanship, and patience. The result is a charming handmade toy with personality and character. Whether you’re making it as a gift or for your own collection, this amigurumi horse pattern provides all the guidance you need to create a beautiful crocheted companion that will delight for years to come.
Happy crocheting!
