

Table of Contents
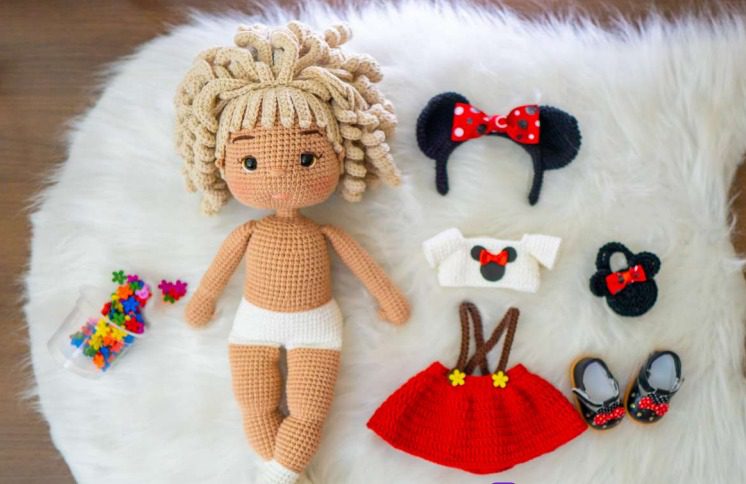
Creating Doll a handmade crochet doll with changeable outfits offers endless creative possibilities and makes for a truly special gift. This comprehensive tutorial guides you through crafting an adorable crochet doll with curly blonde hair and a delightful mouse-inspired outfit set including a red skirt, polka dot accessories, mouse ears, and charming shoes. Whether you’re an intermediate crocheter looking to expand your skills or an experienced maker seeking a fun project, this pattern provides clear instructions to bring this lovable doll and her accessories to life.
Materials Needed for Your Crochet Doll Project
Before beginning your crochet journey, gather these essential materials:
For the Doll:
- Light skin tone cotton yarn for the body (approximately 100g)
- Beige or blonde cotton yarn for the hair (approximately 75g)
- White cotton yarn for undergarments
- Skin tone or flesh-colored embroidery thread for facial details
- Black yarn or embroidery thread for eyes and details
- Fiberfill stuffing
For the Mouse Outfit Set:
- Red cotton yarn for the skirt
- White cotton yarn for the top
- Black cotton yarn for ears, bag, and accessories
- Red yarn with white polka dots or red yarn with white embroidery thread
- Small amount of yellow yarn for accents
Tools Required:
- Crochet hooks sizes 2.0mm to 3.5mm (adjust as needed for your tension)
- Yarn needle for assembly and embroidery
- Scissors
- Stitch markers
- Small black buttons (optional for eyes)
- Small red bow or ribbon
- Small amount of cardboard for stabilizing shoes (optional)
Understanding the Basic Techniques
Throughout this pattern, you will use these essential techniques:
- Magic ring: For starting circular pieces
- Single crochet: The primary stitch used throughout
- Half double crochet and double crochet: For texture variations
- Increase: Working two stitches in one stitch
- Decrease: Combining two stitches to reduce
- Working in continuous spiral rounds
- Surface embroidery for facial features
Each round instruction will include the total stitch count in parentheses to help you track your progress.
Creating the Doll’s Body
Head and Face
Round 1: Begin with a magic ring and work 6 single crochets into the ring (6) Round 2: Increase in each stitch around (12) Round 3: Work 1 single crochet, increase repeat around (18) Round 4: Work 2 single crochets, increase repeat around (24) Round 5: Work 3 single crochets, increase repeat around (30) Round 6: Work 4 single crochets, increase repeat around (36) Round 7: Work 5 single crochets, increase repeat around (42) Round 8: Work 6 single crochets, increase repeat around (48) Round 9: Work 7 single crochets, increase repeat around (54) Rounds 10-18: Single crochet in each stitch around (54)
Begin decreasing to form the chin: Round 19: Work 7 single crochets, decrease repeat around (48) Round 20: Work 6 single crochets, decrease repeat around (42) Round 21: Work 5 single crochets, decrease repeat around (36) Round 22: Work 4 single crochets, decrease repeat around (30) Round 23: Work 3 single crochets, decrease repeat around (24) Round 24: Work 2 single crochets, decrease repeat around (18)
Stuff the head firmly but not too tightly, ensuring even distribution with special attention to forming rounded cheeks.
Torso
Round 1: Begin with a magic ring and work 6 single crochets into the ring (6) Round 2: Increase in each stitch around (12) Round 3: Work 1 single crochet, increase repeat around (18) Round 4: Work 2 single crochets, increase repeat around (24) Round 5: Work 3 single crochets, increase repeat around (30) Rounds 6-15: Single crochet in each stitch around (30)
Decrease for the waist: Round 16: Work 3 single crochets, decrease repeat around (24) Rounds 17-19: Single crochet in each stitch around (24)
Create the hip shape: Round 20: Work 3 single crochets, increase repeat around (30) Rounds 21-23: Single crochet in each stitch around (30)
Close with decreases: Round 24: Work 3 single crochets, decrease repeat around (24) Round 25: Work 2 single crochets, decrease repeat around (18) Round 26: Work 1 single crochet, decrease repeat around (12)
Stuff the body firmly, with special attention to the neck and hip areas. Fasten off, leaving a long tail for attaching to the head.
Arms (Make 2)
Round 1: With skin tone yarn, begin with a magic ring and work 6 single crochets into the ring (6) Round 2: Increase in each stitch around (12) Rounds 3-5: Single crochet in each stitch around (12) Round 6: Decrease once, single crochet in each remaining stitch (11) Rounds 7-20: Single crochet in each stitch around (11)
Stuff the arms lightly, more firmly at the hands and less at the upper arms for better posing. Fasten off, leaving a long tail for sewing to the body.
Legs (Make 2)
Round 1: With skin tone yarn, begin with a magic ring and work 6 single crochets into the ring (6) Round 2: Increase in each stitch around (12) Round 3: Work 1 single crochet, increase repeat around (18) Rounds 4-6: Single crochet in each stitch around (18)
For the ankles: Round 7: Work 4 single crochets, decrease repeat around (15) Round 8: Single crochet in each stitch around (15)
For the knees and thighs: Rounds 9-22: Single crochet in each stitch around (15)
Create white underwear section: Rounds 23-25: Switch to white yarn, single crochet in each stitch around (15)
Stuff legs firmly, especially in the feet for stability. Fasten off, leaving a long tail for sewing to the body.
Creating the Curly Blonde Hair
The doll’s distinctive curly hair requires patience but gives wonderful results:
- Create a base cap: Round 1: With blonde yarn, begin with a magic ring and work 6 single crochets into the ring (6) Round 2: Increase in each stitch around (12) Round 3: Work 1 single crochet, increase repeat around (18) Round 4: Work 2 single crochets, increase repeat around (24) Round 5: Work 3 single crochets, increase repeat around (30) Round 6: Work 4 single crochets, increase repeat around (36) Round 7: Work 5 single crochets, increase repeat around (42) Round 8: Work 6 single crochets, increase repeat around (48) Round 9: Work 7 single crochets, increase repeat around (54) Rounds 10-12: Single crochet in each stitch around (54)
- For the curls:
- Cut approximately 150-200 strands of blonde yarn, each about 15-20cm long
- For each curl: Chain 15, then starting from the second chain from the hook, work single crochet back down the chain
- This creates a tight spiral that forms a curl
- Attach completed curls to the base cap by sewing them securely
- Start from the bottom edge of the cap and work upward, placing curls close together
- For the top of the head, create slightly shorter curls
- Position curls around the entire head, focusing on creating volume at the crown
Facial Features and Details
These details bring your doll to life:
- Eyes placement:
- Position eyes between rounds 13-15, approximately 6-8 stitches apart
- Embroider oval-shaped eyes with black thread
- Add white highlight stitches for sparkle and depth
- Create eyelashes with small straight stitches at the outer corners
- Create the perfect expression:
- Embroider a small nose with a few stitches in flesh-colored thread
- Add a simple smiling mouth with the same thread
- Create subtle eyebrows above the eyes
Creating the Mouse Inspired Outfit Set
Red Skirt with Suspenders
- For the skirt: Round 1: With red yarn, chain 48 and join with a slip stitch to form a ring Round 2: Chain 3 (counts as first double crochet), double crochet in each chain around, join with slip stitch to top of starting chain (48) Rounds 3-12: Chain 3, double crochet in each stitch around, join with slip stitch (48) Add a decorative edge: Round 13: Chain 1, single crochet, chain 1, skip 1 stitch repeat around, join with slip stitch (24 single crochets with chain spaces between)
- For the suspenders (make 2): Row 1: With red yarn, chain 30 Row 2: Starting from second chain from hook, single crochet in each chain (29) Row 3: Chain 1, turn, single crochet across (29) Attach suspenders to the back of the skirt, cross them over the shoulders, and secure to the front of the skirt. Add small yellow flower buttons at the attachment points.
White Top with Mouse Design
Row 1: With white yarn, chain 30, join to form a ring Row 2: Chain 1, single crochet in each chain around (30) Rows 3-8: Chain 1, single crochet in each stitch around (30)
For the sleeves: Row 9: Chain 1, single crochet 7, chain 4 (to create armhole), skip 4 stitches, single crochet 8, chain 4, skip 4 stitches, single crochet 7 (30 including chains) Row 10: Chain 1, single crochet in each stitch and chain around (30) Rows 11-12: Chain 1, single crochet in each stitch around (30)
With black yarn, embroider or crochet a small mouse silhouette on the front center of the shirt, adding a small red bow detail.
Mouse Ears Headband
- For the headband: Row 1: With black yarn, chain 40 Row 2: Starting from second chain from hook, single crochet in each chain (39) Row 3: Chain 1, turn, single crochet across (39) Fold in half lengthwise and sew edges together to form a tube. Shape into a circle and sew ends together.
- For each ear (make 2): Round 1: With black yarn, begin with a magic ring and work 6 single crochets into the ring (6) Round 2: Increase in each stitch around (12) Round 3: Work 1 single crochet, increase repeat around (18) Round 4: Work 2 single crochets, increase repeat around (24) Round 5: Single crochet in each stitch around (24) Fold each ear in half and sew the straight edge. Attach ears to the headband.
- For the bow: Cut a small red fabric bow with white polka dots, or crochet one with red yarn and add white dots with embroidery. Attach to the center of the headband between the ears.
Mini Mouse Handbag
Round 1: With black yarn, begin with a magic ring and work 6 single crochets into the ring (6) Round 2: Increase in each stitch around (12) Round 3: Work 1 single crochet, increase repeat around (18) Round 4: Work 2 single crochets, increase repeat around (24) Rounds 5-10: Single crochet in each stitch around (24)
For the handle: Chain 20, attach to opposite side of bag with slip stitch. Add a small red bow to the front of the bag.
Polka Dot Shoes
For each shoe: Round 1: With black yarn, begin with a magic ring and work 6 single crochets into the ring (6) Round 2: Increase in each stitch around (12) Round 3: Work 1 single crochet, increase repeat around (18) Round 4: Working in back loops only, single crochet in each stitch around (18) Rounds 5-6: Single crochet in each stitch around (18)
For the opening: Round 7: Single crochet 12, turn (leaving 6 stitches unworked) Rows 8-10: Chain 1, turn, single crochet across (12)
Add a red polka dot bow to each shoe. For stability, cut a small piece of cardboard to fit inside each shoe.
Assembly and Finishing Touches
Bring your doll to life by carefully assembling all components:
- Sew the head to the body securely.
- Attach arms to the sides of the body at approximately round 6.
- Attach legs to the bottom of the body.
- Sew the hair cap to the head, ensuring it covers the entire scalp area.
- Dress your doll in the white top first, then add the red skirt with suspenders.
- Place the mouse ears headband on the doll’s head.
- Add the mouse handbag and shoes as final accessories.
Creative Variations and Ideas
Consider these creative options to personalize your doll:
- Create additional outfits for different themes and occasions
- Make a matching mouse character companion
- Vary hair color and style for different looks
- Add miniature accessories like a tiny ice cream cone as shown in the image
- Create seasonal variations with themed outfits
Check this out :Crochet Panda Bag Pattern
Care Instructions for Your Crochet Doll
To maintain your doll’s appearance:
- Spot clean with mild soap and water when necessary
- Allow to air dry completely
- Gently brush hair with a small comb as needed
- Keep away from direct sunlight to prevent color fading
- Store outfit pieces in a small bag when not in use to prevent losing them
Your adorable crochet doll with mouse-inspired outfit set is now complete! This charming creation combines classic doll styling with delightful themed accessories, creating a unique handmade treasure perfect for play or display. The detailed outfit pieces allow for creative costume changes while the doll’s sweet expression and distinctive curly hair give her a personality all her own.
Happy crocheting, and enjoy creating your special doll!
