

Table of Contents
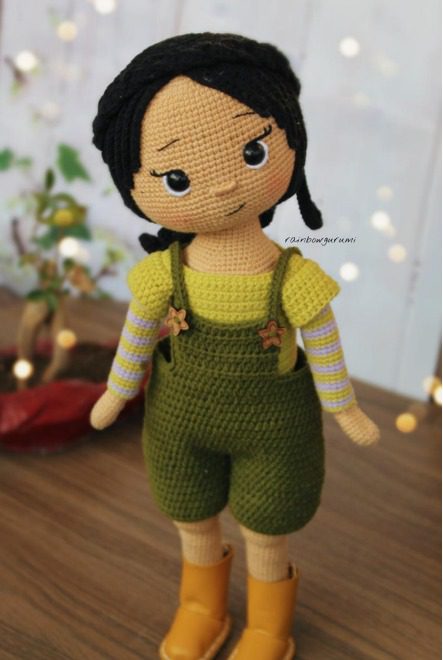
Creating Doll handmade crochet dolls brings immense joy to crafters and becomes a cherished keepsake for recipients. This comprehensive tutorial guides you through creating a charming crochet doll featuring stylish green overalls, a cheerful yellow striped shirt, and beautiful black hair styled in braids. Perfect for intermediate crocheters looking to enhance their amigurumi skills, this project combines basic techniques with delightful details to create a truly special handmade treasure.
Materials Needed for Your Crochet Doll
Before beginning your crochet journey, gather these essential materials:
Main Yarns:
- Light brown or tan cotton yarn for the head and body
- Black cotton yarn for the hair
- Olive green cotton yarn for the overalls
- Yellow cotton yarn for the shirt
- White and yellow striped or variegated yarn for shirt sleeves
- Light beige or cream yarn for legs
- Golden yellow yarn for boots
- Small amount of brown yarn for accessories
Tools Required:
- Crochet hooks sizes 2.0mm to 3.0mm (adjust as needed for your tension)
- Yarn needle for assembly and embroidery
- Fiberfill stuffing for body parts
- Safety eyes (8-10mm size) or black yarn for embroidered eyes
- Embroidery thread for facial features
- Scissors
- Stitch markers
- Wire for structural support (optional)
Doll Understanding the Basic Techniques
This pattern uses standard amigurumi techniques including:
- Magic ring: The foundation for beginning most round pieces
- Single crochet: The primary stitch used throughout
- Increase: Working two single crochets in one stitch
- Decrease: Working two stitches together invisibly
- Working in continuous spiral rounds
- Surface embroidery for facial features
Each round instruction will conclude with the total stitch count in parentheses to help you track your progress.
Creating the Doll’s Head
The head forms the foundation of your doll’s character and expression:
Round 1: Begin with a magic ring and work 6 single crochets into the ring (6) Round 2: Increase in each stitch around (12) Round 3: Work 1 single crochet, increase repeat around (18) Round 4: Work 2 single crochets, increase repeat around (24) Round 5: Work 3 single crochets, increase repeat around (30) Round 6: Work 4 single crochets, increase repeat around (36) Round 7: Work 5 single crochets, increase repeat around (42) Round 8: Work 6 single crochets, increase repeat around (48) Round 9: Work 7 single crochets, increase repeat around (54) Rounds 10-18: Single crochet in each stitch around (54) – these even rounds develop the facial structure
Begin decreasing to form the chin and neck area: Round 19: Work 7 single crochets, decrease repeat around (48) Round 20: Work 6 single crochets, decrease repeat around (42) Round 21: Work 5 single crochets, decrease repeat around (36) Round 22: Work 4 single crochets, decrease repeat around (30) Round 23: Work 3 single crochets, decrease repeat around (24) Round 24: Work 2 single crochets, decrease repeat around (18) Round 25: Work 1 single crochet, decrease repeat around (12)
Stuff the head firmly but not too tightly. Pay particular attention to creating smooth, rounded cheeks while keeping the stuffing evenly distributed.
Crafting the Body
The body should be well-proportioned to match the head:
Round 1: Begin with a magic ring and work 6 single crochets into the ring (6) Round 2: Increase in each stitch around (12) Round 3: Work 1 single crochet, increase repeat around (18) Round 4: Work 2 single crochets, increase repeat around (24) Round 5: Work 3 single crochets, increase repeat around (30) Round 6: Work 4 single crochets, increase repeat around (36) Rounds 7-15: Single crochet in each stitch around (36)
Shape the waist area: Round 16: Work 4 single crochets, decrease repeat around (30) Rounds 17-18: Single crochet in each stitch around (30)
Shape the hips: Round 19: Work 4 single crochets, increase repeat around (36) Rounds 20-25: Single crochet in each stitch around (36)
Close with decreases: Round 26: Work 4 single crochets, decrease repeat around (30) Round 27: Work 3 single crochets, decrease repeat around (24) Round 28: Work 2 single crochets, decrease repeat around (18) Round 29: Work 1 single crochet, decrease repeat around (12) Round 30: Decrease around (6)
Stuff the body firmly, with special attention to the neck area where it will join to the head. Fasten off, leaving a long tail for sewing to the head.
Creating the Arms
Make two identical arms:
Round 1: With light brown yarn, begin with a magic ring and work 6 single crochets into the ring (6) Round 2: Increase in each stitch around (12) Round 3: Single crochet in each stitch around (12) Round 4: Work 4 single crochets, decrease repeat around (10) Rounds 5-25: Single crochet in each stitch around (10)
Stuff the arms lightly, with more stuffing at the hand area and less in the upper arm to allow for better positioning. Fasten off, leaving a long tail for sewing to the body.
Shaping the Legs and Boots
Create the legs in two colors – light beige for the legs and golden yellow for the boots:
Round 1: With golden yellow yarn, begin with a magic ring and work 6 single crochets into the ring (6) Round 2: Increase in each stitch around (12) Round 3: Work 1 single crochet, increase repeat around (18) Round 4: Working in back loops only, single crochet in each stitch around (18) Rounds 5-7: Single crochet in each stitch around (18)
For the ankle: Round 8: Work 7 single crochets, decrease repeat around (16) Round 9: Work 6 single crochets, decrease repeat around (14)
Switch to light beige yarn for legs: Rounds 10-25: Single crochet in each stitch around (14)
Stuff the legs firmly, especially in the feet to help the doll stand sturdily. Fasten off, leaving a long tail for sewing to the body.
Creating the Green Overalls
The overalls are worked in pieces and then assembled:
Front Bib: Row 1: With olive green yarn, chain 12, single crochet in second chain from hook and in each chain across (11) Rows 2-6: Chain 1, turn, single crochet across (11)
Overall Main Piece: Round 1: With olive green yarn, chain 36 and join with a slip stitch to form a ring Round 2: Single crochet in each chain around (36) Rounds 3-5: Single crochet in each stitch around (36)
Create the leg openings: Round 6: Work 18 single crochets, chain 3, skip 6 stitches, work 6 single crochets, chain 3, skip 6 stitches, work 6 single crochets (36 including chains) Round 7: Single crochet in each stitch and chain around (36) Rounds 8-12: Single crochet in each stitch around (36)
Shape the waist: Round 13: Work 4 single crochets, decrease repeat around (30) Rounds 14-16: Single crochet in each stitch around (30)
Create openings for straps: Round 17: Work 8 single crochets, chain 2, skip 2 stitches, work 10 single crochets, chain 2, skip 2 stitches, work 8 single crochets (30 including chains) Round 18: Single crochet in each stitch and chain around (30)
Straps (make 2): Row 1: With olive green yarn, chain 30 Row 2: Starting from second chain from hook, single crochet in each chain across (29) Row 3: Chain 1, turn, single crochet across (29)
Creating the Yellow Shirt
The shirt is worked from top to bottom:
Round 1: With yellow yarn, chain 30 and join with a slip stitch to form a ring Round 2: Single crochet in each chain around (30) Rounds 3-4: Single crochet in each stitch around (30)
For the sleeves: Round 5: Work 6 single crochets, chain 6, skip 6 stitches, work 12 single crochets, chain 6, skip 6 stitches, work 6 single crochets (30 including chains) Round 6: Single crochet in each stitch and chain around (30) Rounds 7-10: Single crochet in each stitch around (30)
Sleeves (make 2): Round 1: With yellow yarn, join to sleeve opening, work 15 single crochets evenly around the opening (15) Round 2: Single crochet in each stitch around (15)
Switch to striped yarn for the sleeve pattern: Rounds 3-10: Alternate 2 rounds of yellow with 2 rounds of white to create stripes, maintaining 15 single crochets in each round
Creating the Black Braided Hair
The hair requires patience but gives your doll distinctive character:
- Create a base cap: Round 1: With black yarn, begin with a magic ring and work 6 single crochets into the ring (6) Round 2: Increase in each stitch around (12) Round 3: Work 1 single crochet, increase repeat around (18) Round 4: Work 2 single crochets, increase repeat around (24) Round 5: Work 3 single crochets, increase repeat around (30) Round 6: Work 4 single crochets, increase repeat around (36) Round 7: Work 5 single crochets, increase repeat around (42) Round 8: Work 6 single crochets, increase repeat around (48) Round 9: Work 7 single crochets, increase repeat around (54) Rounds 10-12: Single crochet in each stitch around (54)
- For the braids (make 2):
- Cut 30 strands of black yarn, each about 40cm long
- Fold strands in half and attach to sides of head
- Divide into three equal sections and braid
- Secure ends with small pieces of yarn
- For the bangs and additional hair:
- Cut shorter strands (about 20cm) for the front
- Attach these across the front hairline
- For side hair, add more strands and trim as needed
Facial Features and Finishing Touches
These details bring your doll to life:
- Eyes placement:
- Position safety eyes between rounds 12-14, approximately 8-10 stitches apart
- If embroidering eyes, create almond shapes with black thread
- Add white highlight stitches for sparkle
- Embroider eyelashes extending from the upper outer corners
- Create the perfect expression:
- Embroider eyebrows with thin curved lines above the eyes
- Add a small embroidered nose with brown or black thread
- Create a subtle smile or neutral expression with a few simple stitches
- Accessories:
- Create a small star appliqué with brown yarn for the overalls
- Attach to one strap of the overalls
- Assembly:
- Attach the head to the body securely
- Sew arms to the sides of the body around round 7-8
- Attach legs to the bottom of the body
- Place the yellow shirt on the doll
- Add the overalls over the shirt
- Sew the bib to the front of the overalls
- Attach the straps from the back of the overalls, cross them over the shoulders, and secure to the front bib
- Add the star accessory to one strap
Check this out :Crochet a Strawberry Princess Doll
Care Instructions for Your Crochet Doll
To maintain your doll’s appearance:
- Spot clean with mild soap and water when necessary
- Allow to air dry completely
- Gently brush hair with a small comb as needed
- Keep away from direct sunlight to prevent color fading
- If safety eyes were used, keep away from very young children
Your crochet doll with green overalls and yellow shirt is now complete! This charming creation showcases your crochet skills and makes a delightful gift or keepsake. Each stitch contributes to the personality and character of your unique handmade treasure.
Remember that while following patterns is important, adding your personal creative touches makes your doll truly special. Don’t hesitate to experiment with color variations, hairstyles, or outfit details to create a one-of-a-kind creation that reflects your personal style.
Happy crocheting, and enjoy your beautiful handmade doll!
