

Table of Contents
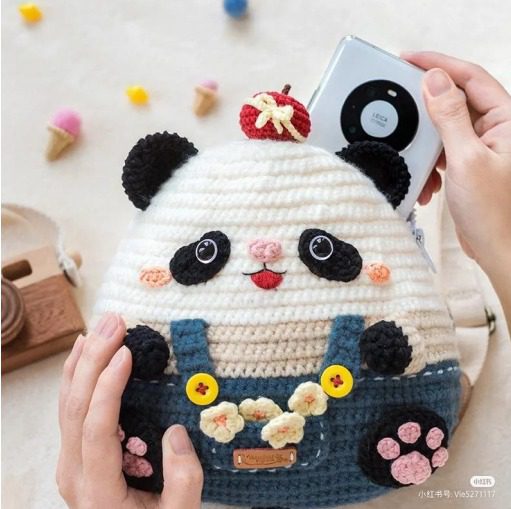
Creating a charming and functional crochet panda bag brings joy to crafters of all skill levels. This adorable panda-shaped bag combines whimsical design with practical functionality, making it the perfect accessory for carrying small items or as a delightful gift for panda enthusiasts. Complete with cute details like an apple charm, flower embellishments, and signature panda paws, this project showcases your crochet skills while resulting in a truly unique handmade creation.
This Panda Bag comprehensive tutorial guides you through each step of creating your own panda bag, from selecting materials to assembling the final details. Whether you’re an intermediate crocheter looking to enhance your amigurumi skills or an experienced maker seeking a fun project, this pattern provides clear instructions to help bring this lovable panda bag to life.
Panda Bag Materials Needed
Before beginning your crochet journey, gather these essential materials:
Main Yarns:
- White worsted weight cotton yarn (approximately 150g) for the panda body
- Black worsted weight cotton yarn (approximately 50g) for panda ears, eyes, and paws
- Navy blue or denim blue worsted weight cotton yarn (approximately 100g) for the pocket and bottom section
- Small amounts of red, pink, peach, and yellow yarn for decorative elements
- Brown or tan yarn for small accents
Tools Required:
- Crochet hooks sizes 4.0mm to 5.0mm (adjust as needed for your tension)
- Yarn needle for assembly and embroidery
- Fiberfill stuffing (small amount for dimensionality in certain areas)
- Scissors
- Stitch markers
- Yellow buttons (2) for pocket decoration
- Small leather label (optional)
- Zipper appropriate for the top opening (approximately 20-25cm)
- Fabric lining material (optional)
Understanding Crochet Techniques for This Project
Throughout this pattern, you will use several essential techniques:
- Magic ring: For starting circular pieces like the ears and apple charm
- Single crochet: The primary stitch used for most of the bag
- Increase: Working two stitches in one stitch to expand your piece
- Decrease: Combining two stitches to reduce your piece
- Working in rounds: Creating seamless circular sections
- Working in rows: Creating the pocket and flat sections
- Surface embroidery: Adding facial details
Each round or row will include the total stitch count in parentheses to help track your progress.
Panda Bag Creating the Body
The panda body forms the main compartment of your bag:
Round 1: With white yarn, begin with a magic ring and work 6 single crochets into the ring (6) Round 2: Increase in each stitch around (12) Round 3: Work 1 single crochet, increase repeat around (18) Round 4: Work 2 single crochets, increase repeat around (24) Round 5: Work 3 single crochets, increase repeat around (30) Round 6: Work 4 single crochets, increase repeat around (36) Round 7: Work 5 single crochets, increase repeat around (42) Round 8: Work 6 single crochets, increase repeat around (48) Round 9: Work 7 single crochets, increase repeat around (54) Round 10: Work 8 single crochets, increase repeat around (60) Round 11: Work 9 single crochets, increase repeat around (66) Round 12: Work 10 single crochets, increase repeat around (72) Round 13: Work 11 single crochets, increase repeat around (78) Round 14: Work 12 single crochets, increase repeat around (84) Round 15: Work 13 single crochets, increase repeat around (90)
Rounds 16-35: Single crochet in each stitch around (90) – these even rounds form the main body height
For the top opening, add a reinforcement round: Round 36: Working in back loops only, single crochet in each stitch around (90)
This creates a ridge where you’ll later attach the zipper or closure of your choice.
Panda Bag Crafting the Ears
Make two identical ears:
Round 1: With black yarn, begin with a magic ring and work 6 single crochets into the ring (6) Round 2: Increase in each stitch around (12) Round 3: Work 1 single crochet, increase repeat around (18) Round 4: Work 2 single crochets, increase repeat around (24) Rounds 5-6: Single crochet in each stitch around (24)
Fasten off, leaving a long tail for sewing to the body. The ears should be flat circles, so do not stuff them.
Panda Bag Creating the Face Details
The facial features give your panda its adorable character:
For each eye patch (make 2): Round 1: With black yarn, begin with a magic ring and work 6 single crochets into the ring (6) Round 2: Increase in each stitch around (12) Round 3: Work 1 single crochet, increase repeat around (18) Round 4: Single crochet in each stitch around (18)
For the nose: With pink yarn, create a small oval shape: Row 1: Chain 4, work 1 single crochet in second chain from hook and in each chain across (3) Row 2: Chain 1, turn, 3 single crochets across (3) Row 3: Chain 1, turn, decrease, single crochet (2) Row 4: Chain 1, turn, decrease (1)
For the mouth: With red yarn, embroider a small upside-down triangle below the nose.
For the inner eye details: Use white yarn to create small round circles and attach to the center of each black eye patch. Add a small black stitch in the center of each white circle to complete the eyes.
For the cheeks: With peach or light pink yarn, create two small circles: Round 1: Begin with a magic ring and work 6 single crochets (6) Round 2: Increase in each stitch around (12)
Creating the Blue Pocket Section
The distinctive blue pocket adds functionality and character:
Row 1: With blue yarn, chain 41, single crochet in second chain from hook and in each chain across (40) Row 2: Chain 1, turn, single crochet across (40) Row 3: Chain 1, turn, 3 single crochets, decrease repeat across (32) Row 4: Chain 1, turn, single crochet across (32) Row 5: Chain 1, turn, 2 single crochets, decrease repeat across (24) Row 6: Chain 1, turn, single crochet across (24) Rows 7-20: Chain 1, turn, single crochet across (24)
For the pocket edging: Row 21: Chain 1, work single crochet around the entire perimeter of the pocket, working 3 single crochets in each corner to create a smooth edge.
Crafting the Panda Paws
Make two front paws and two back paws:
Front Paws (Make 2): Round 1: With black yarn, begin with a magic ring and work 6 single crochets into the ring (6) Round 2: Increase in each stitch around (12) Round 3: Work 1 single crochet, increase repeat around (18) Round 4: Work 2 single crochets, increase repeat around (24) Rounds 5-6: Single crochet in each stitch around (24)
Back Paws (Make 2): Follow the same pattern as the front paws, but create paw pad details: With pink yarn, create small circles: Round 1: Begin with a magic ring and work 6 single crochets (6) Round 2: Increase in each stitch around (12)
Attach these pink circles to the black paws to create paw pads.
Creating the Apple Charm
This sweet detail sits atop your panda’s head:
For the apple: Round 1: With red yarn, begin with a magic ring and work 6 single crochets into the ring (6) Round 2: Increase in each stitch around (12) Round 3: Work 1 single crochet, increase repeat around (18) Round 4: Single crochet in each stitch around (18) Round 5: Work 4 single crochets, decrease repeat around (15) Round 6: Work 3 single crochets, decrease repeat around (12)
Stuff lightly before closing. Round 7: Work 2 single crochets, decrease repeat around (9) Round 8: Work 1 single crochet, decrease repeat around (6) Round 9: Decrease around (3)
Fasten off and weave in ends.
For the leaf: With green yarn: Row 1: Chain 7, starting from second chain from hook, single crochet 6 across Row 2: Chain 1, turn, decrease, 2 single crochets, decrease (4) Row 3: Chain 1, turn, decrease twice (2) Row 4: Chain 1, turn, decrease (1)
For the stem: With brown yarn, chain 4 and work slip stitches back down the chain.
Attach leaf and stem to the top of the apple.
Creating Flower Embellishments
Make several small flowers for decoration:
Row 1: With yellow yarn, chain 4 and join with slip stitch to form a ring Row 2: Chain 1, work 10 single crochets into the ring, join with slip stitch Row 3: For each petal: Chain 3, slip stitch into same stitch, slip stitch into next stitch repeat around to create 5 petals
Create variations using different colors like pink and cream for variety.
Assembly Instructions
Bring your panda bag to life by carefully assembling all components:
- Position and sew the ears to the upper sides of the panda body.
- Attach the eye patches to the front of the panda, positioning them with approximately 10-12 stitches between them.
- Sew the nose in place below the eyes, then embroider the mouth.
- Attach the cheek circles below and to the outside of each eye.
- Position the blue pocket section on the lower front of the bag and sew in place.
- Attach the yellow buttons to the center of the pocket as shown.
- Sew the leather label (if using) to the center of the pocket below the buttons.
- Position and attach the flower embellishments along the top of the pocket.
- Sew the front paws to the sides of the bag, just above the blue pocket.
- Attach the back paws with their pink paw pads to the lower back of the bag.
- Sew the apple charm to the top center of the panda’s head.
- Install the zipper around the top opening by sewing it to the reinforced ridge created in Round 36.
- If desired, add a fabric lining inside the bag for durability and structure.
Finishing Touches and Variations
These final details complete your panda bag:
- Add small white highlights to the eyes for extra sparkle
- Lightly stuff the paws if you want them to have more dimension
- Consider adding a small interior pocket to the lining for organizing small items
- For a larger bag, use a heavier weight yarn and larger hook
- Create a smaller coin purse version by reducing stitch counts
Practical Uses for Your Panda Bag
Your completed panda bag is perfect for:
- Carrying small electronic devices like phones or music players
- Storing crafting supplies or small notions
- Using as a decorative storage container on a desk or shelf
- Gifting to panda enthusiasts or children
- Creating a themed accessory for travel or everyday use
Check this out :Crochet a Kawaii Bunny Girl Doll
Care Instructions
To maintain your panda bag’s appearance:
- Spot clean with mild soap and water when necessary
- For more thorough cleaning, hand wash gently and reshape while drying
- Allow to air dry completely away from direct sunlight
- Store stuffed lightly when not in use to maintain its shape
- Keep away from rough surfaces that might catch or pull the yarn
Your adorable panda bag is now complete! This charming creation combines functionality with whimsical design, creating a unique accessory that showcases your crochet skills. The delightful details like the apple charm, flower embellishments, and expressive face make this project a standout addition to your handmade collection or a memorable gift for someone special.
Happy crocheting, and enjoy your new panda companion!
