

Table of Contents
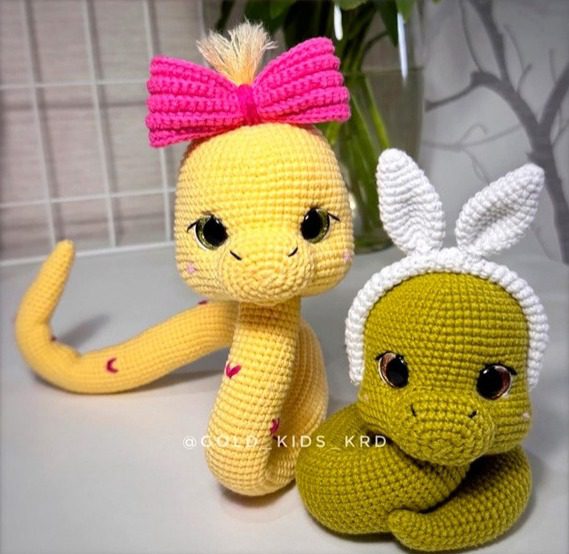
Creating handmade toys brings special joy, especially when crafting something as charming as this snake amigurumi. This detailed guide will walk you through the entire process of crocheting a cute snake toy that’s perfect for gifts or adding to your handmade collection. With basic crochet skills, you can create this delightful character that children will love.
Essential Materials for Your Snake Amigurumi
Before starting your crochet project, gather these necessary supplies:
- Cotton yarn (Alize Cotton Gold or YarnArt JEANS recommended)
- Stuffing material
- Size 2 crochet hook
- Safety eyes (12mm or 14mm)
- Wire (1.5mm) for structural support
- Scissors
- Sewing needle and thread
- Embroidery materials for facial details
Understanding the Pattern Terminology
This pattern uses standard crochet abbreviations:
- SC – Single crochet
- INC – Increase (2 single crochets in one stitch)
- DEC – Decrease (combining two stitches)
- MR – Magic ring
- CH – Chain stitch
- BLO – Back loop only
- FLO – Front loop only
Head Crochet Instructions
Begin with the head, which forms the characteristic shape of your snake:
- Create a magic ring with 8 single crochets
- Round 2: Work 8 increases to reach 16 stitches
- Round 3: (1 SC, 1 INC) repeat 8 times (24 stitches)
- Round 4: (2 SC, 1 INC) repeat 8 times (32 stitches)
- Round 5: (7 SC, 1 INC) repeat 4 times (36 stitches)
- Round 6: (5 SC, 1 INC) repeat 6 times (42 stitches)
- Round 7: (6 SC, 1 INC) repeat 6 times (48 stitches)
- Round 8: (11 SC, 1 INC) repeat 4 times (52 stitches)
- Round 9: (12 SC, 1 INC) repeat 4 times (56 stitches)
- Round 10: Work 56 SC around
- Round 11: (13 SC, 1 INC) repeat 4 times (60 stitches)
- Rounds 12-13: Work 60 SC around for 2 rounds
- Round 14: (14 SC, 1 INC) repeat 4 times (64 stitches)
- Rounds 15-19: Work 64 SC around for 5 rounds
In the next round, you’ll create openings for the eyes:
- Round 20: Work 24 SC, then 1 INC from 2 stitches of the previous row, then work 14 SC, then 1 INC from 2 stitches of the previous row, finish with 24 SC (maintaining 64 stitches)
- Rounds 21-22: Work 64 SC around for 2 rounds
- Round 23: Work 15 SC, 1 INC, 1 SC, 1 INC, 29 SC, 1 INC, 1 SC, 1 INC, 14 SC (68 stitches)
- Round 24: Work 68 SC around
- Round 25: Work 16 SC, 1 INC, 1 SC, 1 INC, 31 SC, 1 INC, 1 SC, 1 INC, 15 SC (72 stitches)
- Round 26: Work 72 SC around
- Round 27: Work 17 SC, 1 DEC, 34 SC, 1 DEC, 17 SC (70 stitches)
- Round 28: Work 70 SC around
Now install the safety eyes in the openings created in round 20.
- Round 29: (8 SC, 1 DEC) repeat 7 times (63 stitches)
- Round 30: (7 SC, 1 DEC) repeat 7 times (56 stitches)
- Round 31: (5 SC, 1 DEC) repeat 8 times (48 stitches)
- Round 32: (4 SC, 1 DEC) repeat 8 times (40 stitches)
- Round 33: (3 SC, 1 DEC) repeat 8 times (32 stitches)
Begin stuffing the head firmly, paying special attention to the cheek areas.
- Round 34: (2 SC, 1 DEC) repeat 8 times (24 stitches)
Work a slip stitch, fasten off, leaving enough thread for sewing. Hide the end inside the head.
Creating the Snake’s Muzzle
The muzzle adds personality to your snake amigurumi:
- Start with a magic ring containing 8 single crochets
- Round 2: Work “1 SC, 2 INC from 3 SC, 2 SC, 2 INC from 3 SC, 1 SC” (16 stitches)
- Round 3: Work “3 SC, 3 INC, 4 SC, 3 INC, 3 SC” (22 stitches)
- Round 4: Work “(2 SC, 1 INC) repeat 3 times, 4 SC, (1 INC, 2 SC) repeat 3 times” (28 stitches)
- Round 5: Work “5 SC, 1 INC, 2 SC, 1 INC, 10 SC, 1 INC, 2 SC, 1 INC, 5 SC” (32 stitches)
- Round 6: Work 32 SC around
- Round 7: Work 32 slip stitches
Leave enough thread for sewing. Pull to tighten the opening. The muzzle is now ready to be attached to the head.
Body Construction
The snake’s body is simple but requires patience as it’s quite long:
- Create a magic ring with 6 single crochets
- Round 2: Work (2 SC, 1 INC) repeat 2 times (8 stitches)
- Round 3: Work 8 SC around
- Round 4: Work (3 SC, 1 INC) repeat 2 times (10 stitches)
- Rounds 5-6: Work 10 SC around for 2 rounds
- Round 7: Work (4 SC, 1 INC) repeat 2 times (12 stitches)
- Rounds 8-10: Work 12 SC around for 3 rounds
- Round 11: Work (5 SC, 1 INC) repeat 2 times (14 stitches)
As you work, gradually stuff the body with filling. If using a wire frame, you can begin installing it at this point, using approximately 40-45cm of wire.
- Rounds 12-14: Work 14 SC around for 3 rounds
- Round 15: Work (6 SC, 1 INC) repeat 2 times (16 stitches)
- Rounds 16-18: Work 16 SC around for 3 rounds
- Round 19: Work (7 SC, 1 INC) repeat 2 times (18 stitches)
- Rounds 20-23: Work 18 SC around for 4 rounds
- Round 24: Work (8 SC, 1 INC) repeat 2 times (20 stitches)
- Rounds 25-30: Work 20 SC around for 6 rounds
- Round 31: Work (9 SC, 1 INC) repeat 2 times (22 stitches)
Continue working without increases to achieve your desired snake length:
- Rounds 32-141: Work 22 SC around for 110 rounds
- Round 142: Work (10 SC, 1 INC) repeat 2 times (24 stitches)
- Rounds 143-144: Work 24 SC around for 2 rounds
Work a slip stitch. Leave enough thread for sewing the head to the body. Pull tight to close the opening. Add stuffing and leave about 6cm of wire for attaching the head (cut off any excess).
Creating the Bow
The bow adds a charming touch to your snake:
- Chain 57 stitches
- Starting from the second chain from the hook, work 56 SC
- Rounds 3-9: Chain 1, turn, and work 1 SC in each stitch of the previous row (7 rows total)
Join the ends of your work to form the bow. Create a chain of air stitches and wrap it around the center of the bow. Secure it with a few stitches.
Final Assembly
Now it’s time to bring all the pieces together:
- Sew the muzzle to the head between rounds 20 and 30, firmly stuffing with filling
- Attach the head to the body
- Create eye details by embroidering whites, eyelashes (arrows), and nostrils
- Cut approximately 10cm of yarn, form a small tail, and attach it to the head
- Wrap the tail with bow-colored yarn
- Fluff the tail with a brush and trim to desired length
- Attach the bow
- Embroider small hearts randomly across the body
Your adorable snake amigurumi is now complete! This charming handmade toy makes a wonderful gift for children or a unique addition to your craft collection.
Chek this out :Crocheting Sullivan Monster Costume Amigurumi Doll
Customization Ideas
Feel free to personalize your snake amigurumi:
- Choose different color combinations for a unique look
- Add a lower lip following the pattern suggestion
- Create companion toys using similar techniques
- Experiment with different facial expressions
Remember to tag the original pattern creator if you share your finished project online, as this helps support the crochet design community.
Happy crocheting!
