

Table of Contents
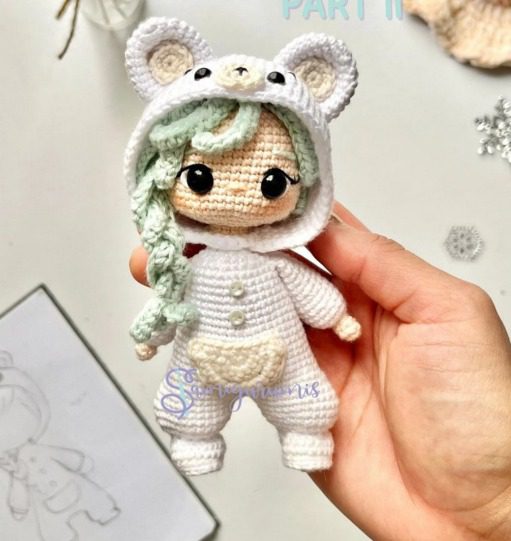
Amigurumi Polly Bear dolls have captured the hearts of crafters worldwide with their adorable designs and endless customization possibilities. The Polly Bear doll, with its charming bear hood and mint green braided hair, is a perfect project for intermediate crocheters looking to create something truly special. This comprehensive guide will walk you through every step of creating your own Polly Bear doll, from gathering materials to adding those final adorable details.
Materials Needed for Your Polly Bear
Before diving into the crochet process, gather all necessary materials to ensure a smooth crafting experience:
- 2.0 mm cotton threads in four colors:
- Nude (for the doll’s face and head)
- White (for the hood and outfit)
- Cream (for bear ears and nose details)
- Pastel Green (for the hair)
- Black and white embroidery thread
- Safety eyes (9 mm and 5 mm sizes)
- Crochet hooks in sizes 1.75 mm, 2.0 mm, and 2.20 mm
- Stuffing material
- Tapestry needle for sewing pieces together
- Two cream-colored buttons for the outfit
- Flexible wire (optional, for added posability)
Polly Bear Understanding Crochet Abbreviations
This pattern uses standard US crochet terminology with the following abbreviations:
- MR: Magic Ring
- ch: Chain stitch
- sc: Single crochet
- slst: Slip stitch
- hdc: Half double crochet
- BB: Bobble stitch
- inc: Increase (2 single crochets in one stitch)
- dec: Decrease (2 stitches crocheted together)
- dec3: Triple decrease
- BLO: Back loop only
- FLO: Front loop only
- R: Round
Polly Bear Creating the Arms
The arms of the Polly Bear doll give it a huggable quality. To begin:
- Using nude thread and a 1.75 mm hook:
- R1: Make a magic ring with 6 sc (6)
- R2-R3: 6 sc for 2 rounds (6)
- Switch to white thread:
- R4: Work in BLO for 6 sc (6)
- R5: Working in BLO, make 6 inc = 12 sc (12)
- R6: (2 sc, 1 inc) x 4 = 16 sc (16)
- R7-R10: 16 sc for 4 rounds (16)
- R11: 14 sc, 1 dec = 15 sc (15)
- R12: 15 sc
- R13: 1 dec, 13 sc = 14 sc (14)
- R14: 14 sc
- R15: 12 sc, 1 dec = 13 sc (13)
- R16: 1 dec, 11 sc = 12 sc (12)
- R17: 12 sc
- Cut and hide the excess thread, then stuff the arms lightly. You can insert chenille stems or flexible wire to make the arms poseable.
Polly Bear Crafting the Legs and Feet
The legs give your doll stability and character. Follow these steps for both legs:
- Using white thread and a 1.75 mm hook:
- R1: Chain 7, then in the 2nd chain from hook make: 1 inc, 4 sc, 2 inc together (in the first chain), 4 sc, 1 inc = 16 sc (16)
- R2: 2 inc, 4 sc, 4 inc, 4 sc, 2 inc = 24 sc (24)
- R3: Working in BLO only, make 24 sc (24)
- R4-R5: 24 sc for 2 rounds (24)
- R6: 4 sc, 1 dec, 4 dec3, 1 dec, 4 sc = 14 sc (14)
- R7: 6 inc, 2 inc3, 6 inc = 30 sc (30)
- R8-R10: 30 sc for 3 rounds (30)
Cut the thread after completing the first leg. For the soles, make 24 slip stitches in the front loops only of round 3 of each foot using white thread.
Polly Bear Creating the Belly Detail
The belly detail adds dimension and character to your Polly Bear doll:
- Using cream thread and a 1.75 mm hook:
- R1: Create a magic ring with 4 sc (4)
- R2: 4 inc = 8 sc (8)
- R3: (1 sc, 1 inc) x 4 = 12 sc (12)
- R4: (2 sc, 1 inc) x 4 = 16 sc (16)
- R5: 16 sc
- Make low stitches at the top edge and leave a long thread for sewing. This piece will be attached between rounds 17 and 24 of the body.
Joining the Legs and Creating the Body
The body forms the core of your amigurumi doll. Here’s how to connect the legs and build up the body:
- For the leg union:
- Make the necessary single crochets in the second leg until you reach the crotch area (approximately 8 sc)
- Make 2 chains and insert your hook into the first leg (about 7 sc from the last stitch when counting backward)
- This creates the first stitch of round 11
- Continuing with white thread:
- R11: 30 sc (first leg), 2 inc (on chains), 30 sc (second leg), 2 inc (on chains) = 68 sc (68)
- R12: 15 sc, 2 dec, 28 sc, 2 dec, 17 sc = 64 sc (64)
- R13: (14 sc, 1 dec) x 4 = 60 sc (60)
- R14: 1 sc, 1 dec, (13 sc, 1 dec) x 3, 12 sc = 56 sc (56)
- R15: (12 sc, 1 dec) x 4 = 52 sc (52)
- R16: 1 sc, 1 dec, (11 sc, 1 dec) x 3, 10 sc = 48 sc (48)
- R17: 48 sc
- R18: (10 sc, 1 dec) x 4 = 44 sc (44)
- R19-R21: 44 sc for 3 rounds (44)
- R22: (20 sc, 1 dec) x 2 = 42 sc (42)
- R23: 8 sc, 1 dec, 22 sc, 1 dec, 8 sc = 40 sc (40)
- R24: 40 sc
- R25: (18 sc, 1 dec) x 2 = 38 sc (38)
- R26: 9 sc, 1 dec, 18 sc, 1 dec, 7 sc = 36 sc (36)
- R27: 36 sc
- R28: 9 sc, 1 dec, 16 sc, 1 dec, 7 sc = 34 sc (34)
- R29: (15 sc, 1 dec) x 2 = 32 sc (32)
- R30: 32 sc
- Stuff the body firmly before continuing.
Joining the Arms to the Body
The arms bring your doll to life with the ability to pose and hug:
- Position the arms centered at the sides of the body
- R31: 5 sc, 6 sc (joining arm and body), 13 sc, 6 sc (joining arm and body), 2 sc = 32 sc (32)
- Continue decreasing:
- R32: (2 sc, 1 dec) x 8 = 24 sc (24)
- R33: (2 sc, 1 dec) x 6 = 18 sc (18)
- R34: (1 sc, 1 dec) x 6 = 12 sc (12)
- Stuff the upper body, then:
- Change to nude thread
- R35: Work in BLO only, make 12 sc (12)
- R36-R43: 12 sc for 8 rounds (12)
- Complete the stuffing, then:
- R44: 6 dec = 6 sc (6)
- Cut and hide the thread
- Detail of the Belly:
- Sew the belly piece between rounds 17 and 24 of the body
- Attach the two cream buttons to the chest area
Crafting the Head
The head gives your Polly Bear doll its adorable expression:
- Using nude thread and a 1.75 mm hook:
- R1: Create a magic ring with 8 sc (8)
- R2: 8 inc = 16 sc (16)
- R3-R11: 16 sc for 9 rounds (16)
- Begin increases:
- Make a chain and turn
- R12: 16 inc = 32 sc (32)
- R13: (3 sc, 1 inc) x 8 = 40 sc (40)
- R14: (4 sc, 1 inc) x 8 = 48 sc (48)
- R15-R27: 48 sc for 13 rounds (48)
- Place the safety eyes between rounds 20 and 21, with 8 sc between them
- You can also embroider:
- Eye details using white thread
- Eyelashes using black thread
- Eyebrows using pastel green thread
- Nose using nude thread
- Decrease to close the head:
- R28: (6 sc, 1 dec) x 6 = 42 sc (42)
- R29: (5 sc, 1 dec) x 6 = 36 sc (36)
- R30: (4 sc, 1 dec) x 6 = 30 sc (30)
- R31: (3 sc, 1 dec) x 6 = 24 sc (24)
- R32: (2 sc, 1 dec) x 6 = 18 sc (18)
- R33: (1 sc, 1 dec) x 6 = 12 sc (12)
- Stuff the head
- R34: 6 dec = 6 sc (6)
- Close with tapestry needle
Creating the Hair
The mint green hair gives your Polly Bear doll its distinctive look:
- Using pastel green thread and a 2.20 mm hook:
- R1: Create a magic ring with 8 sc (8)
- R2: 8 inc = 16 sc (16)
- R3: (1 sc, 1 inc) x 8 = 24 sc (24)
- Making the hair strands:
- S1-S11: Chain 15, then in the 2nd chain from hook, make 14 hdc, then hook with 1 slip stitch in the next stitch (make 11 strands)
- S12-S16: Chain 13, then in the 2nd chain from hook, make 12 hdc, hook leaving 1 sc free (make 5 strands)
- S17-S19: Chain 33, then in the 2nd chain from hook, make 32 hdc, hook with 1 slip stitch in the next stitch (make 3 strands)
- Arranging the hair:
- Place strands S12-S16 in front, with 3 strands on the right side and 2 on the left side
- Use strands S17-S19 to create a braid
Making the Bear Hood
The bear hood transforms your doll into the adorable Polly Bear:
- Using white thread and a 2.50 mm hook:
- R1: Create a magic ring with 6 sc (6)
- R2: 6 inc = 12 sc (12)
- R3: (1 sc, 1 inc) x 6 = 18 sc (18)
- R4: 1 sc, 1 inc, (2 sc, 1 inc) x 5, 1 sc = 24 sc (24)
- R5: (3 sc, 1 inc) x 6 = 30 sc (30)
- R6: 1 sc, 1 inc, (4 sc, 1 inc) x 5, 3 sc = 36 sc (36)
- R7: (5 sc, 1 inc) x 6 = 42 sc (42)
- R8: 1 sc, 1 inc, (6 sc, 1 inc) x 5, 5 sc = 48 sc (48)
- R9: (7 sc, 1 inc) x 6 = 54 sc (54)
- R10: 1 sc, 1 inc, (8 sc, 1 inc) x 5, 7 sc = 60 sc (60)
- R11-R22: 60 sc for 11 rounds (60)
- R23: Chain 6 and leave 6 sc free, 54 sc = 60 sc (60)
- R24: 6 sc (over the chains), 54 sc = 60 sc (60)
- Cut and hide the excess thread.
- Place the safety eyes between rounds 20 and 21 with 7 sc separation.
- Embroider the eyebrows with black thread.
Creating the Hood Ears
The bear ears add character to your hood:
- Using white thread and a 2.20 mm hook:
- R1: Create a magic ring with 6 sc (6)
- R2: 6 inc = 12 sc (12)
- R3: (1 sc, 1 inc) x 6 = 18 sc (18)
- R4-R9: 18 sc for 6 rounds (18)
- Leave a long thread to sew to the hood.
Inner Ear Details
Add depth to your bear ears with inner details:
- Using cream thread and a 1.75 mm hook:
- R1: Create a magic ring with 6 sc (6)
- R2: 6 inc = 12 sc (12)
- Cut and hide the excess thread.
- Glue this piece in the center of each ear.
- Sew the ears between rounds 10 and 13 of the hood.
Finishing the Nose
The nose completes the bear face on your hood:
- Using cream thread and a 1.75 mm hook:
- R1: Create a magic ring with 6 sc (6)
- R2: 6 inc = 12 sc (12)
- Cut and hide the excess thread.
- Using black embroidery thread, embroider a small nose.
- Glue this piece between rounds 21 and 24 of the hood.
Final Assembly
Now it’s time to bring all the pieces together:
- Attach the head to the body
- Secure the hair to the head
- Place the hood over the head and hair
- Sew the belly detail to the body between rounds 17 and 24
- Attach the buttons to the chest
- Make any final adjustments to the positioning of the features
Check this out :Crochet Matilda Amigurumi Doll
Congratulations!
You’ve successfully created your own Polly Bear amigurumi doll! This adorable creation showcases your crochet skills and makes a perfect gift or keepsake. Feel proud of what you’ve accomplished – creating a handmade doll from start to finish is a significant achievement.
The Polly Bear amigurumi combines the cuteness of a traditional doll with the charm of a teddy bear hood, resulting in a unique character that’s sure to be treasured. With its soft white outfit, mint green braided hair, and sweet bear hood, this doll has a personality all its own.
Whether you’re making this as a gift or keeping it for yourself, your Polly Bear doll is sure to bring joy and warmth to whoever holds it. Happy crocheting!
This pattern is designed for personal use. Remember that while you can sell the dolls you make with this pattern, the pattern itself is copyright protected and should not be shared, reproduced, or distributed.
