

Table of Contents
Crocheting amigurumi dolls has become increasingly popular among crafting enthusiasts, and the adorable Matilda doll is a perfect project for those looking to create a charming handmade toy. This comprehensive guide will walk you through each step of creating your own Matilda amigurumi doll, from gathering materials to adding the final decorative touches.
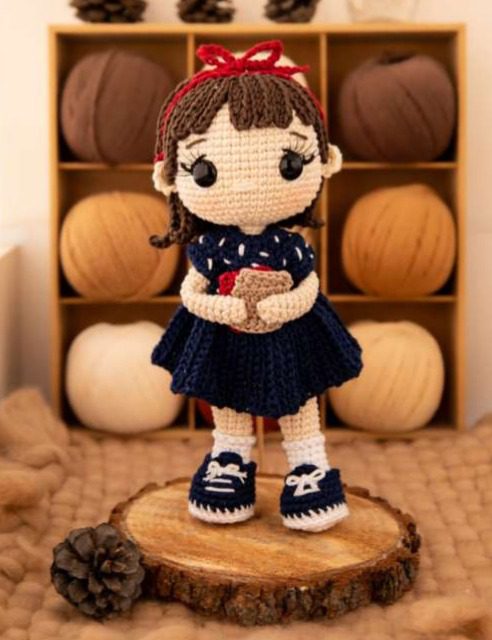
Introduction to the Matilda
Before beginning this crochet journey, it’s important to note that this pattern is designed for intermediate to advanced crocheters. If you have any questions during the creation process, you can reach out to the designer through their social media channels. The finished doll will stand approximately 24.5 cm tall (not including the hair bun).
Matilda Important Notes Before Starting
- Rounds are worked in spiral, rows, or circular patterns as indicated in the instructions
- Single crochet stitches are formed in an “X” shape for a tighter, neater finish
- While using stitch markers is recommended to avoid errors, experienced crocheters may choose to count stitches instead
- Always read through the entire pattern before beginning your project
- You can adjust the yarn weight and hook size if you wish to create a larger or smaller doll
- The final size of the doll is approximately 24.5 cm (without counting the hair bun)
Matilda Materials Needed
Hooks and Yarn
- Size 3 crochet hook (or appropriate size for your yarn)
- Sport weight yarn (100% mercerized cotton recommended) in the following colors:
- Beige/skin tone
- Burgundy/wine red
- Navy blue
- Black
- White
- Dark brown
- Light khaki
Additional Supplies
- Synthetic stuffing
- One pair of 14mm safety eyes
- False eyelashes
- Thin wooden dowel
- Pipe cleaner
- Brown-toned blush for cheeks
- Thin makeup brush
- Silicone adhesive
- Scissors
- Stitch markers
- Pins
- Yarn needle
- Small piece of cardboard
Crochet Abbreviations Used
- MR: Magic Ring
- R: Round
- Row: Row
- CH: Chain stitch
- SL ST: Slip stitch
- SC: Single crochet (US terminology)
- HDC: Half double crochet
- DC: Double crochet
- INC: Increase (2 single crochets in the same stitch)
- DEC: Decrease
- HDCINC: Half double crochet increase
- SCINC: Single crochet increase
- HDINC: Front loop increase
- BLO: Back loop only
- FLO: Front loop only
- BPSC: Back post single crochet
- TRI: Tricot stitch
Creating Matilda’s Arms
Make two identical arms using beige/skin tone yarn, working in spiral rounds:
- Round 1: Begin with a magic ring of 7 single crochet stitches (7)
- Rounds 2-16: Work 7 single crochet stitches in each round (7) [15 rounds total]
- Cut yarn and secure. Hide the loose end inside the arm.
- Cut a pipe cleaner in half and use one half for each arm (fold to the necessary size and don’t add excessive stuffing so the extremity remains easy to pose).
Creating Matilda’s Legs
Begin with white yarn, working in spiral rounds:
- Round 1: Start with 5 chains. In the second chain from hook: 1 SC, 1 INC, 1 SC, 1 INC; on the other side of the chain: 1 INC, 2 SC, 1 INC (12)
- Round 2: 1 INC, 3 SC, 3 INC, 3 SC, 2 INC (18)
- Rounds 3-5: Work 18 SC in each round (18) [3 rounds total]
- Round 6: 6 SC, 3 DEC, 6 SC (15)
- Round 7: 4 SC, 3 DEC, 5 SC (12)
- Rounds 8-11: Work 12 SC in each round (12) [4 rounds total]
Change to beige/skin tone yarn:
- Round 12: Working in back loops only, 12 SC (12)
- Rounds 13-17: Work 12 SC in each round (12) [5 rounds total]
- Round 18: 11 SC, 1 INC (13)
- Round 19: 13 SC (13)
- Round 20: 12 SC, 1 INC (14)
- Round 21: 14 SC (14)
Important tip: Cut a small piece of cardboard the size of the shoe sole and insert it before closing the leg further. This will help your doll stand more easily.
Repeat the entire process to create the second leg. For the second leg, don’t cut the yarn after round 21 – you’ll use this to join the legs in round 22.
Joining the Legs and Creating the Body
- Round 22: On the left leg: 10 SC; then chain 2; on the right leg: 14 SC, 2 SC on back chains, 4 SC on left leg (32)
- Rounds 23-30: Work 32 SC in each round (32) [8 rounds total]
At this point, you’ll need to pause to create a skeleton structure and add stuffing as shown in the reference photos. This will give the doll stability and shape.
- Round 31: (2 SC, DEC) 8 times (24)
- Rounds 32-37: Work 24 SC in each round (24) [6 rounds total]
Continue working until you reach approximately the middle of the back. In the next round, you’ll join the arms.
Attaching the Arms and Completing the Upper Body
- Round 38: 1 DEC, 5 SC on back, 7 SC on left arm, 5 SC on front, DEC, 5 SC more on front, 7 SC on right arm, 5 SC more on back (36)
- Round 39: (2 SC, DEC) 9 times (27)
- Round 40: (1 SC, DEC) 9 times (18)
- Round 41: (1 SC, DEC) 6 times (12)
- Round 42: (4 SC, DEC) 2 times (10)
- Rounds 43-44: Work 10 SC in each round (10) [2 rounds total]
- Round 45: (1 SC, INC) 5 times (15)
- Round 46: (2 SC, INC) 5 times (20)
- Round 47: 1 SC, INC, (2 SC, INC) 6 times (27)
- Round 48: (2 SC, INC) 9 times (36)
- Round 49: 3 SC, INC, (5 SC, INC) 5 times, 2 SC (42)
- Round 50: (6 SC, INC) 6 times (48)
- Round 51: 4 SC, INC, (7 SC, INC) 5 times, 3 SC (54)
Creating Matilda’s Head
Before closing the head completely, insert the wooden dowel to give the doll’s neck rigidity. Then continue with the head construction:
- Rounds 52-64: Work 54 SC in each round (54) [13 rounds total]
Before proceeding further, add the facial features:
- Insert 14mm safety eyes between rounds 56 and 57, with approximately 10 stitches between them
- Embroider the white and black parts of the eyes as shown in the photos
- Embroider the nose with beige yarn between rounds 54 and 55, covering 3 stitches, passing the thread three times
- Embroider the eyebrows with a slight inclination of 1 stitch, measuring 3 stitches in length
- False eyelashes will be added after the doll is completed to avoid damaging them
- The blush on the cheeks should also be added at the final stage
Continue decreasing to close the head:
- Round 65: (5 SC, DEC) 6 times (36)
- Round 66: 3 SC, DEC, (4 SC, DEC) 5 times, 2 SC (30)
- Round 67: (5 SC, DEC) 6 times (36)
- Round 68: 2 SC, DEC, (4 SC, DEC) 5 times, 2 SC (30)
- Round 69: (3 SC, DEC) 6 times (24)
- Round 70: 1 SC, DEC, (2 SC, DEC) 5 times, 1 SC (18)
- Round 71: (1 SC, DEC) 6 times (12)
- Round 72: 6 DEC (6)
Sew to close, cut and hide the yarn.
Creating the Ears
Make 2 chains, turn, and in the 2nd chain from hook work 6 SC, turn to continue working on the other side of the chain, and crochet 6 more SC.
Leave a long tail to sew the ears to the head between rounds 54 and 57, positioned approximately 10 stitches away from each eye.
Crafting Matilda’s Hair
Using dark brown yarn, start with a spiral pattern:
- Round 1: Magic ring with 6 SC (6)
- Round 2: 6 INC (12)
- Round 3: (1 SC, INC) 6 times (18)
- Round 4: (2 SC, INC) 6 times (24)
From this point, you’ll begin creating hair strands (H). After completing each strand, attach it to the next point of the magic ring with a slip stitch. Occasionally you may need to skip 1 stitch (you’ll be given specific instructions when needed):
- Hair strands H1-12: Make 16 chains, turn, and in the 2nd chain from hook: 2 SC, 9 HDC; slip stitch to the next point on the magic ring [12 hair strands]
- Hair strand H13: Make 13 chains, turn, and in the 2nd chain from hook: 12 HDC; slip stitch to the next point on the magic ring
- Hair strand H14: Make 12 chains, turn, and in the 2nd chain from hook: 2 SC, 11 HDC; slip stitch to the next point on the magic ring
- Hair strands H15-20: Make 9 chains, turn, and in the 2nd chain from hook: 8 HDC; slip stitch to the next point on the magic ring [6 hair strands]
- Hair strand H21: Make 9 chains, turn, and in the 2nd chain from hook: 8 HDC; slip stitch, but skip 1 stitch on the magic ring
- Hair strand H22: Make 13 chains, turn, and in the 2nd chain from hook: 9 HDC; slip stitch to the next point on the magic ring
Continue following this pattern, creating all the indicated hair strands and attaching them to complete the hairstyle as shown in the reference photos.
Making the Headband
Using burgundy/wine red yarn:
- Make 9 chains, pulling the ends firmly so it doesn’t unravel
- Attach it to the hair as shown in the photos
Creating the Hair Bun
Using burgundy/wine red yarn:
- Make 35 chains, pulling the ends firmly so they don’t unravel
- Shape into a bun and attach it on top of the headband
Crafting Matilda’s Shoes
Start with white yarn:
- Make 5 chains. In the 2nd chain from hook: (1 SC, INC) twice; on the other side of the chain: (1 SC, INC) twice (12)
- Work (1 INC, 2 SC) 4 times (16)
- Work 24 back post single crochet stitches (24)
Change to navy blue yarn:
- Rounds 4-7: Work 24 SC in each round (24) [4 rounds total]
- Round 8: 8 SC, 4 DEC, 8 SC (20)
- Rounds 9-10: Work 17 SC in each round (17)
Add yarn at what would be the 7th stitch of round 7 and work: 1 SC, 2 chains, 1 DC, 1 chain, 1 SC. Cut the yarn and hide it.
Embroider the shoe eyelets with white yarn as shown in the photo, then make a small bow and attach it with silicone adhesive.
Creating Matilda’s Dress
Using navy blue yarn:
- Make 13 chains. Turn and in the 2nd chain from hook: 12 SC (12)
- Round 1: (1 HDC, INC HDC) 6 times (18)
- Round 2: (2 HDC, INC HDC) 6 times (24)
- Round 3: (3 HDC, INC HDC) 6 times (30)
- Round 4: (4 HDC, INC HDC) 6 times (36)
- Round 5: (5 HDC, INC HDC) 6 times (42)
- Round 6: 5 HDC, 3 chains, skip 11 HDC, 10 HDC, 3 chains, skip 11 HDC, 5 HDC (26)
Begin working in circular rounds: 8. Round 7: Working through back loops, 1 INC HDC, 25 HDC (27) 9. Round 8: (2 HDC, INC HDC) 9 times (36) 10. Round 9: 36 HDC (36)
Slip stitch at the first stitch of the next round, then begin working in rows:
- Row 1: Make 10 chains, turn. In the 2nd chain from hook: 2 HDC, 7 SC. Slip stitch to the next stitch of round 9, then work slip stitch to the next point of round 9. Turn.
- Row 2: Work 7 HDC, 2 HDC, 1 chain. Turn.
Continue creating the skirt in this manner, following the pattern until you’ve used all the stitches from round 9. At the end, make 1 slip stitch at the initial point and hide the yarn.
Put the dress on the doll, sew the back, and embroider the details with white yarn.
Adding Final Touches
- Books: Make two small books in different colors following these steps:
- Make 7 chains. Turn and in the 2nd chain from hook: 6 HDC
- Rows 1-4: 6 HDC [4 rows total]
- Hide the yarn and repeat for the second book
- Glue the books to the doll’s arms
- Facial Features:
- Add the false eyelashes
- Apply blush to the cheeks
- Take the front loop from round 12 of the legs, add white yarn, and work 12 SC to create a sock appearance
Your Matilda amigurumi doll is now complete! This charming handcrafted doll makes a wonderful gift or display piece. Feel free to share photos of your finished doll on social media and tag the original designer.
Care Instructions
- Keep away from small children who might remove small parts like eyes
- Spot clean only, as machine washing may damage the doll
- Store in a dry place away from direct sunlight to preserve colors
Check this out :Crochet a Magical Hogwarts Student Amigurumi Doll
Final Tips for Success
- Maintain consistent tension throughout your work for a professional finish
- Take your time with the facial features – they bring personality to your doll
- Don’t hesitate to redo sections if you’re not satisfied with the results
- Most importantly, enjoy the creative process!
Creating amigurumi dolls like Matilda is not just about following a pattern, but about bringing a character to life through your craftsmanship. Each doll will have its own unique personality, reflecting the hands that made it.
