

Table of Contents
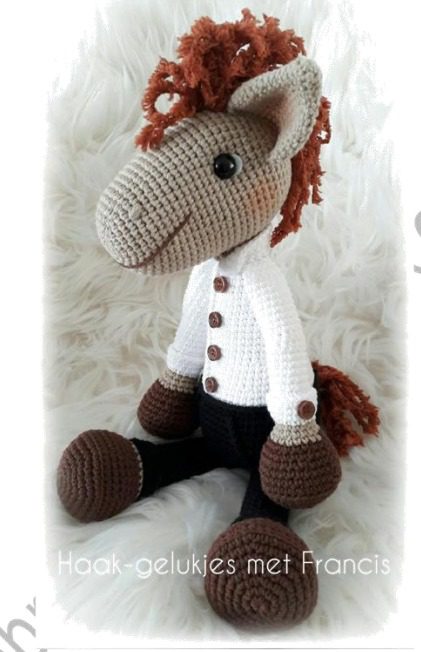
Creating amigurumi Charming Horse animals is a delightful way to practice your crochet skills while making adorable toys that bring joy to both children and adults. This comprehensive guide will walk you through creating a charming horse amigurumi with a distinctive personality and stylish removable outfit. Perfect for intermediate crocheters looking to expand their skills, this project combines simple techniques with thoughtful details to create a truly special handmade toy.
Charming Horse Materials Needed
For the Horse
- Worsted weight yarn in beige/tan (for body and head)
- Worsted weight yarn in rust/auburn (for mane and tail)
- Worsted weight yarn in brown (for hooves)
- Worsted weight yarn in black (for pants)
- Worsted weight yarn in white (for shirt)
- Small amount of pink yarn or embroidery thread (for cheeks)
- 2 safety eyes (9-12mm)
- Fiberfill stuffing
- Yarn needle
- Stitch markers
- 2.5mm-3.5mm crochet hook (depending on your tension)
- Small buttons for shirt (5-6)
- Small scissors
Charming Horse Understanding the Techniques
Before beginning this project, it’s helpful to familiarize yourself with these essential amigurumi techniques:
Charming Horse Working in Continuous Rounds
Most amigurumi projects, including this horse, are worked in continuous spiral rounds rather than joined rounds. Use stitch markers to keep track of the beginning of each round.
Charming Horse Invisible Decreases
For a smoother finish, use invisible decreases (inserting hook through front loops only of next 2 stitches, yarn over and pull through both loops).
Magic Ring/Magic Circle
Start most body parts with a magic ring to create a tight center with no hole.
Color Changes
Learn to change colors cleanly, especially for the outfit components.
Charming Horse Head and Snout Construction
The distinctive elongated horse head is what gives this amigurumi its charming character. Let’s break down the process:
Horse Head
- With beige/tan yarn, make a magic ring.
- Round 1: 6 SC into the ring (6)
- Round 2: INC in each stitch around (12)
- Round 3: (SC, INC) repeat 6 times (18)
- Round 4: (2 SC, INC) repeat 6 times (24)
- Round 5: (3 SC, INC) repeat 6 times (30)
- Round 6: (4 SC, INC) repeat 6 times (36)
- Round 7: (5 SC, INC) repeat 6 times (42)
- Round 8: (6 SC, INC) repeat 6 times (48)
- Rounds 9-12: SC in each stitch around (48)
Charming Horse Snout Shaping
- Round 13: (6 SC, DEC) repeat 6 times (42)
- Round 14: (5 SC, DEC) repeat 6 times (36)
- Round 15: (4 SC, DEC) repeat 6 times (30)
- Round 16: (3 SC, DEC) repeat 6 times (24)
- Round 17: (2 SC, DEC) repeat 6 times (18) – Begin stuffing firmly at this point
- Round 18: (SC, DEC) repeat 6 times (12)
- Round 19: SC in each stitch around (12)
- Round 20: (SC, INC) repeat 6 times (18)
- Round 21: (2 SC, INC) repeat 6 times (24)
- Round 22: (3 SC, INC) repeat 6 times (30)
- Round 23: (4 SC, INC) repeat 6 times (36)
- Rounds 24-35: SC in each stitch around (36)
- Round 36: (4 SC, DEC) repeat 6 times (30)
- Round 37: (3 SC, DEC) repeat 6 times (24)
- Round 38: (2 SC, DEC) repeat 6 times (18)
- Round 39: (SC, DEC) repeat 6 times (12)
- Round 40: DEC around (6)
Fasten off, leaving a long tail for sewing. Stuff the head firmly, especially the snout area, to maintain its shape.
Charming Horse Ears (Make 2)
The horse’s alert ears add personality and dimension:
- With beige/tan yarn, make a magic ring.
- Round 1: 6 SC into the ring (6)
- Round 2: INC in each stitch around (12)
- Round 3: (SC, INC) repeat 6 times (18)
- Round 4: SC in each stitch around (18)
- Round 5: SC in back loops only, around (18)
- Rounds 6-8: SC in each stitch around (18)
- Round 9: (SC, DEC) repeat 6 times (12)
- Round 10: (SC, DEC) repeat 4 times (8)
Fasten off, leaving a long tail for sewing. Do not stuff the ears. Fold the ear in half along the round worked in back loops only and sew to the head.
Charming Horse Body
The horse’s body is shaped to allow for a seated position:
- With beige/tan yarn, make a magic ring.
- Round 1: 6 SC into the ring (6)
- Round 2: INC in each stitch around (12)
- Round 3: (SC, INC) repeat 6 times (18)
- Round 4: (2 SC, INC) repeat 6 times (24)
- Round 5: (3 SC, INC) repeat 6 times (30)
- Round 6: (4 SC, INC) repeat 6 times (36)
- Round 7: (5 SC, INC) repeat 6 times (42)
- Round 8: (6 SC, INC) repeat 6 times (48)
- Round 9: (7 SC, INC) repeat 6 times (54)
- Rounds 10-19: SC in each stitch around (54)
- Round 20: (7 SC, DEC) repeat 6 times (48)
- Round 21: SC in each stitch around (48)
- Round 22: (6 SC, DEC) repeat 6 times (42)
- Round 23: SC in each stitch around (42)
- Round 24: (5 SC, DEC) repeat 6 times (36)
- Round 25: SC in each stitch around (36)
- Round 26: (4 SC, DEC) repeat 6 times (30)
- Round 27: SC in each stitch around (30)
- Round 28: (3 SC, DEC) repeat 6 times (24)
- Round 29: SC in each stitch around (24)
- Round 30: (2 SC, DEC) repeat 6 times (18)
Fasten off, leaving a long tail for sewing to the head. Stuff the body firmly.
Arms and Legs
Arms (Make 2)
- With brown yarn for hooves:
- Round 1: 6 SC into magic ring (6)
- Round 2: INC in each stitch around (12)
- Round 3: (SC, INC) repeat 6 times (18)
- Round 4: SC in each stitch around (18)
- Rounds 5-6: SC in each stitch around (18)
- Switch to beige/tan yarn:
- Rounds 7-15: SC in each stitch around (18)
- Round 16: (4 SC, DEC) repeat 3 times (15)
- Rounds 17-25: SC in each stitch around (15)
Fasten off, leaving a long tail for sewing. Stuff firmly, especially in the “hoof” section.
Legs (Make 2)
- With brown yarn for hooves:
- Round 1: 6 SC into magic ring (6)
- Round 2: INC in each stitch around (12)
- Round 3: (SC, INC) repeat 6 times (18)
- Round 4: (2 SC, INC) repeat 6 times (24)
- Rounds 5-7: SC in each stitch around (24)
- Switch to black yarn for pants:
- Rounds 8-20: SC in each stitch around (24)
- Round 21: (2 SC, DEC) repeat 6 times (18)
- Rounds 22-28: SC in each stitch around (18)
Fasten off, leaving a long tail for sewing. Stuff firmly, especially in the “hoof” section.
Mane and Tail
The shaggy mane and tail add character and texture to your horse amigurumi:
Mane
- Cut rust/auburn yarn into approximately 30-40 strands, each about 5-6 inches long.
- Fold each strand in half to create a loop.
- Using your crochet hook, pull the loop through a stitch on top of the horse’s head.
- Thread the ends through the loop and pull tight.
- Repeat this process along the top of the head and down the back of the neck.
- Trim the mane to your desired length and style once all strands are attached.
Tail
- Cut 20-25 strands of rust/auburn yarn, each about 6-7 inches long.
- Using the same loop method as for the mane, attach the strands at the base of the spine.
- Style and trim as desired.
Removable Outfit
White Shirt
- With white yarn:
- Chain 36, join with a slip stitch to form a ring.
- Round A: SC in each chain around (36)
- Rounds B-C: SC in each stitch around (36)
- Round D: 8 SC, chain 8 (skip 8 stitches), 12 SC, chain 8 (skip 8 stitches), 8 SC (36 including chains)
- Rounds E-H: SC in each stitch including chains (36)
- Divide for front opening:
- Row I: Chain 1, SC in next 18 stitches, turn (18)
- Rows J-M: Chain 1, SC in each stitch across, turn (18)
- Repeat rows I-M for the second front panel.
- Add button holes on one side and sew buttons on the other.
Black Pants
- With black yarn:
- Chain 40, join with a slip stitch to form a ring.
- Round 1: SC in each chain around (40)
- Rounds 2-4: SC in each stitch around (40)
- Round 5: 20 SC, chain 2, skip 2 stitches (for first leg opening), 18 SC (38 including chain)
- Round 6: SC in each stitch including chains (38)
- Round 7: 18 SC, chain 2, skip 2 stitches (for second leg opening), 18 SC (38 including chain)
- Round 8: SC in each stitch including chains (38)
- Rounds 9-10: SC in each stitch around (38)
- Add elastic or a drawstring at the waist for a snug fit.
Assembly
- Sew the head to the body, ensuring it’s positioned at a natural angle.
- Attach ears to the top of the head, positioning them symmetrically.
- Sew arms to the body at shoulder height.
- Attach legs to the bottom of the body.
- Embroider or attach pink circles for cheeks.
- Add any final details like eyebrows or additional facial features.
- Dress your horse in its removable outfit.
Customization Ideas
This base pattern can be modified in numerous ways:
- Change the yarn colors for different horse varieties (black, chestnut, palomino)
- Create different outfits (dresses, vests, hats)
- Add accessories like a small backpack or scarf
- Embroider additional details like freckles or a custom name
- Add a wire frame inside for posable limbs
Care Instructions
To keep your amigurumi horse looking its best:
- Spot clean with mild soap and water as needed
- Air dry completely
- Brush the mane and tail gently to maintain fluffiness
- Store in a clean, dry place away from direct sunlight
- For removable clothes, hand wash separately
Check this out :Crochet Polly Bear Amigurumi Doll
Conclusion
Creating this charming horse amigurumi is a rewarding project that combines various crochet techniques to produce a characterful toy with personality. Whether made as a gift or for your own collection, this horse with its distinctive long face and stylish outfit is sure to bring smiles to all who see it.
The removable clothing adds an interactive element that children especially love, while the attention to detail in the design makes it an impressive display piece for amigurumi enthusiasts. Follow the pattern carefully, take your time with the assembly, and don’t be afraid to add your own creative touches to make your horse truly unique.
Happy crocheting!
