

Table of Contents
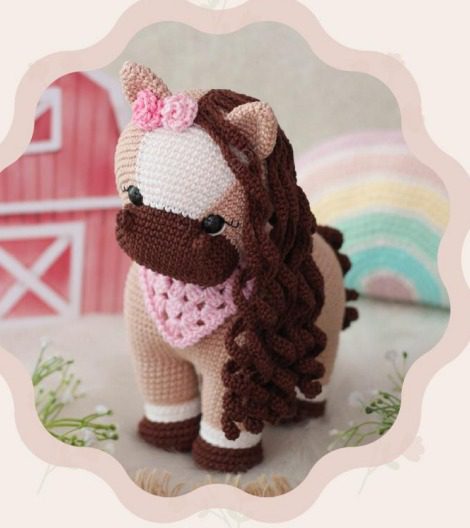
This comprehensive Pony Amigurumi pattern will guide you through creating a charming pony amigurumi with a distinctive flowing mane, cute ears, and a bandana accessory. Perfect for farm animal collections or as a standalone gift, this pony combines simple techniques with thoughtful details to create a truly special handmade toy.
Pony Amigurumi Materials Needed
Pony Amigurumi Yarn
- Cream/off-white worsted weight yarn (for body)
- Dark brown worsted weight yarn (for mane, tail, hooves, and snout)
- Light pink worsted weight yarn (for bandana and ears)
- Small amount of white yarn (for face markings if desired)
Pony Amigurumi Tools and Notions
- 3.5mm (E) crochet hook for main body
- 3.0mm crochet hook for smaller details
- Safety eyes (9mm black)
- Polyester fiberfill for stuffing
- Yarn needle
- Stitch markers
- Scissors
- Pins (for positioning parts before sewing)
Pony Amigurumi Abbreviations and Techniques
- MR: Magic ring
- SC: Single crochet
- INC: Increase (2 SC in same stitch)
- DEC: Invisible decrease
- BLO: Back loop only
- FLO: Front loop only
- SLST: Slip stitch
- Ch: Chain
Pony Amigurumi Body Construction
Main Body
- With cream yarn, create a magic ring
- Round 1: 6 SC into the ring (6)
- Round 2: INC in each stitch around (12)
- Round 3: (SC, INC) repeat 6 times (18)
- Round 4: (2 SC, INC) repeat 6 times (24)
- Round 5: (3 SC, INC) repeat 6 times (30)
- Round 6: (4 SC, INC) repeat 6 times (36)
- Round 7: (5 SC, INC) repeat 6 times (42)
- Round 8: (6 SC, INC) repeat 6 times (48)
- Rounds 9-16: SC in each stitch around (48)
- Round 17: (6 SC, DEC) repeat 6 times (42)
- Round 18: SC in each stitch around (42)
- Round 19: (5 SC, DEC) repeat 6 times (36)
- Round 20: SC in each stitch around (36)
- Round 21: (4 SC, DEC) repeat 6 times (30)
- Round 22: SC in each stitch around (30)
- Round 23: (3 SC, DEC) repeat 6 times (24)
- Round 24: SC in each stitch around (24)
Begin stuffing firmly at this point, continuing to add stuffing as you go.
- Round 25: (2 SC, DEC) repeat 6 times (18)
- Round 26: SC in each stitch around (18)
- Round 27: (SC, DEC) repeat 6 times (12)
- Round 28: DEC around (6)
Fasten off, leaving a long tail. Pull the tail through the front loops of the remaining 6 stitches and pull tight to close. Weave in the end.
Pony Amigurumi Head
- With cream yarn, create a magic ring
- Round 1: 6 SC into the ring (6)
- Round 2: INC in each stitch around (12)
- Round 3: (SC, INC) repeat 6 times (18)
- Round 4: (2 SC, INC) repeat 6 times (24)
- Round 5: (3 SC, INC) repeat 6 times (30)
- Round 6: (4 SC, INC) repeat 6 times (36)
- Round 7: (5 SC, INC) repeat 6 times (42)
- Rounds 8-14: SC in each stitch around (42)
- Round 15: (5 SC, DEC) repeat 6 times (36)
- Round 16: (4 SC, DEC) repeat 6 times (30)
- Round 17: (3 SC, DEC) repeat 6 times (24)
Insert safety eyes between rounds 9 and 10, approximately 8-10 stitches apart.
- Begin stuffing the head firmly at this point
Pony Amigurumi Snout
- With dark brown yarn, create a magic ring
- Round 1: 6 SC into the ring (6)
- Round 2: INC in each stitch around (12)
- Round 3: (SC, INC) repeat 6 times (18)
- Round 4: (2 SC, INC) repeat 6 times (24)
- Rounds 5-7: SC in each stitch around (24)
- Round 8: (2 SC, DEC) repeat 6 times (18)
Stuff lightly and attach to the front of the head, centered and positioned between rounds 8-14.
Pony Amigurumi Legs (Make 4)
Pony Amigurumi Upper Legs
- With cream yarn, create a magic ring
- Round 1: 6 SC into the ring (6)
- Round 2: INC in each stitch around (12)
- Round 3: (SC, INC) repeat 6 times (18)
- Rounds 4-8: SC in each stitch around (18)
Hooves
- Switch to dark brown yarn
- Round 9: SC in each stitch around (18)
- Round 10: (7 SC, DEC) repeat 2 times (16)
- Rounds 11-12: SC in each stitch around (16)
Stuff firmly, especially in the hoof area. Fasten off, leaving a long tail for sewing to the body.
Ears (Make 2)
Outer Ear
- With cream yarn, chain 7
- Row 1: Starting from 2nd chain from hook, SC in each chain (6)
- Row 2: Ch 1, turn, INC, 4 SC, INC (8)
- Row 3: Ch 1, turn, 8 SC (8)
- Row 4: Ch 1, turn, DEC, 4 SC, DEC (6)
- Row 5: Ch 1, turn, DEC, 2 SC, DEC (4)
Inner Ear
- With light pink yarn, chain 5
- Row 1: Starting from 2nd chain from hook, SC in each chain (4)
- Row 2: Ch 1, turn, 4 SC (4)
- Row 3: Ch 1, turn, 4 SC (4)
Sew the pink inner ear piece to the cream outer ear. Do not stuff the ears.
Tail
- With dark brown yarn, chain 15
- Row 1: Starting from 2nd chain from hook, SC in each chain (14)
- Row 2: Ch 1, turn, 14 SC (14)
- Row 3: Ch 1, turn, 14 SC (14)
- Row 4: Ch 1, turn, 14 SC (14)
Cut approximately 30 strands of dark brown yarn, each about 8 inches long. Fold each strand in half and attach them along the base of the tail using a crochet hook to pull the folded end through a stitch, then pulling the ends through the loop. Trim to desired length.
Mane
Mane Base
- With dark brown yarn, chain 26
- Row 1: Starting from 2nd chain from hook, SC in each chain (25)
- Row 2: Ch 1, turn, 25 SC (25)
- Row 3: Ch 1, turn, 25 SC (25)
Mane Strands
Cut approximately 60-80 strands of dark brown yarn, each about 10 inches long. Fold each strand in half and attach them along the base of the mane using a crochet hook to pull the folded end through a stitch, then pulling the ends through the loop. Arrange them to create the flowing mane effect seen in the image. Trim to desired length.
Bandana
- With light pink yarn, chain 24
- Row 1: Starting from 2nd chain from hook, SC in each chain (23)
- Row 2: Ch 1, turn, 23 SC (23)
- Row 3: Ch 1, turn, 23 SC (23)
- Row 4: Ch 1, turn, 23 SC (23)
Fold the bandana into a triangle and sew the straight edges together. Position around the pony’s neck.
Pink Ear Bows (Make 2)
- With light pink yarn, chain 8
- Row 1: Starting from 2nd chain from hook, SC in each chain (7)
- Row 2: Ch 1, turn, 7 SC (7)
Pinch in the middle and wrap with a small piece of pink yarn to create a bow shape. Attach to the top of each ear.
Assembly
- Head to Body: Sew the head to the front of the body, positioning it so the pony has a natural-looking downward gaze.
- Legs: Position the front legs at the bottom front of the body and the back legs at the bottom back. Sew securely.
- Ears: Attach the ears to the top of the head, angled slightly outward for a cute look.
- Mane: Sew the mane base along the top of the head, starting between the ears and continuing down the back of the neck. Arrange the flowing strands as desired.
- Tail: Attach the tail at the back of the body, positioning it so the flowing strands hang down naturally.
- Bandana: Wrap the bandana around the neck and secure with a few stitches.
- Details: Add any additional embroidery or details as desired, such as nostrils or additional facial features.
Creating The Flowing Mane Effect
The flowing mane is what gives this pony its distinctive charm. Here’s a detailed approach to achieve this effect:
- After attaching the mane base to the head and neck, divide the yarn strands into small sections.
- For each section, gently twist the strands together to create a spiral effect.
- Use your fingers to carefully separate and fluff some strands for a natural-looking texture.
- For defined curls in certain sections, wrap small portions around a pencil or dowel, mist lightly with water, and allow to dry before removing.
- Position some strands to fall over the face for that classic pony look, while arranging others to cascade down the neck.
- Use a wide-toothed comb or your fingers to gently separate and style the mane once all strands are attached.
Customization Ideas
This basic pattern can be modified in many ways:
- Change the colors for different types of ponies (black, chestnut, palomino, etc.)
- Add spots or markings for an appaloosa or pinto look
- Create different bandana styles or add a small saddle
- Make a unicorn version by adding a horn
- Scale the pattern up or down for different sized ponies
Troubleshooting Tips
- If your pony won’t stand: Check that the legs are positioned symmetrically and are stuffed firmly enough to support the body weight.
- For a rounder face: Add a few extra increase rounds when making the head.
- If the mane is too bulky: Use fewer strands or thinner yarn for a more delicate look.
Care Instructions
To keep your amigurumi pony looking its best:
- Spot clean with mild soap and water as needed
- Air dry completely
- Gently brush the mane and tail with a soft-bristled brush
- Store in a clean, dry place away from direct sunlight
- Reshape if necessary after cleaning
Check this out :Crocheting a Charming Horse Amigurumi
Conclusion
Creating this adorable farm pony amigurumi is a rewarding project that combines various crochet techniques to produce a characterful toy with personality. Whether made as a gift or for your own collection, this pony with its distinctive flowing mane and cute bandana is sure to bring smiles to all who see it.
The attention to detail in the design makes it an impressive display piece for amigurumi enthusiasts. Follow the pattern carefully, take your time with the assembly, and don’t be afraid to add your own creative touches to make your pony truly unique.
Happy crocheting!
