

Table of Contents
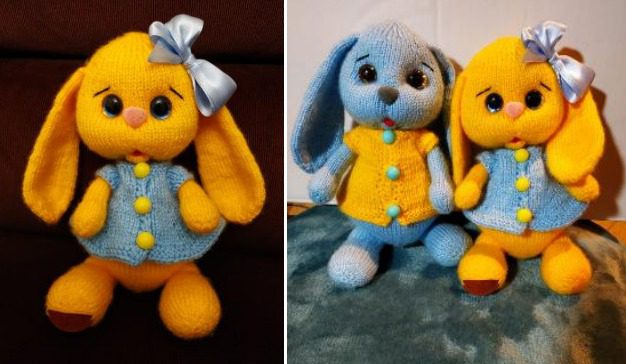
These Bunny Dolls charming knitted bunny dolls with their long floppy ears and cute removable outfits make perfect handmade gifts for children or delightful additions to any knitted toy collection. This comprehensive guide will walk you through creating both the yellow and blue variations, complete with their coordinating outfits and accessories.
Bunny Dolls Materials Needed
For the Bunnies
- Main yarn:
- Bright yellow DK or light worsted weight yarn (for yellow bunny)
- Light blue DK or light worsted weight yarn (for blue bunny)
- Accent yarn:
- Small amount of pink yarn (for nose)
- Small amount of white yarn (for eye highlights)
- Tools and notions:
- US size 3-4 (3.25-3.5mm) knitting needles
- Double-pointed needles (DPNs) for small parts
- Safety eyes (9-12mm black)
- Polyester fiberfill
- Yarn needle
- Stitch markers
- Scissors
- Pink embroidery floss (for mouth)
Bunny Dolls For the Outfits
- Light blue DK yarn (for yellow bunny’s outfit)
- Bright yellow DK yarn (for blue bunny’s outfit)
- Small amount of white yarn (for bow)
- 4-5 small buttons in contrasting color
- Small amount of turquoise yarn (for accent buttons)
Bunny Dolls Knitting Techniques You’ll Need
- Knitting in the round
- Increasing and decreasing
- Basic colorwork (for facial features)
- Picking up stitches
- Seaming and joining
- Working with double-pointed needles
- Simple embroidery
Bunny Body Pattern
Bunny Dolls Head
- Begin at the top of the head:
- With main color (yellow or blue), cast on 8 stitches and distribute onto 3 or 4 DPNs.
- Join to work in the round, being careful not to twist.
- Increase rounds:
- Round 1: Knit all stitches (8)
- Round 2: [KFB (knit front and back of stitch)] around (16)
- Round 3: Knit all stitches (16)
- Round 4: [K1, KFB] around (24)
- Round 5: Knit all stitches (24)
- Round 6: [K2, KFB] around (32)
- Round 7: Knit all stitches (32)
- Round 8: [K3, KFB] around (40)
- Rounds 9-16: Knit all stitches (40)
- Face shaping:
- Round 17: [K8, K2tog] around (36)
- Round 18: Knit all stitches (36)
- Round 19: [K4, K2tog] around (30)
- Round 20: Knit all stitches (30)
- Round 21: [K3, K2tog] around (24)
Begin stuffing the head firmly at this point.
- Closing the head:
- Round 22: [K2, K2tog] around (18)
- Round 23: [K1, K2tog] around (12)
- Round 24: [K2tog] around (6)
- Cut yarn, thread through remaining stitches with yarn needle, pull tight and secure.
Bunny Dolls Body
- Begin at the neck:
- With main color (matching the head), pick up 24 stitches around the neck edge.
- Join to work in the round.
- Body shaping:
- Rounds 1-2: Knit all stitches (24)
- Round 3: [K3, KFB] around (30)
- Rounds 4-5: Knit all stitches (30)
- Round 6: [K4, KFB] around (36)
- Rounds 7-14: Knit all stitches (36)
- Round 15: [K4, K2tog] around (30)
- Round 16: Knit all stitches (30)
- Round 17: [K3, K2tog] around (24)
- Round 18: Knit all stitches (24)
- Round 19: [K2, K2tog] around (18)
- Round 20: [K1, K2tog] around (12)
Begin stuffing the body firmly, continuing as you decrease.
- Closing the body:
- Round 21: [K2tog] around (6)
- Cut yarn, thread through remaining stitches, pull tight and secure.
Bunny Dolls Arms (Make 2)
- Begin at the paw:
- With main color, cast on 12 stitches and distribute onto DPNs.
- Join to work in the round.
- Arm shaping:
- Rounds 1-4: Knit all stitches (12)
- Round 5: [K4, K2tog] around (10)
- Rounds 6-16: Knit all stitches (10)
Stuff lightly, more firmly at the paws.
- Closing the arm:
- Round 17: [K2tog] around (5)
- Cut yarn, thread through remaining stitches, pull tight and secure.
Bunny Dolls Legs (Make 2)
- Begin at the foot:
- With main color, cast on 14 stitches and distribute onto DPNs.
- Join to work in the round.
- Leg and foot shaping:
- Rounds 1-4: Knit all stitches (14)
- Round 5: [K5, K2tog] around (12)
- Rounds 6-18: Knit all stitches (12)
Stuff firmly, especially in the foot area.
- Closing the leg:
- Round 19: [K2tog] around (6)
- Cut yarn, thread through remaining stitches, pull tight and secure.
Ears (Make 2)
- Begin at ear base:
- With main color, cast on 8 stitches.
- Work in rows:
- First section (widening):
- Row 1: Knit all stitches (8)
- Row 2: Purl all stitches (8)
- Row 3: [K1, KFB] around (12)
- Row 4: Purl all stitches (12)
- Row 5: [K1, KFB] repeat to end (18)
- Row 6: Purl all stitches (18)
- Rows 7-18: Continue in stockinette stitch (knit on right side, purl on wrong side) (18)
- Second section (narrowing):
- Row 19: [K1, K2tog] repeat to end (12)
- Row 20: Purl all stitches (12)
- Row 21: [K2tog] repeat to end (6)
- Row 22: Purl all stitches (6)
Cut yarn, thread through remaining stitches, and secure. Do not stuff ears.
Facial Features
- Eyes:
- Place safety eyes on the face between rounds 12-14, approximately 10 stitches apart.
- Secure backings before stuffing is complete.
- Nose:
- With pink yarn, embroider a small triangle or oval nose centered below the eyes.
- Mouth:
- With pink embroidery floss, create a simple curved smile below the nose.
Bunny Outfits
Basic Cardigan (for both bunnies)
- Back panel:
- With contrasting yarn (blue for yellow bunny, yellow for blue bunny), cast on 18 stitches.
- Work in stockinette stitch for 20 rows.
- Bind off.
- Left front panel:
- Cast on 10 stitches.
- Work in stockinette stitch for 20 rows.
- Bind off.
- Right front panel:
- Cast on 10 stitches.
- Work in stockinette stitch for 20 rows.
- Bind off.
- Sleeves (make 2):
- Cast on 10 stitches.
- Work in stockinette stitch for 10 rows.
- Bind off.
- Assembly:
- Sew shoulder seams, joining back panel to front panels.
- Sew sleeve seams and attach to the body of the cardigan.
- Add button holes on one front panel:
- Work buttonholes evenly spaced by binding off 1 stitch and casting on 1 stitch on the next row.
- Sew buttons on the opposite front panel.
Optional Pants (for blue bunny)
- Begin at waist:
- With matching color yarn, cast on 24 stitches.
- Join to work in the round.
- Pants body:
- Rounds 1-10: Knit all stitches (24)
- Next round: Knit 12 stitches, place remaining stitches on holder.
- Work each leg separately in the round for 12 rounds.
- Bind off.
- Return to held stitches and repeat for second leg.
Hair Bow (for girl bunny)
- With white or light blue yarn, cast on 12 stitches.
- Work in garter stitch (knit every row) for 12 rows.
- Bind off.
- Pinch the center and wrap with a small piece of matching yarn to create bow shape.
- Sew to the top of the head.
Assembly Instructions
- Head and Body:
- The head and body should already be connected if you followed the pattern in sequence.
- Arms:
- Sew arms to the sides of the body, positioning them so the bunny can “sit” naturally.
- Legs:
- Sew legs to the bottom of the body, ensuring the bunny sits upright.
- Ears:
- Fold ears in half lengthwise and sew to the top of the head, spacing them evenly.
- Outfits:
- Dress the bunnies in their outfits, adjusting as needed for fit.
- Accessories:
- Add hair bow and any other decorative elements.
Special Techniques
Creating Floppy Ears
The long floppy ears are a distinctive feature of these bunnies. To ensure they have the right flop:
- After knitting the ears, steam or lightly dampen them.
- Shape them with a gentle curve.
- Allow to dry completely before attaching to the head.
- When attaching, position them so they naturally hang down along the sides of the bunny’s face.
Button Accents
For the turquoise button accents:
- Cut 4-5 very short lengths of turquoise yarn (about 1 inch each).
- Thread a yarn needle with the turquoise yarn.
- Make a single stitch at each button position.
- Secure on the back side with a small knot.
Customization Ideas
This basic pattern can be modified in many ways:
- Create different colored bunnies (pink, green, purple, etc.)
- Make seasonal outfits (swimwear, winter clothes, holiday themes)
- Add accessories like small backpacks or purses
- Create a “family” with different sized bunnies
- Add embroidered details to the outfits
Finishing Touches
- Check all seams to ensure they’re secure and no stuffing will escape.
- Fluff and shape the bunny to ensure proper posture.
- Add any final details like straightening the bow or adjusting the outfit.
- Brush the completed bunny with a soft brush for a fluffy finish if desired.
Display Ideas
These adorable bunnies look great:
- As a pair or trio (multiple color variations)
- In a child’s room on a shelf
- As part of a seasonal display
- Sitting in a doll house or miniature scene
- As Easter decorations
Care Instructions
To keep your knitted bunnies looking their best:
- Spot clean with mild soap and water
- Allow to air dry completely
- Reshape if necessary after cleaning
- Store away from direct sunlight to prevent fading
- For outfits, hand wash separately and lay flat to dry
Troubleshooting Tips
- If ears won’t stay upright: Add a small pipe cleaner inside during knitting for structure
- If bunny won’t sit properly: Check leg placement and add more stuffing to bottom
- If outfit is too tight: Block gently to stretch slightly
- If outfit is too loose: Add a small safety pin to adjust fit
Check this out :Crocheting an Adorable Farm Pony Amigurumi
Conclusion
Creating these charming bunny dolls is a delightful project that combines basic knitting techniques with cute design elements. The contrasting outfits and sweet facial expressions make them irresistible toys for children or collectibles for craft enthusiasts. By following this pattern carefully and adding your own creative touches, you’ll create unique handmade treasures that are sure to be cherished.
Happy knitting!
