

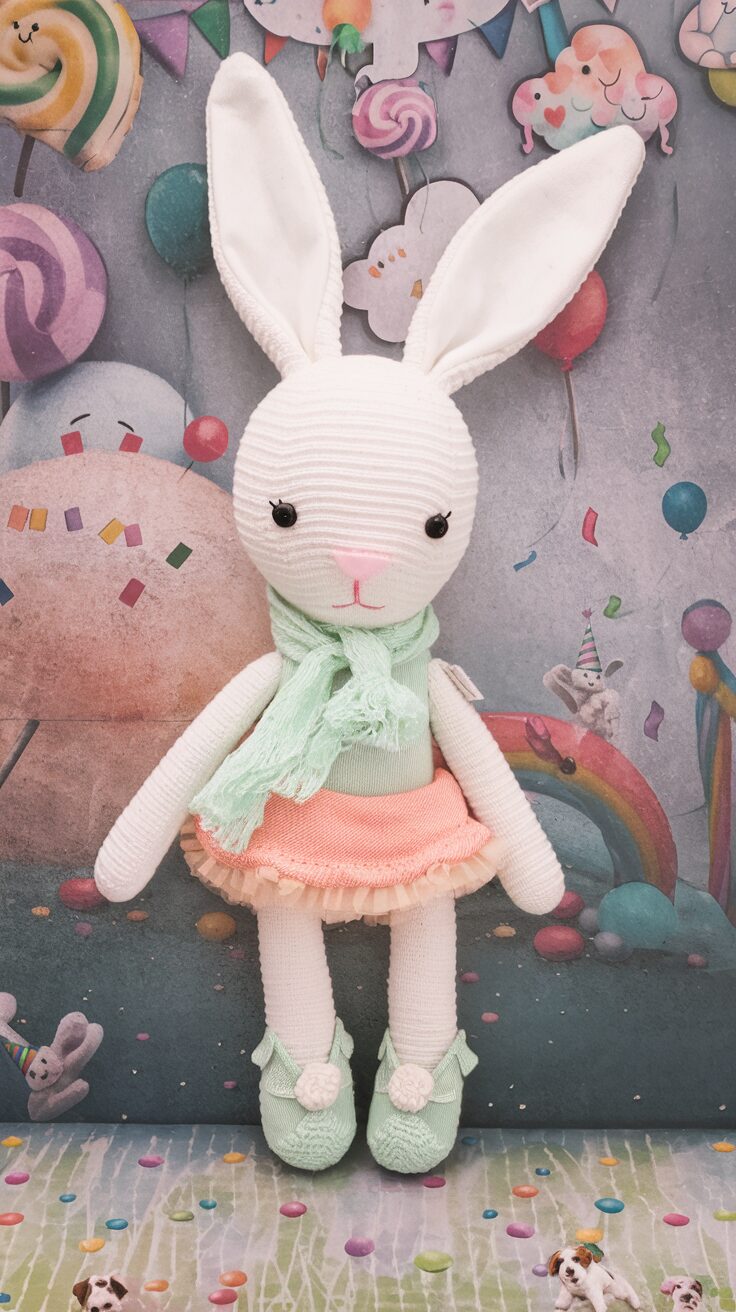
Creating your own adorable Easter Bunny amigurumi bunny is a rewarding project that results in a charming companion or heartfelt gift. This Jenny the Bunny amigurumi pattern walks you through creating a sweet, stylish Easter Bunny complete with a cute dress, mint green boots, and a cozy scarf. Standing at approximately 30 cm (11.8 inches) tall when finished, Jenny makes an impressive yet achievable project for beginner to intermediate crocheters.
If you Like Easter Bunny Amigurumi you can Like The Adorable Girl in Yellow Dress Crochet Pattern TOOO …
Table of Contents
Materials Needed for Your Amigurumi Easter Bunny
Before you begin, gather these supplies to create your Jenny the Bunny amigurumi:
- Yarn: 100% cotton yarn (I used Egitto Titan Wool, 50g/127.5m)
- White (for bunny body, head, arms, and ears)
- Pink (for dress)
- Mint green (for boots and scarf)
- Small amount of black cotton yarn (for eyelashes)
- Small amount of pink cotton yarn (for mouth)
- Crochet hook: 2.0 mm (or size appropriate for your chosen yarn)
- Additional supplies:
- Polyester fiberfill for stuffing
- 8 mm plastic safety eyes
- Plastic safety nose (optional – you can also stitch the nose with pink yarn)
- Darning needle
- Scissors
- Stitch marker
Abbreviations and Techniques
This pattern uses US terminology and is worked in continuous rounds unless otherwise stated:
- ch = chain
- dec = decrease (insert hook into front loop of first stitch, repeat into front loop of next stitch, yarn over and pull loop through both loops on hook)
- dc = double crochet (yarn over, insert hook, yarn over, pull loop through stitch, yarn over, pull through 2 loops, yarn over, pull through remaining 2 loops)
- inc = increase (work two single crochets into the same stitch)
- sc = single crochet (insert hook, yarn over, pull loop through stitch, yarn over, pull through both loops on hook)
- sl st = slip stitch (insert hook, yarn over, pull loop through stitch and loop on hook)
- st = stitch
Detailed Amigurumi Easter Bunny Pattern Instructions
Head
Using white yarn:
Round 1: Start with 6 sc in a magic ring [6]
Round 2: Work 2 sc in each st around [12]
Round 3: (Sc in next st, inc in next st) x 6 [18]
Round 4: (Sc in each of next 2 st, inc in next st) x 6 [24]
Round 5: (Sc in each of next 3 st, inc in next st) x 6 [30]
Round 6: (Sc in each of next 4 st, inc in next st) x 6 [36]
Round 7: (Sc in each of next 5 st, inc in next st) x 6 [42]
Round 8: (Sc in each of next 6 st, inc in next st) x 6 [48]
Round 9: (Sc in each of next 7 st, inc in next st) x 6 [54]
Rounds 10-25: Sc in each st around [54]
At this point, insert plastic safety eyes between rounds 19 and 20 (10 stitches apart). Insert the nose between rounds 21 and 22, or stitch it with pink cotton yarn. Stitch the eyelashes and mouth with cotton yarn. Secure the washers on the inside of the work.
Round 26: (Sc in each of next 7 st, dec) x 6 [48]
Round 27: (Sc in each of next 6 st, dec) x 6 [42]
Round 28: (Sc in each of next 5 st, dec) x 6 [36]
Round 29: (Sc in each of next 4 st, dec) x 6 [30]
Begin stuffing the head with polyester fiberfill and continue adding stuffing as you work.
Round 30: (Sc in each of next 3 st, dec) x 6 [24]
Round 31: (Sc in each of next 2 st, dec) x 6 [18]
Round 32: (Sc in each of next 4 st, dec) x 3 [15]
Cut the yarn, leaving a long tail for sewing.
Legs and Body
The legs and body are made as one continuous piece. Start with white yarn:
Round 1: Start with 6 sc in a magic ring [6]
Round 2: Work 2 sc in each st around [12]
Round 3: (Sc in each of next 3 st, inc in next st) x 3 [15]
Rounds 4-26: Sc in each st around [15]
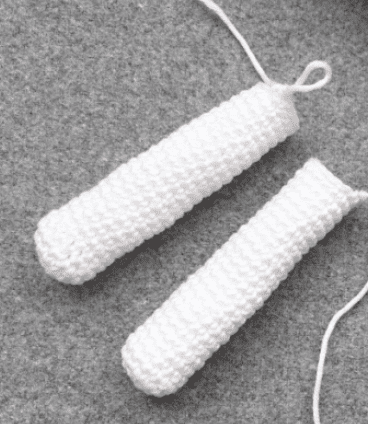
Bind off the first leg. Leave a yarn tail about 20 cm long and cut the yarn. Put it aside while you create the second leg by repeating rounds 1-26. Important: Do not cut the yarn after finishing the second leg.
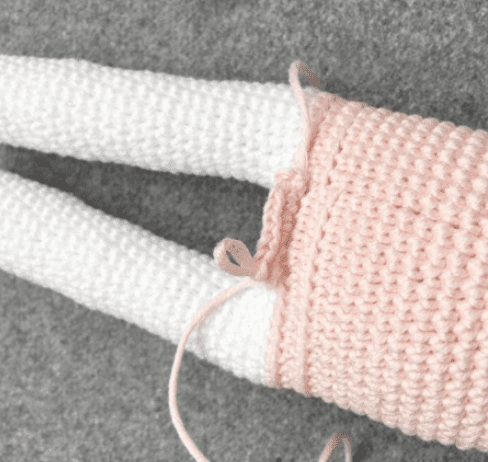
Joining the legs (Round 27): Continue with the second leg, sc in each of next 15 sts, ch 8. Continue around the first leg (starting with the first st in what would have been the next round). Sc in each of next 15 sts, ch 8. You have now made 46 sts (15 sc + 8 ch + 15 sc + 8 ch). The piece is still open but will be joined to a round with the first stitch of the next round.
Rounds 28-30: Sc in each st around [46]
Close the hole between the legs using the yarn tail left from the first leg. Stuff the legs with polyester fiberfill.
Switch to pink yarn:
Round 31: Sc in each st around [46]
Round 32: Working in the back loops only, sc in each st around [46]
Round 33: Sc in each st around [46]
Round 34: Working in the back loops only, sc in each st around [46]
Rounds 35-44: Sc in each st around [46]
Round 45: (Sc in each of next 21 st, dec) x 2 [44]
Round 46: (Sc in each of next 9 st, dec) x 4 [40]
Round 47: (Sc in each of next 8 st, dec) x 4 [36]
Rounds 48-49: Sc in each st around [36]
Round 50: (Sc in each of next 4 st, dec) x 6 [30]
Round 51: Sc in each st around [30]
Stuff half of the body with polyester fiberfill and continue adding stuffing as you work.
Round 52: (Sc in each of next 3 st, dec) x 6 [24]
Round 53: Sc in each st around [24]
Round 54: (Sc in each of next 2 st, dec) x 6 [18]
Round 55: (Sc in each of next 4 st, dec) x 3 [15]
Cut the yarn, leaving a long tail for sewing.
Skirt
With pink yarn:
Hold the legs toward yourself and work in the front loops of round 32:
Round 1: Pull the yarn through the first loop and ch 2. Starting with the same stitch, work 2 sc in each st around [92]. Sl st in the first sc.
Rounds 2-3: Ch 1. Starting with the same stitch, sc in each st around [92]. Sl st in the first sc.
Repeat rounds 1-3, working in the front loops of round 34.
Sew the body to the head.
Arms (Make 2)
With white yarn:
Round 1: Start with 6 sc in a magic ring [6]
Round 2: Work 2 sc in each st around [12]
Rounds 3-24: Sc in each st around [12]
Fill the arm with stuffing.
Round 25: Dec x 6, sl st in next st [6]
Cut the yarn, leaving a long tail for sewing. Attach the arms to the body.
Ears (Make 2)
With white yarn:
Round 1: Start with 6 sc in a magic ring [6]
Round 2: (Sc in next st, inc in next st) x 3 [9]
Round 3: (Sc in each of next 2 st, inc in next st) x 3 [12]
Rounds 4-6: Sc in each st around [12]
Round 7: (Sc in each of next 3 st, inc in next st) x 3 [15]
Round 8: Sc in each st around [15]
Round 9: (Sc in each of next 4 st, inc in next st) x 3 [18]
Round 10: Sc in each st around [18]
Round 11: (Sc in each of next 5 st, inc in next st) x 3 [21]
Round 12: Sc in each st around [21]
Round 13: (Sc in each of next 6 st, inc in next st) x 3 [24]
Rounds 14-20: Sc in each st around [24]
Round 21: (Sc in each of next 6 st, dec) x 3 [21]
Round 22: Sc in each st around [21]
Round 23: (Sc in each of next 5 st, dec) x 3 [18]
Round 24: Sc in each st around [18]
Round 25: (Sc in each of next 4 st, dec) x 3 [15]
Round 26: Sc in each st around [15]
Round 27: (Sc in each of next 3 st, dec) x 3 [12]
Round 28: Sc in each st around [12]
Cut the yarn, leaving a long tail for sewing. Attach the ears to the head.
Boots (Make 2)

With mint green yarn:
Round 1: Start with 6 sc in a magic ring [6]
Round 2: Work 2 sc in each st around [12]
Round 3: (2 sc in each of next 4 st, sc in each of next 2 st) x 2 [20]
Round 4: Sc in each of next 3 st, 2 sc in each of next 4 st, sc in each of next 6 st, 2 sc in each of next 4 st, sc in each of next 3 st [28]
Round 5: Working in the back loops only, sc in each st around [28]. Sl st in the first sc.
Rounds 6-7: Ch 1. Sc in each st around [28]. Sl st in the first sc.
Round 8: Ch 1. Sc in the next st. Dec x 4. Sc in each of next 19 st [24]. Sl st in the first sc.
Round 9: Ch 1. Sc in the next st. Dec x 1. Sc in each of next 21 st [23]. Sl st in the first sc.
Round 10: Ch 1. Dec x 1. Sc in each of next 21 st [22]. Sl st in the first sc.
Rounds 11-13: Ch 1. Sc in each of next 22 st [22]. Sl st in the first sc.
Scarf
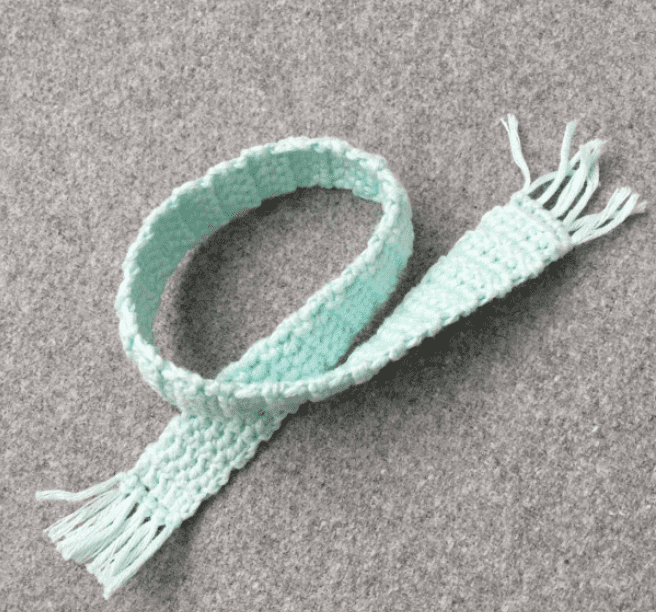
With mint green yarn:
Row 1: Ch 6.
Row 2: Work in the opposite direction. Starting with the second stitch, sc in each st around [5].
Row 3: Turn the piece. Dc in each of next 5 st [5].
Row 4: Turn the piece. Starting with the same stitch, sc in each st around [5].
Repeat rows 3-4 32 times (or until the scarf reaches your desired length).
To make fringes, cut 10 pieces of yarn about 4 cm long and attach to the ends of the scarf.
Finishing Your Amigurumi Easter Bunny
- Sew the head to the body securely.
- Attach the arms to the body, positioning them at a natural angle.
- Sew the ears to the top of the head.
- Place the boots on the bunny’s feet.
- Wrap the scarf around the bunny’s neck.
Your Jenny the Bunny amigurumi is now complete! This adorable handmade Easter Bunny makes a perfect gift or charming addition to your own collection.
Customization Ideas
While the pattern creates the classic Jenny the Easter Bunny as designed, you can personalize your creation with these variations:
- Color Choices: Try different colors for the dress, boots, or scarf to match your preferences or the recipient’s favorite colors
- Outfit Changes: Create additional outfits like a simple skirt, pants, or a seasonal costume
- Accessory Additions: Add a tiny flower crown, backpack, or other small accessories to personalize your Easter Bunny
- Size Adjustments: Use different yarn weights and corresponding hook sizes to create a larger or smaller Easter Bunny
- Facial Expression: Vary the placement of eyes and the style of mouth embroidery to give your Easter Bunny a unique personality
Tips for Amigurumi Success
- Tension Matters: Keep your tension consistent throughout for the most professional-looking result
- Count Your Stitches: Use stitch markers and count frequently to ensure accuracy
- Stuff Properly: Add stuffing gradually and firmly, but not so tightly that it distorts the shape
- Secure Safety Parts: Always ensure safety eyes and nose are firmly attached before completing your amigurumi, especially if making the Easter Bunny for children
- Sewing Technique: When attaching parts, use the matching yarn color and take small, even stitches for the cleanest finish
Enjoy creating your own Jenny the Easter Bunny amigurumi, and don’t forget that each handmade creation has its own unique character and charm!
This pattern is for personal use and finished items can be sold with proper credit to the designer. Please do not share, reproduce, or sell this pattern itself. Original pattern by Deli T.
