

Table of Contents
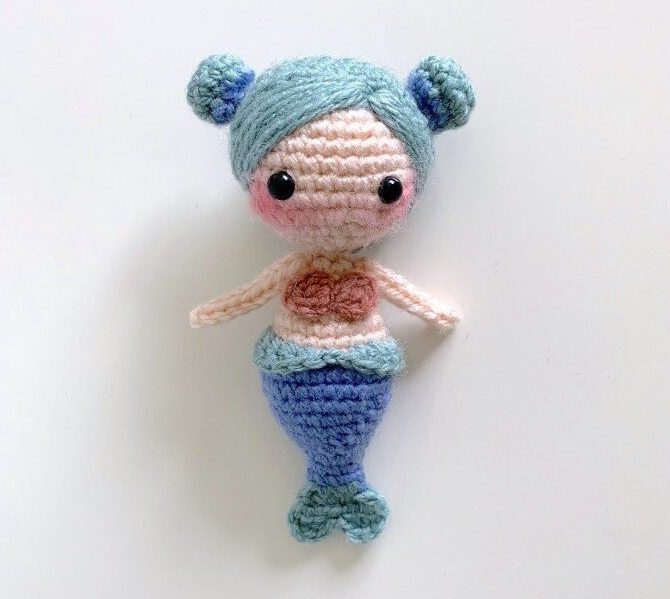
Creating Amigurumi Mermaid a charming amigurumi mermaid doll brings the magic of the ocean to your crochet collection. This intermediate-level project combines creative color changes, interesting textures, and adorable details to craft a miniature mermaid with flowing hair, a distinctive tail fin, and sweet facial features. Follow this comprehensive guide to create your own enchanting sea companion that’s perfect for gifting, collecting, or imaginative play.
Materials Needed for Your Amigurumi Mermaid
Before beginning your underwater adventure, gather these supplies:
- Amigo XL yarn in the following colors:
- Light Peach (#46) – 1 skein for skin tones
- Vintage Pink (#49) – 1 skein for bikini top
- Verdigris (#25) – 1 skein for hair and tail fin
- Cornflower (#17) – 1 skein for body and tail details
- Crochet hook size 3 mm (US size C)
- Safety eyes (7 mm)
- Polyester fiberfill stuffing
- White pipe cleaner for neck support
- Tapestry needle for assembly
- Scissors
- Blush powder and cotton swab for facial details (optional)
- Decorative embellishments like beads or small shells (optional)
Understanding Amigurumi Mermaid Terminology
For successful completion of your mermaid doll, familiarize yourself with these essential crochet terms:
- Magic ring (MR): A technique to begin crocheting in the round
- Chain (ch): The foundation stitch in crochet
- Slip stitch (sl st): Used to join rounds or create a flat joining stitch
- Single crochet (sc): The most common stitch used in amigurumi
- Half double crochet (hdc): A medium-height stitch
- Double crochet (dc): A taller stitch
- Increase (inc): Working two stitches into one stitch
- Decrease (dec): Working two stitches together
- Back loop only (BLO): Working through only the back loop of a stitch
- Yarn over (YO): Wrapping yarn over the hook
Numbers in parentheses after each round indicate the total stitch count when the round is complete.
Creating Amigurumi Mermaid Head and Body
Begin with the main structure of your mermaid using Light Peach yarn for the upper body:
Round 1: Create a magic ring and work 6 single crochets into it (6 stitches) Round 2: Increase in each stitch around (12 stitches) Round 3: Work 1 single crochet, then increase. Repeat around (18 stitches) Round 4: Work 2 single crochets, then increase. Repeat around (24 stitches) Round 5: Work 3 single crochets, then increase. Repeat around (30 stitches) Rounds 6-11: Work 1 single crochet in each stitch for six rounds (30 stitches) Round 12: Work 3 single crochets, then decrease. Repeat around (24 stitches)
At this point, attach 7 mm safety eyes between Rounds 9 and 10, with 6 stitches between them. Begin stuffing the head, and continue adding stuffing as you work downward.
Round 13: Work 2 single crochets, then decrease. Repeat around (18 stitches) Round 14: Work 1 single crochet, then decrease. Repeat around (12 stitches) Round 15: Decrease around (6 stitches) Round 16: Work 1 single crochet in each stitch (6 stitches)
Begin forming the body:
Round 17: Increase in each stitch around (12 stitches) Round 18: Work 3 single crochets, increase. Repeat three times (15 stitches) Round 19: Work 4 single crochets, increase. Repeat three times (18 stitches) Round 20: Work 5 single crochets, increase. Repeat three times (21 stitches) Rounds 21-22: Work 1 single crochet in each stitch for two rounds (21 stitches)
Switch to Cornflower yarn for the mermaid’s tail:
Round 23: Working in back loops only, work 6 single crochets, increase. Repeat three times (24 stitches) Round 24: Work 7 single crochets, increase. Repeat three times (27 stitches) Round 25: Work 1 single crochet in each stitch (27 stitches)
Insert a folded pipe cleaner up through the neck into the head to provide stability. Continue stuffing the body as you work downward.
Round 26: Work 7 single crochets, decrease. Repeat three times (24 stitches) Round 27: Work 6 single crochets, decrease. Repeat three times (21 stitches) Round 28: Work 5 single crochets, decrease. Repeat three times (18 stitches) Round 29: Work 4 single crochets, decrease. Repeat three times (15 stitches) Round 30: Work 3 single crochets, decrease. Repeat three times (12 stitches) Round 31: Work 4 single crochets, decrease. Repeat twice (10 stitches) Round 32: Work 3 single crochets, decrease. Repeat twice (8 stitches) Round 33: Work 1 single crochet in each stitch (8 stitches)
Ensure your mermaid’s body is stuffed firmly but not overstuffed, which could distort the stitches. Switch to Verdigris yarn for the tail fin.
Round 34: Squeeze Round 33 flat and close it with 4 single crochets across Round 35: Chain 1, turn, increase, 2 single crochets, increase (6 stitches) Round 36: Chain 1, turn, increase, 1 single crochet, 2 slip stitches, 1 single crochet, increase (8 stitches) Round 37: Chain 2, turn, 1 double crochet, 1 half double crochet, 2 slip stitches, 1 half double crochet, 1 double crochet, chain 2, 1 slip stitch
Fasten off and weave in the ends.
Amigurumi Mermaid Crafting the Hip Fin
Using Verdigris yarn, add a decorative fin at the hip transition:
Attach yarn to the center back of the doll, at the back loops created during Round 23 of the body. Work this round in the front loops of Round 23:
Chain 3, work 1 double crochet in the same stitch. Work 1 double crochet in each stitch until you reach the middle of the mermaid’s back. Work 1 half double crochet, 2 slip stitches (this part should be positioned at the center back of the mermaid), then 1 half double crochet. Continue with 1 double crochet in each stitch around the remaining half.
Join with a slip stitch to the first double crochet to complete the round. Fasten off and weave in the ends.
Amigurumi Mermaid Creating the Bikini Top
Using Vintage Pink yarn, form a simple bikini top:
Round 1: In a magic ring, work (chain 3, 1 double crochet, chain 3, 1 slip stitch) twice. Pull the ring tight.
Fasten off, leaving a long tail for sewing to the body later.
Amigurumi Mermaid Forming the Hair Cap
Using Verdigris yarn, create the base for the mermaid’s hairstyle:
Round 1: Create a magic ring and work 6 single crochets into it (6 stitches) Round 2: Increase in each stitch around (12 stitches) Round 3: Work 1 single crochet, then increase. Repeat around (18 stitches) Round 4: Work 2 single crochets, then increase. Repeat around (24 stitches) Round 5: Work 3 single crochets, then increase. Repeat around (30 stitches) Rounds 6-10: Work 1 single crochet in each stitch for five rounds (30 stitches)
Fasten off, leaving a long tail for sewing to the head later.
Amigurumi Mermaid Creating Hair Buns
Make two identical hair buns using Verdigris and Cornflower yarn:
Round 1: Create a magic ring and work 6 single crochets into it (6 stitches) Round 2: Increase in each stitch around (12 stitches) Round 3: Work 1 single crochet in each stitch (12 stitches)
Switch to Cornflower yarn: Round 4: Work 2 single crochets, decrease. Repeat three times (9 stitches)
Fasten off, leaving a long tail for sewing to the hair cap later.
Forming the Arms
Create two identical arms using Light Peach yarn:
Set up an i-cord technique: Chain 3, insert hook into second chain from hook, yarn over, pull up a loop. Insert hook into next chain, yarn over, pull up a loop (3 loops on hook).
Round 1: Drop 2 loops from hook (hold them securely with your non-hook hand). Yarn over, pull through the remaining loop on hook. Insert hook into first dropped loop, yarn over, pull through (2 loops on hook). Insert hook into second dropped loop, yarn over, pull through (3 loops on hook).
Rounds 2-7: Repeat Round 1 six more times.
To finish, yarn over and pull through all 3 loops on hook. Fasten off, leaving a long tail for sewing to the body later.
Final Assembly and Detailing
Follow these steps to complete your mermaid doll:
- Attach the hair components: Sew the two hair buns to both sides of the hair cap, then sew the hair cap to the head. Create side-swept bangs by attaching strands of Verdigris yarn to the front of the hair cap.
- Attach the arms: Position and sew both arms to the sides of the mermaid’s body.
- Add facial details: Apply blush powder to the doll’s cheeks using a cotton swab for a natural rosy glow.
- Attach the bikini top: Sew the pink bikini top to the chest area of the doll.
- Add embellishments: Consider adding decorative touches like tiny beads, sequins, small shells, or ribbons to enhance your mermaid’s charm.
- Final check: Ensure all parts are securely attached and all yarn ends are neatly woven in.
Tips for Amigurumi Success
- Maintain consistent tension throughout your project for a professional finish
- Count your stitches at the end of each round to avoid mistakes
- Use stitch markers to keep track of the beginning of rounds
- When changing colors, work the last yarn over of the previous stitch with the new color
- Stuff firmly but gently to maintain the doll’s shape without stretching stitches
- For the i-cord arms, practice the technique before attempting the final piece
- Add stuffing gradually rather than all at once for better control
Customizing Your Mermaid
This pattern offers numerous opportunities for personalization:
- Color variations: Change the hair and tail colors to create different mermaid characters
- Hairstyle options: Experiment with different hair arrangements like braids or flowing locks
- Embellishments: Add a pearl necklace, a tiny crown, or a starfish hair accessory
- Facial features: Embroider different expressions or add eyelashes for varied looks
- Tail details: Add sequins or embroidery to the tail for a glistening effect
- Size adjustments: Use thicker yarn and a larger hook for a bigger mermaid, or finer yarn and a smaller hook for a tiny version
Display Ideas for Your Finished Mermaid
Once completed, your amigurumi mermaid can be showcased in several creative ways:
- Perched on a shelf alongside ocean-themed decorations
- As part of a bathroom decor collection
- In a child’s room as a whimsical guardian
- In a glass jar or decorative fishbowl for a unique display
- Attached to a gift bag as a special decoration
- Incorporated into a mobile with other sea creatures
Why Amigurumi Mermaids Make Perfect Gifts
Handcrafted amigurumi mermaids offer several advantages as gifts:
- They demonstrate thoughtfulness and personal effort
- They appeal to both children and adults who love fantasy creatures
- They can be personalized to match the recipient’s style or decor
- They’re unique alternatives to mass-produced toys
- They’re lightweight and easy to mail to distant friends or family
- They connect to the timeless appeal of mermaid mythology
Level Up Your Crochet Skills
This intermediate project incorporates several valuable techniques that will enhance your overall crochet abilities:
- Working with color changes for distinctive sections
- Creating an i-cord for slender appendages
- Using back loop only stitches for texture
- Forming curved shapes with strategic increases and decreases
- Working with a pipe cleaner insert for posable features
- Adding facial details and embellishments
Check this out :Crochet Amigurumi Elephant Pattern
Conclusion
Completing this charming amigurumi mermaid brings the satisfaction of creating a detailed character with personality and charm. The combination of the expressive face, distinctive tail, and customizable hair creates a unique handcrafted treasure that showcases your crochet skills.
Whether made as a gift, a decorative piece, or an addition to a growing amigurumi collection, your mermaid represents creativity and craftsmanship. The techniques learned in creating this project—from the i-cord arms to the decorative fin details—build a foundation for future crochet adventures.
Remember that each handmade item carries the special touch of its creator. Small variations in tension, stuffing, or embellishment give your mermaid her own unique character. Enjoy the process of bringing this underwater friend to life through the art of amigurumi crochet!
