

Table of Contents
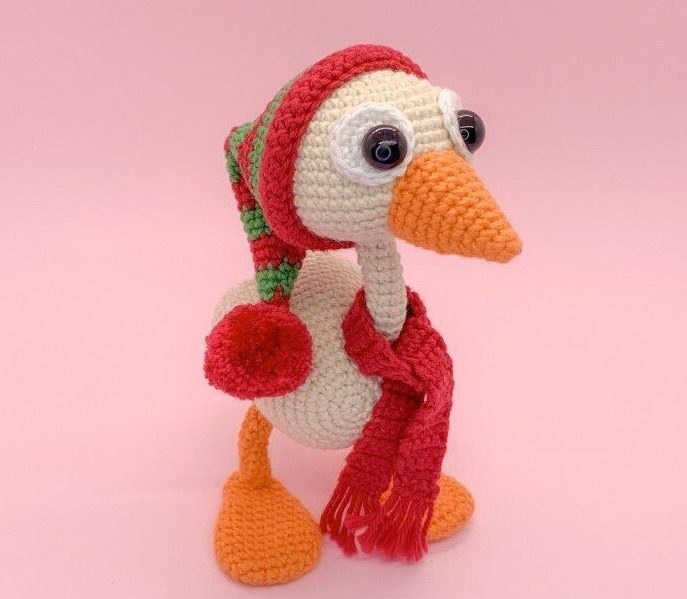
Creating Goose Amigurumi a charming Christmas-themed amigurumi goose is the perfect holiday project for crochet enthusiasts of all levels. This adorable festive goose, complete with a striped holiday hat and cozy scarf, makes a delightful decoration or gift during the winter season. Standing approximately 15 cm tall, this crochet character combines simple techniques with adorable details to create a memorable handmade treasure.
Essential Materials for Your Christmas Goose Amigurumi
Before beginning your holiday crochet project, gather these supplies:
- Rainbow Cotton 8/4 yarn in the following colors:
- Nude (color 03) – for the body, head, neck, and wings
- Red (color 058) – for the hat, scarf, and pompom
- Dark Green (color 022) – for hat stripes
- Orange (color 057) – for the beak, legs, and feet
- White (color 001) – for the eye details
- Crochet hook size 2.75 mm
- Safety eyes (10 mm)
- Polyester fiberfill stuffing
- Embroidery needle
- White sewing thread
- Pipe cleaner or metal wire (for neck support)
For a larger version of this amigurumi goose, you can substitute Rainbow Cotton 8/6 or 8/8 yarn with an appropriately sized hook.
Understanding Goose Amigurumi Terminology
This pattern uses standard crochet abbreviations:
- Magic ring: A technique for beginning crochet in the round
- Chain stitch (ch): The foundation stitch in crochet
- Single crochet (sc): The primary stitch used throughout the pattern
- Increase (inc): Working two stitches into one stitch to expand your work
- Decrease (dec): Working two stitches together to reduce width
Numbers in square brackets [x] indicate the total stitch count at the end of each round.
Goose Amigurumi Creating the Eye Details
Begin by making two identical white eye accents:
Round 1: Create a magic ring and work 6 single crochets into it [6 stitches] Round 2: Increase in all 6 stitches [12 stitches] Round 3: Work 3 single crochets, increase in next stitch. Repeat this sequence three times total [15 stitches]
Fasten off, weave in the yarn end, and set aside. These will be sewn onto the head later using white thread.
Forming the Goose Amigurumi Body
Using nude yarn, create the rounded body:
Round 1: Create a magic ring and work 6 single crochets into it [6 stitches] Round 2: Increase in all 6 stitches [12 stitches] Round 3: Work 1 single crochet, increase in next stitch. Repeat around [18 stitches] Round 4: Work 2 single crochets, increase in next stitch. Repeat around [24 stitches] Round 5: Work 3 single crochets, increase in next stitch. Repeat around [30 stitches] Round 6: Work 4 single crochets, increase in next stitch. Repeat around [36 stitches] Round 7: Work 5 single crochets, increase in next stitch. Repeat around [42 stitches] Round 8: Work 6 single crochets, increase in next stitch. Repeat around [48 stitches] Rounds 9-14: Single crochet in all 48 stitches [48 stitches]
Begin shaping with strategic decreases: Round 15: Decrease, work 5 single crochets, decrease, work 39 single crochets [46 stitches] Round 16: Work 14 single crochets, decrease, work 18 single crochets, decrease, work 10 single crochets [44 stitches] Round 17: Work 3 single crochets, decrease, work 30 single crochets, decrease, work 7 single crochets [42 stitches] Round 18: Single crochet in all 42 stitches [42 stitches] Round 19: Work 9 single crochets, decrease, work 24 single crochets, decrease, work 5 single crochets [40 stitches] Round 20: Decrease, work 14 single crochets, decrease, work 22 single crochets [38 stitches] Round 21: Work 5 single crochets, decrease, work 11 single crochets, decrease, work 18 single crochets [36 stitches] Round 22: Decrease, work 6 single crochets, decrease, work 26 single crochets [34 stitches] Round 23: Work 4 single crochets, decrease, work 15 single crochets, decrease, work 11 single crochets [32 stitches] Round 24: Work 12 single crochets, decrease, work 10 single crochets, decrease, work 6 single crochets [30 stitches] Round 25: Decrease, work 5 single crochets, decrease, work 21 single crochets [28 stitches] Round 26: Work 2 single crochets, decrease, work 13 single crochets, decrease, work 9 single crochets [26 stitches] Round 27: Decrease, work 2 single crochets, decrease, work 20 single crochets [24 stitches]
Begin stuffing the body at this point.
Round 28: Work 2 single crochets, decrease. Repeat this sequence six times total [18 stitches] Round 29: Work 1 single crochet, decrease. Repeat this sequence six times total [12 stitches] Round 30: Decrease in all 12 stitches [6 stitches]
Stuff the body firmly, fasten off, and weave in the yarn end.
Crafting the Goose Amigurumi Head and Neck
Using nude yarn, create the expressive head and long neck:
Round 1: Create a magic ring and work 6 single crochets into it [6 stitches] Round 2: Increase in all 6 stitches [12 stitches] Round 3: Work 1 single crochet, increase in next stitch. Repeat around [18 stitches] Round 4: Work 2 single crochets, increase in next stitch. Repeat around [24 stitches] Round 5: Work 3 single crochets, increase in next stitch. Repeat around [30 stitches] Round 6: Work 4 single crochets, increase in next stitch. Repeat around [36 stitches] Round 7: Work 5 single crochets, increase in next stitch. Repeat around [42 stitches] Rounds 8-10: Single crochet in all 42 stitches [42 stitches] Round 11: Work 6 single crochets, increase in next stitch. Repeat around [48 stitches] Rounds 12-15: Single crochet in all 48 stitches [48 stitches] Round 16: Work 6 single crochets, decrease. Repeat around [42 stitches] Round 17: Work 5 single crochets, decrease. Repeat around [36 stitches]
At this point, attach the safety eyes between rounds 8 and 13 by pushing the crochet hook between stitches. Sew the white eye details you created earlier around the safety eyes.
Round 18: Work 4 single crochets, decrease. Repeat around [30 stitches] Round 19: Work 3 single crochets, decrease. Repeat around [24 stitches]
Begin stuffing the head at this point.
Round 20: Work 1 single crochet, decrease. Repeat eight times [16 stitches] Round 21: Decrease in all 16 stitches [8 stitches] Rounds 22-32: Single crochet in all 8 stitches [8 stitches]
Stuff the head firmly and insert pipe cleaner or wire into the neck to provide stability. Fasten off and weave in the yarn end. Insert the end of the pipe cleaner into the body to make the neck stand upright, then sew the head to the body between rounds 6 and 7.
Goose Amigurumi Forming the Distinctive Beak
Using orange yarn, create the characteristic beak:
Round 1: Create a magic ring and work 4 single crochets into it [4 stitches] Round 2: Work 1 single crochet, increase. Repeat this sequence twice [6 stitches] Round 3: Work 2 single crochets, increase. Repeat this sequence twice [8 stitches] Round 4: Work 3 single crochets, increase. Repeat this sequence twice [10 stitches] Round 5: Work 4 single crochets, increase. Repeat this sequence twice [12 stitches] Round 6: Work 5 single crochets, increase. Repeat this sequence twice [14 stitches] Round 7: Work 6 single crochets, increase. Repeat this sequence twice [16 stitches] Round 8: Work 7 single crochets, increase. Repeat this sequence twice [18 stitches] Round 9: Single crochet in all 18 stitches [18 stitches] Round 10: Work 8 single crochets, increase. Repeat this sequence twice [20 stitches]
Fasten off, stuff the beak firmly, and sew it to the head between rounds 12 and 18.
Goose Amigurumi Creating the Wings
Make two identical wings using nude yarn:
Round 1: Create a magic ring and work 6 single crochets into it [6 stitches] Round 2: Increase in all 6 stitches [12 stitches] Round 3: Work 3 single crochets, increase. Repeat this sequence three times [15 stitches] Rounds 4-8: Single crochet in all 15 stitches [15 stitches]
Flatten the wing and crochet 7 stitches through both layers to close. Sew the wings to the body between rounds 11 and 12.
Goose Amigurumi Forming the Legs and Feet
For each of the two legs, use orange yarn:
Round 1: Chain 6 [6 stitches] Rounds 2-8: Single crochet in all 6 stitches [6 stitches]
Stuff the legs firmly with pipe cleaner for stability. Sew them to the body between rounds 11 and 14, with 8 stitches of space between the legs.
For each of the two feet, use orange yarn:
Round 1: Chain 6. Work stitches around both sides of the foundation chain [6 stitches] Round 2: Work 4 single crochets, work 3 single crochets in next stitch. Repeat this sequence twice [14 stitches] Round 3: Work 4 single crochets, increase in each of the next 3 stitches. Repeat this sequence twice [20 stitches] Rounds 4-7: Single crochet in all 20 stitches [20 stitches] Round 8: Work 7 single crochets, decrease, work 8 single crochets, decrease, work 1 single crochet [18 stitches] Round 9: Work 6 single crochets, decrease, work 7 single crochets, decrease, work 1 single crochet [16 stitches] Round 10: Single crochet in all 16 stitches [16 stitches] Round 11: Work 6 single crochets, decrease, work 6 single crochets, decrease [14 stitches] Round 12: Work 5 single crochets, decrease, work 5 single crochets, decrease [12 stitches] Rounds 13-14: Single crochet in all 12 stitches [12 stitches] Round 15: Decrease in all 12 stitches [6 stitches]
Fasten off and weave in the yarn end. Do not stuff the feet. Sew them to the legs to complete the lower body.
Goose Amigurumi Creating the Holiday Hat
The striped Christmas hat incorporates both red and green yarn:
Begin with red yarn: Round 1: Create a magic ring and work 4 single crochets into it [4 stitches] Round 2: Work 3 single crochets, increase in next stitch [5 stitches] Round 3: Work 4 single crochets, increase in next stitch [6 stitches]
Switch to green yarn: Round 4: Work 5 single crochets, increase in next stitch [7 stitches] Round 5: Work 3 single crochets, increase in next stitch, work 3 single crochets [8 stitches] Round 6: Work 7 single crochets, increase in next stitch [9 stitches]
Switch to red yarn: Round 7: Work 4 single crochets, increase in next stitch, work 4 single crochets [10 stitches] Round 8: Work 2 single crochets, increase in next stitch, work 7 single crochets [11 stitches] Round 9: Work 5 single crochets, increase in next stitch, work 5 single crochets [12 stitches]
Switch to green yarn: Round 10: Work 11 single crochets, increase in next stitch [13 stitches] Round 11: Work 8 single crochets, increase in next stitch, work 4 stitches [14 stitches] Round 12: Work 13 single crochets, increase in next stitch [15 stitches]
Switch to red yarn: Round 13: Work 7 single crochets, increase in next stitch, work 7 single crochets [16 stitches] Round 14: Work 2 single crochets, increase in next stitch, work 13 single crochets [17 stitches] Round 15: Increase in first stitch, work 16 single crochets [18 stitches]
Switch to green yarn: Round 16: Work 10 single crochets, increase in next stitch, work 7 single crochets [19 stitches] Round 17: Work 7 single crochets, increase in next stitch, work 11 single crochets [20 stitches] Round 18: Work 4 single crochets, increase in next stitch, work 15 single crochets [21 stitches]
Switch to red yarn: Round 19: Work 20 single crochets, increase in next stitch [22 stitches] Round 20: Work 8 single crochets, increase in next stitch, work 13 single crochets [23 stitches] Round 21: Work 11 single crochets, increase in next stitch, work 11 single crochets [24 stitches]
Switch to green yarn: Round 22: Increase in first stitch, work 7 single crochets. Repeat this sequence three times [27 stitches] Round 23: Work 4 single crochets, increase in next stitch, work 4 single crochets. Repeat this sequence three times [30 stitches] Round 24: Increase in first stitch, work 9 single crochets. Repeat this sequence three times [33 stitches]
Switch to red yarn: Round 25: Work 5 single crochets, increase in next stitch, work 5 single crochets. Repeat this sequence three times [36 stitches] Round 26: Work 11 single crochets, increase in next stitch. Repeat this sequence three times [39 stitches] Round 27: Work 6 single crochets, increase in next stitch, work 6 single crochets. Repeat this sequence three times [42 stitches]
Switch to green yarn: Rounds 28-30: Single crochet in all 42 stitches for three rounds [42 stitches]
Switch to red yarn: Rounds 31-33: Single crochet in all 42 stitches for three rounds [42 stitches] Round 34 (working in back loops only): Work 20 single crochets, increase in next stitch. Repeat this sequence twice [44 stitches] Rounds 35-36: Single crochet in all 44 stitches for two rounds [44 stitches]
Fasten off and weave in the yarn end. Fold up rounds 34-36 to create the brim of the hat. Make a red pompom approximately 2.5 cm in diameter (you can use a fork to wrap the yarn around) and sew it to the top of the hat.
Goose Amigurumi Crafting the Cozy Scarf
Using red yarn, create a simple scarf:
Chain 5 stitches to begin Row 1: Starting in the second chain from the hook, work 4 single crochets [4 stitches]. Chain 1 and turn. Rows 2-55: Work 4 single crochets across, chain 1, turn [4 stitches] Row 56: Work 4 single crochets [4 stitches]
Fasten off and weave in the yarn end. Add yarn fringes to each end of the scarf for a finished look.
Goose Amigurumi Final Assembly and Finishing Touches
- Place the hat on the goose’s head and secure with a few stitches if needed
- Wrap the scarf around the neck, positioning it attractively
- Check that all components are securely attached
- Fluff the pompom on the hat
- Adjust the neck position using the inserted wire for the perfect pose
Tips for Amigurumi Success
- Work with even tension throughout to ensure consistent results
- Stuff firmly but not overstuffed, which can distort the shape
- Take care when inserting safety eyes to position them symmetrically
- When changing colors, work the last yarn over of the previous stitch with the new color
- For children’s toys, consider omitting the wire support or using a child-safe alternative
Customizing Your Christmas Goose
While this pattern creates a festive Christmas goose, you can easily customize yours:
- Change the colors to match your holiday décor scheme
- Add a tiny jingle bell to the hat pompom
- Embroider a simple holiday motif on the scarf
- Create a matching family of geese in different sizes
- For year-round appeal, skip the Christmas colors and use pastels or neutrals
Why Amigurumi Makes Perfect Holiday Gifts
Handcrafted amigurumi toys offer several advantages as holiday presents:
- They show thoughtfulness and personal effort
- They can be customized for the recipient
- They’re unique alternatives to mass-produced decorations
- They can become cherished keepsakes that appear year after year
- They’re lightweight and easy to mail to distant loved ones
Displaying Your Christmas Goose
Once completed, your festive goose can be displayed in multiple ways:
- As part of a holiday mantel arrangement
- Perched on a bookshelf or windowsill
- Incorporated into a wreath design
- As a tree topper for a small tabletop Christmas tree
- Together with other handmade holiday decorations
Caring for Your Amigurumi Creations
To keep your Christmas goose looking its best year after year:
- Store in a cool, dry place when not in use
- Place in a sealed plastic bag with a silica gel packet to prevent moisture damage
- Gently brush with a soft toothbrush to remove dust
- For spot cleaning, use a damp cloth with mild soap and allow to air dry completely
- Avoid direct sunlight which can fade the yarn colors over time
Check this out :Stylish Amigurumi Teddy Bear with Complete Crochet Pattern
Conclusion
Completing this charming Christmas goose amigurumi brings the satisfaction of creating a festive decoration that combines craftsmanship with holiday cheer. Its distinctive shape, cheerful hat and scarf, and expressive features make it an endearing addition to your holiday decor or a thoughtful handmade gift.
The skills developed in creating this detailed amigurumi project—from shaping the contoured body to crafting the striped hat—provide excellent practice for crocheters looking to enhance their amigurumi techniques. Each completed goose represents hours of careful work and creativity, resulting in a one-of-a-kind treasure.
Remember that handmade items carry special significance, especially during the holiday season. Your crocheted Christmas goose represents not just a decorative object, but the time, care, and thought you’ve invested in creating something special. Enjoy your festive feathered friend throughout the holiday season and for many years to come!
