

Table of Contents
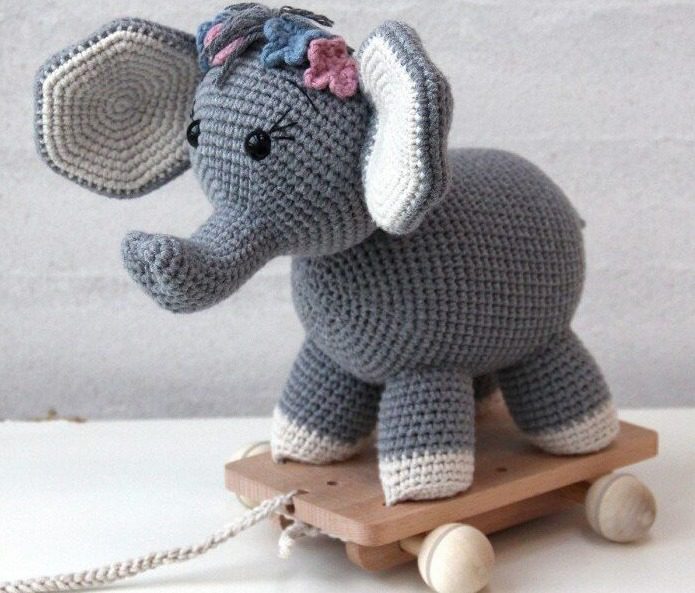
Creating a charming amigurumi elephant is an enjoyable project for crocheters of all skill levels. This comprehensive guide will walk you through crafting an adorable elephant that can be attached to a small wagon, creating a delightful pull toy or decorative piece. Standing approximately 20 cm tall, this elephant features contrasting ears and legs, a distinctive trunk, and can be embellished with colorful flower details.
Materials for Your Amigurumi Elephant Project
To create this endearing elephant, you’ll need the following supplies:
- Cosy yarn: A soft, high-quality cotton blend (60% cotton, 40% acrylic) that creates beautiful texture and maintains its shape well:
- 150g gray for the elephant’s body and head
- 50g off-white for the ears and legs
- Small amounts of black, blue, and light rose yarn for eyelashes and flower embellishments
- Additional supplies:
- Polyester fiberfill stuffing
- Small decorative wagon (purchased separately)
- Safety eyes (12mm)
- Crochet hook (2.5-3.5mm)
- Yarn needle for assembly
- Scissors
The finished elephant will have a gauge of approximately 20 stitches per 10 cm.
Understanding the Pattern Terminology
Before beginning your elephant, familiarize yourself with these essential crochet terms:
- Magic ring: A technique for beginning crochet in the round
- Chain stitch: The foundation of crochet work
- Slip stitch: Used to join rounds or make flat connections
- Double crochet: Standard stitch used throughout the pattern (US terminology)
- Treble: A taller stitch than double crochet (US terminology)
- Back loop: Working through only the back loop of a stitch for texture
- Increase: Working two stitches into one stitch to expand your work
- Decrease: Working two stitches together to reduce width
Instructions within asterisks (*) should be repeated either for the entire round/row or the number of times indicated. Numbers in parentheses at the end of a line show the total stitch count for that round.
The pattern works in continuous spiral rounds unless otherwise specified.
Creating Your Elephant’s Head
The elephant’s distinctive head begins with the trunk and expands to form the face and cranium. Use gray yarn and your chosen hook:
Round 1: Create a magic ring and work 6 double crochets into it (6 stitches) Round 2: Increase in each stitch around by working 2 double crochets in each stitch (12 stitches) Round 3: Work 1 double crochet, then increase. Repeat around (18 stitches) Rounds 4-18: Work 18 double crochets around for all 15 rounds (18 stitches)
To create the characteristic heart shape at the end of the trunk, use your yarn needle to sew a few stitches at the tip, keeping it flat.
Continue expanding to form the head: Round 19: Work 2 double crochets, then increase. Repeat around (24 stitches) Round 20: Work 3 double crochets, then increase. Repeat around (30 stitches) Round 21: Work 4 double crochets, then increase. Repeat around (36 stitches) Round 22: Work 5 double crochets, then increase. Repeat around (42 stitches) Round 23: Work 6 double crochets, then increase. Repeat around (48 stitches) Round 24: Work 7 double crochets, then increase. Repeat around (54 stitches) Round 25: Work 8 double crochets, then increase. Repeat around (60 stitches) Rounds 26-35: Work 60 double crochets around for all 10 rounds (60 stitches)
At this point, place the safety eyes between rounds 25 and 26, with 9 stitches between them.
Begin decreasing to shape the back of the head: Round 36: Work 8 double crochets, then decrease. Repeat around (54 stitches) Round 37: Work 7 double crochets, then decrease. Repeat around (48 stitches) Round 38: Work 6 double crochets, then decrease. Repeat around (42 stitches) Round 39: Work 5 double crochets, then decrease. Repeat around (36 stitches) Round 40: Work 4 double crochets, then decrease. Repeat around (30 stitches) Round 41: Work 3 double crochets, then decrease. Repeat around (24 stitches) Round 42: Work 2 double crochets, then decrease. Repeat around (18 stitches) Round 43: Work 1 double crochet, then decrease. Repeat around (12 stitches) Round 44: Decrease around until closed (6 stitches)
Fasten off, leaving a tail for sewing to the body.
Forming the Elephant’s Body
The body creates a rounded shape that complements the distinctive head. Use gray yarn:
Round 1: Create a magic ring and work 6 double crochets into it (6 stitches) Round 2: Increase in each stitch around by working 2 double crochets in each stitch (12 stitches) Round 3: Work 1 double crochet, then increase. Repeat around (18 stitches) Round 4: Work 2 double crochets, then increase. Repeat around (24 stitches) Round 5: Work 3 double crochets, then increase. Repeat around (30 stitches) Round 6: Work 4 double crochets, then increase. Repeat around (36 stitches) Round 7: Work 5 double crochets, then increase. Repeat around (42 stitches) Round 8: Work 6 double crochets, then increase. Repeat around (48 stitches) Round 9: Work 7 double crochets, then increase. Repeat around (54 stitches) Round 10: Work 8 double crochets, then increase. Repeat around (60 stitches) Rounds 11-32: Work 60 double crochets around for all 22 rounds (60 stitches)
Begin decreasing to close the body: Round 33: Work 8 double crochets, then decrease. Repeat around (54 stitches) Round 34: Work 7 double crochets, then decrease. Repeat around (48 stitches) Round 35: Work 6 double crochets, then decrease. Repeat around (42 stitches) Round 36: Work 5 double crochets, then decrease. Repeat around (36 stitches) Round 37: Work 4 double crochets, then decrease. Repeat around (30 stitches) Round 38: Work 3 double crochets, then decrease. Repeat around (24 stitches) Round 39: Work 2 double crochets, then decrease. Repeat around (18 stitches) Round 40: Work 1 double crochet, then decrease. Repeat around (12 stitches) Round 41: Decrease around until closed (6 stitches)
Fasten off, leaving a tail for closing.
Crafting the Legs
Make four identical legs using two colors for contrast. Begin with off-white yarn:
Round 1: Create a magic ring and work 6 double crochets into it (6 stitches) Round 2: Increase in each stitch around by working 2 double crochets in each stitch (12 stitches) Round 3: Work 1 double crochet, then increase. Repeat around (18 stitches) Round 4: Work 2 double crochets, then increase. Repeat around (24 stitches) Round 5: Work 24 double crochets in back loops only to create a defined edge (24 stitches) Rounds 6-7: Work 24 double crochets around for both rounds (24 stitches)
Switch to gray yarn: Rounds 8-15: Work 24 double crochets around for all 8 rounds (24 stitches)
Fasten off, leaving a tail for sewing to the body.
Creating the Distinctive Ears
The elephant’s large ears incorporate two colors for visual interest. Make two identical ears beginning with off-white yarn:
Round 1: Create a magic ring and work 6 double crochets into it (6 stitches) Round 2: Increase in each stitch around by working 2 double crochets in each stitch (12 stitches) Round 3: Work 1 double crochet, then increase. Repeat around (18 stitches) Round 4: Work 2 double crochets, then increase. Repeat around (24 stitches) Round 5: Work 3 double crochets, then increase. Repeat around (30 stitches) Round 6: Work 4 double crochets, then increase. Repeat around (36 stitches) Round 7: Work 5 double crochets, then increase. Repeat around (42 stitches) Round 8: Work 6 double crochets, then increase. Repeat around (48 stitches) Round 9: Work 7 double crochets, then increase. Repeat around (54 stitches)
Switch to gray yarn: Round 10: Work 8 double crochets, then increase. Repeat around (60 stitches) Rounds 11-12: Work 60 double crochets around for both rounds (60 stitches)
Begin decreasing to shape the ear: Round 13: Work 8 double crochets, then decrease. Repeat around (54 stitches) Round 14: Work 7 double crochets, then decrease. Repeat around (48 stitches) Round 15: Work 6 double crochets, then decrease. Repeat around (42 stitches) Round 16: Work 5 double crochets, then decrease. Repeat around (36 stitches) Round 17: Work 4 double crochets, then decrease. Repeat around (30 stitches) Round 18: Work 3 double crochets, then decrease. Repeat around (24 stitches) Round 19: Work 2 double crochets, then decrease. Repeat around (18 stitches) Round 20: Work 1 double crochet, then decrease. Repeat around (12 stitches) Round 21: Decrease around until closed (6 stitches)
Fasten off, leaving a tail for attaching to the head.
Adding a Simple Tail
Using gray yarn: Chain 11 stitches, turn the work, and work 10 slip stitches back along the chain. Fasten off, leaving a tail for sewing to the body.
Decorative Flowers
Create colorful flowers using light rose and blue yarn:
Round 1: Create a magic ring and work 5 double crochets into it (5 stitches) Round 2: For each petal: Chain 2, work 2 treble increases in the same stitch, chain 2, slip stitch into the same stitch. Repeat 5 times total to form 5 petals.
Fasten off, leaving a tail for sewing to your elephant.
Assembling Your Amigurumi Elephant
- Stuff the head and body firmly with polyester fiberfill before closing completely.
- Sew the head securely to the body.
- Attach the ears to either side of the head.
- Position and sew the four legs to the underside of the body.
- Attach the tail to the back of the body.
- If desired, add flower embellishments to the head or body.
- Using black yarn, embroider eyelashes above the safety eyes for a feminine touch.
Creating the Pull Rope
To make a decorative rope for your elephant:
- Fold a few meters of yarn in half.
- Guide your yarn needle through the first hole of the wagon and pull the loop back through.
- Using both strands of yarn held together, chain approximately 120 stitches.
- At the end, tie a secure knot and trim excess yarn.
Attaching the Elephant to a Wagon
To create a pull-toy effect:
- For each leg, start in the center of the magic ring and chain 15 stitches using two strands of yarn held together.
- Pull these chains through the holes in the wagon.
- Tie the chains together securely under the wagon.
Styling and Display Options
Your completed amigurumi elephant offers several display possibilities:
- As a standalone decorative piece
- Attached to a small wagon as a pull toy
- Grouped with other amigurumi animals for a nursery display
- Given as a thoughtful handmade gift for baby showers or children’s birthdays
Why Choose the Cosy Yarn
The pattern recommends Cosy yarn for good reason. This high-quality cotton blend offers:
- Exceptional softness ideal for children’s toys
- Special elasticity that helps the elephant maintain its shape
- A pleasant texture with subtle fluffiness
- Durability for long-lasting play
- AZO certification ensuring safety for all users
- A natural, vintage-like appearance
Customizing Your Elephant
While the pattern creates a charming gray and white elephant, you can personalize yours by:
- Choosing different color combinations
- Adding embroidered details like the name of a child
- Creating seasonal variations with holiday-themed accessories
- Making a family of elephants in different sizes
- Adding a decorative blanket or saddle on the elephant’s back
Skill Level and Techniques
This amigurumi elephant is suitable for intermediate crocheters familiar with:
- Working in continuous rounds
- Creating magic rings
- Increasing and decreasing stitches
- Working in back loops
- Basic assembly techniques
- Simple color changes
For beginners, this pattern offers an excellent opportunity to advance your skills while creating a charming finished piece.
Check this out :Crocheting a Majestic Amigurumi Lion with Free Pattern
Conclusion
Completing this amigurumi elephant brings the satisfaction of creating a charming character with personality and charm. The combination of the distinctive trunk, contrast-colored ears and feet, and the option to attach it to a wagon results in a unique handcrafted treasure.
Whether made as a gift, a decorative item, or a gentle toy, your crocheted elephant represents creativity and craftsmanship. The skills developed in creating this amigurumi project—from working the detailed trunk to assembling the finished piece—build a foundation for future crochet adventures.
Remember that each handmade item carries the special touch of its creator. Small variations in tension, stuffing, or embellishment give your elephant its own unique character. Enjoy the process of bringing this adorable pachyderm to life through the art of amigurumi crochet!
