

Table of Contents
Luiza Terms of Use
- For personal Luiza use only.
- DO NOT share, translate, or copy this pattern.
- You may sell finished dolls made from this pattern if you credit @amigurumaecrafts as the pattern designer.
- DO NOT mass produce.
- Respect the original designer.
- DO NOT use the photos to sell your finished items.
Notes Before Starting
Before beginning this Luiza project, you should have the following skills:
- Knowledge of basic crochet stitches used in amigurumi
- Ability to change yarn colors
- Understanding that amigurumi is crocheted in continuous rounds, so you should use stitch markers to track the end of your rounds
- This doll is crocheted in the “X” technique, which creates tight stitches with no visible holes
Luiza Materials
- 2mm crochet hook
- 2.5mm crochet hook
- Tapestry needle
- Scissors
- Stitch markers
- Sewing pins
- 8mm black safety eyes
- Polyester fiberfill
- Fabric glue
Luiza Yarn Colors
- Red
- Purple
- Light purple
- Navy blue
- Light brown
- Black
- Dark brown
- Gray
- White
Note: I used milk cotton (4 ply) yarn for this doll. The finished doll is approximately 5 inches (about 13 cm) tall. You can use different yarn but adjust your hook size accordingly.
Luiza Abbreviations
- SC = single crochet
- MR = magic ring
- INC = increase (invisible increase)
- DEC = decrease (invisible decrease)
- HDC-DEC = half double crochet decrease
- HDC-INC = half double crochet increase
- CH = chain
- SL ST = slip stitch
- BLO = back loops only
- FLO = front loops only
- HDC = half double crochet
- DC = double crochet
- DC-INC = double crochet increase
Luiza Hands (Make 2)
Start with light brown yarn. Use 2mm hook.
Round 1: 6 sc in magic ring (6) Rounds 2-7: 6 sc (6) work 6 rounds Slip stitch, fasten off.
Luiza Feet (Make 2)
Start with purple yarn, 2mm hook.
Round 1: Ch 4 Round 2: sc in 2nd ch from hook, 1 sc, 4 sc in one stitch, on the other side of the chain 1 sc, 3 sc in last stitch (10) Round 3: 2 sc, 4 inc, 2 sc, 2 inc (16) Round 4: BLO 16 sc (16) Round 5: 16 sc (16)
Change to light brown
Round 6: BLO 1 sc, 2 dec, 1 hdc-dec, 2 dec, 5 sc (11) Round 7: 1 sc, 2 dec, 6 sc (9) Rounds 8-10: 9 sc (9) work 3 rounds
Slip stitch and fasten off first foot, hide end. For the second foot, don’t cut the yarn as we’ll be joining the legs. Stuff both feet.
Luiza Body
Change to navy blue
Round 11: 5 sc on 2nd foot (your 5th sc should be at the right center of the 2nd foot, if not, make adjustments), ch 3, 9 sc on first foot (when joining the first foot, start crocheting from the inner center of the first foot), 3 sc along the back of the chain, 4 sc on 2nd foot (24)
Possible adjustments example: Round 11: 4 sc on 2nd foot, ch 3, 9 sc on first foot, 3 sc along the back of the chain, 5 sc on 2nd foot (24)
Rounds 12-15: 24 sc (24) work 4 rounds
Change to white
Round 16: BLO (10 sc, 1 dec) x 2 (22) Round 17: (9 sc, 1 dec) x 2 (20) Round 18: (4 sc, 1 dec, 4 sc) x 2 (18)
Joining Arms to Body
Round 19: 2 sc on body, 6 sc on first arm, 9 sc on body, 6 sc on second arm, 7 sc on body (30)
If the arms are slightly out of place, you may need to adjust their position. Just note that there should be 9 sc on the front and 9 sc on the back of the torso.
Possible adjustment example: Round 19: 6 sc on first arm, 9 sc on body, 6 sc on second arm, 9 sc on body.
Begin stuffing the body. Do not stuff the arms.
Round 20: (3 sc, 1 dec) x 6 (24) Round 21: (2 sc, 1 dec) x 6 (18)
Change to light brown
Round 22: BLO (1 sc, 1 dec) x 6 (12) Round 23: (1 sc, 1 dec) x 4 (8) Round 24: 8 sc (8)
Before moving to the next round, we’ll make the shirt sleeves.
Luiza Sleeves (Make 2)
White; 2.5mm hook
Ch 8, dc in 3rd ch from hook, 5 dc in remaining 5 sts. Fasten off, leaving a long tail for sewing.
Sew this piece to the shoulders Connect these two ends together by sewing them under the arms
Continue crocheting the head. (Or you can crochet the skirt first [on page 7], so the head doesn’t get in the way)
Head
Round 25: 8 inc (16) Round 26: (1 sc, 1 inc) x 8 (24) Round 27: (2 sc, 1 inc) x 8 (32) Round 28: (3 sc, 1 inc) x 8 (40) Round 29: (4 sc, 1 inc) x 8 (48) Rounds 30-33: 48 sc (48) work 4 rounds Round 34: (6 sc, 1 dec) x 6 (42) Rounds 35-39: 42 sc (42) work 5 rounds
Insert safety eyes between rounds 33-34, with 8 stitches between them. (Use pins to mark the eye positions)
Embroider the facial details: nose [between rounds 32-33, 2 stitches away from eyes], eyebrows [round 37] and eyelashes. Then continue to the next round.
Round 40: (5 sc, 1 dec) x 6 (36) Round 41: (4 sc, 1 dec) x 6 (30)
Begin stuffing the head.
Round 42: (3 sc, 1 dec) x 6 (24) Round 43: (2 sc, 1 dec) x 6 (18) Round 44: (1 sc, 1 dec) x 6 (12) Round 45: 6 dec (6)
Cut the yarn, leaving a long tail for sewing. Using a tapestry needle, thread the end through all front loops of the last round and pull tight. Knot and hide the ends inside the doll’s body.
Skirt
When crocheting the skirt, don’t cut the yarn after changing colors as you’ll be changing color every other round.
Navy blue; 2mm hook
Round 1: Insert hook into the front loop of the 15th round (start from the back of the body), ch 1, 23 sc (24), sl st in first st. Round 2: Ch 2 (counts as first hdc), 2 hdc, 1 hdc-inc, (3 hdc, hdc-inc) x 5 (30) sl st in first hdc.
Change to light purple
Round 3: Ch 1 (counts as first sc), 29 sc (30) sl st in first sc
Change to navy blue
Round 4: Ch 1 (counts as first hdc), 3 hdc, 1 hdc-inc, (4 hdc, hdc-inc) x 5 (36) sl st in first hdc.
Change to light purple
Round 5: Ch 1 (counts as first sc), 35 sc (36)
Change to navy blue
Round 6: BLO 36 sl st Slip stitch, fasten off. Hide ends.
Ears (Make 2)
Light brown; 2mm hook
Ch 2, make 3 sc in 2nd ch from hook. Fasten off, leaving a long tail for sewing.
Sew the ears on rounds 33-34, about 5-6 stitches away from the eyes.
Wig
Dark brown; 2.5mm hook
Round 1: 6 sc in magic ring (6) Round 2: 6 inc (12) Round 3: (1 sc, 1 inc) x 6 (18) Round 4: (2 sc, 1 inc) x 6 (24) Round 5: (3 sc, 1 inc) x 6 (30) Round 6: (4 sc, 1 inc) x 6 (36) Round 7: (5 sc, 1 inc) x 6 (42) Rounds 8-14: 42 sc (42) work 7 rounds
Don’t cut the yarn; we’ll start crocheting the hair strands. After completing each strand, make a slip stitch into the next stitch of the 14th round.
Hair Strands 1-5: Ch 9, (starting from 2nd ch from hook) 2 inc, 6 sc (10) Slip stitch. Fasten off, leaving a long tail for sewing.
We’ll be sewing the wig with the wrong side facing up. Put on and sew the wig to the head, positioning hair strands 1-5 at the front and not sewing them down.
Hair Bun
Dark brown; 2.5mm hook
Round 1: 6 sc in magic ring Round 2: 6 inc (12) Round 3: (1 sc, 1 inc) x 6 (18) Round 4: (2 sc, 1 inc) x 6 (24) Rounds 5-7: 24 sc (24) work 3 rounds Round 8: (4 sc, 1 dec) x 4 (20)
Without cutting the yarn, we’ll crochet hair strands on the bun.
Hair Strands 1-10: Ch 9, (starting from 2nd ch from hook) 8 sc, skip 1 st in round 8, sl st in next st. Fasten off, leaving a long tail for sewing.
Sew the end of each hair strand over the bun. Place and sew the bun on top of the head. Lightly stuff the bun.
Hair Tie (Make 2)
Red yarn; 2mm hook
Ch 22, sl st in 10th ch from hook, ch 10, sl st in the same stitch where you made the first sl st (this forms the bow), then ch 16.
You can add more chains to fit the circumference of your bun. Fasten off, leaving a long tail.
Then take a piece of red yarn, wrap it 3 times around the bun, hide the ends, wrap the ribbon around the bun so that the bow is in the center. Tie the ribbon at the back and also hide the ends in the bun.
Shirt Decoration
Insert needle in the middle front of the 21st row, make a few red stitches around (using a basting stitch), then tie both ends in front. Cut excess yarn.
For bracelets, tie purple and light purple yarn together on the wrists, hide the ends in the hand.
Barbell
Gray; 2.5mm hook
Part A (make two): Round 1: 6 sc in magic ring Slip stitch and fasten off.
Part B (make two): Round 1: 6 sc in magic ring Round 2: 6 inc (12) Slip stitch and fasten off, leaving a long tail for sewing.
Sew or glue part A on top of part B.
Handle: Cut a 4cm wire, wrap with gray yarn. Glue the pieces together.
Check this out :Knitting Adorable Bunny Dolls
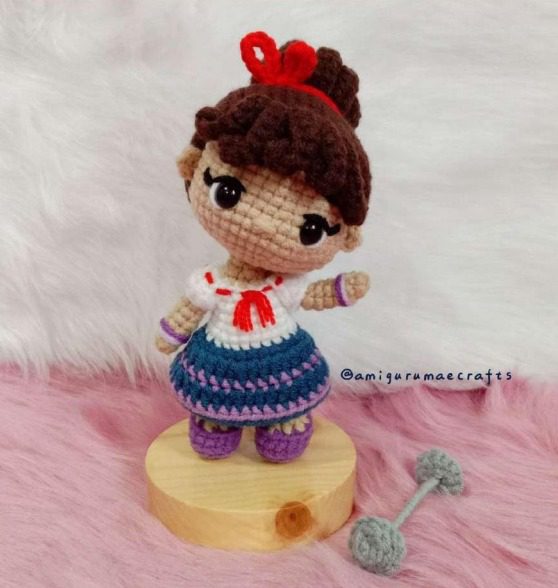
Congratulations! Your Little Luiza is complete.
I hope you enjoyed crocheting with this pattern.
Thank you!
Pattern translation provided by “Strana Amigurumia”. Original pattern by @amigurumaecrafts
