

Table of Contents
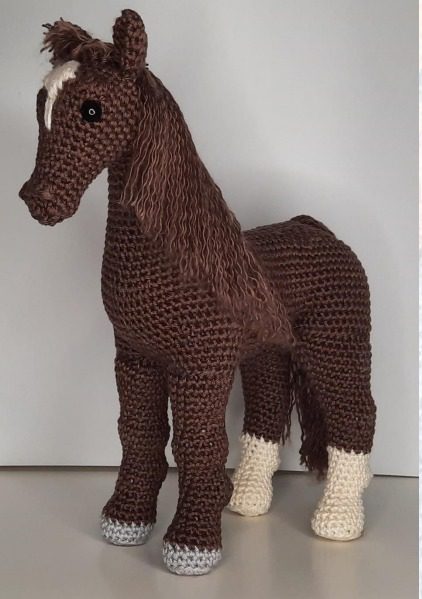
Crocheting a lifelike horse amigurumi is a rewarding project that combines basic techniques with artistic details to create a stunning handmade toy. This rich brown horse with distinctive white stockings and realistic features makes an impressive gift or cherished keepsake. Whether you’re creating this for a horse-loving child or as a decorative piece, this detailed pattern will guide you through every step of crafting this beautiful equine companion.
Materials Needed for Your Horse Amigurumi
To create this realistic horse amigurumi, gather these supplies:
- Worsted weight yarn in dark brown (for the main body)
- Worsted weight yarn in cream/off-white (for the leg markings and facial blaze)
- Worsted weight yarn in light gray (for the hooves)
- Small amount of black yarn (for details)
- Crochet hook size E/3.5mm
- Two 12mm safety eyes
- Fiberfill stuffing
- Tapestry needle
- Stitch markers
- Scissors
- Optional: wire for neck stability
Understanding the Crochet Terms
Before beginning your horse amigurumi, familiarize yourself with these standard crochet abbreviations used throughout the pattern:
- Magic Ring (MR): A technique to start crocheting in the round without a hole in the center
- Chain (CH): Creates a foundation for your work
- Single Crochet (SC): The most basic and commonly used stitch in amigurumi
- Increase (INC): Making two stitches in one stitch to expand your work
- Decrease (DEC): Combining two stitches into one to reduce your work
- Back Loop Only (BLO): Working through only the back loop of a stitch
- Front Loop Only (FLO): Working through only the front loop of a stitch
- Slip Stitch (SL ST): Used to join rounds or move across stitches without adding height
- Round (RND): A complete circuit when working in a spiral
Head and Snout Construction
Begin with dark brown yarn:
Round 1: 6 SC in magic ring Round 2: INC in all 6 stitches (12) Round 3: (SC, INC) repeat 6 times (18) Round 4: (2 SC, INC) repeat 6 times (24) Round 5: (3 SC, INC) repeat 6 times (30) Round 6: (4 SC, INC) repeat 6 times (36) Round 7: (5 SC, INC) repeat 6 times (42) Round 8: SC in each stitch around (42) Round 9: SC in each stitch around (42)
For the snout shaping: Round 10: (5 SC, DEC) repeat 6 times (36) Round 11: (4 SC, DEC) repeat 6 times (30) Round 12: (3 SC, DEC) repeat 6 times (24) Round 13: (2 SC, DEC) repeat 6 times (18) Round 14: (1 SC, DEC) repeat 6 times (12) Round 15: (DEC) repeat 6 times (6)
Fasten off, leaving a tail for sewing. Before closing completely, stuff the head firmly.
Facial Details and Blaze
For the white blaze, using cream yarn: Create a small triangle or diamond shape by chaining 3, then working rows of SC, gradually decreasing to create the shape. Sew this onto the front of the face.
Insert safety eyes between rounds 5 and 6, approximately 6 stitches apart.
For the nostrils: Use black yarn to embroider two small curved lines on the snout.
Ears (Make 2)
Using dark brown yarn: Round 1: 6 SC in magic ring Round 2: INC in all 6 stitches (12) Round 3: (SC, INC) repeat 6 times (18) Rounds 4-6: SC in each stitch around (18) Round 7: (SC, DEC) repeat 6 times (12) Round 8: (DEC) repeat 6 times (6)
Fasten off, leaving a long tail for sewing. Do not stuff the ears. Flatten and sew to the top of the head.
Creating the Flowing Mane
The mane is what gives this horse its distinctive look. Create it by:
- Cut strands of brown yarn approximately 6 inches long
- Fold each strand in half
- Using your crochet hook, pull the folded end through stitches along the top of the head and neck
- Thread the loose ends through the loop and pull tight
- Trim the mane to your desired length once complete
Body Construction
Using dark brown yarn: Round 1: 6 SC in magic ring Round 2: INC in all 6 stitches (12) Round 3: (SC, INC) repeat 6 times (18) Round 4: (2 SC, INC) repeat 6 times (24) Round 5: (3 SC, INC) repeat 6 times (30) Round 6: (4 SC, INC) repeat 6 times (36) Round 7: (5 SC, INC) repeat 6 times (42) Round 8: (6 SC, INC) repeat 6 times (48) Round 9: (7 SC, INC) repeat 6 times (54) Round 10: (8 SC, INC) repeat 6 times (60) Rounds 11-25: SC in each stitch around (60) Round 26: (8 SC, DEC) repeat 6 times (54) Round 27: (7 SC, DEC) repeat 6 times (48) Round 28: (6 SC, DEC) repeat 6 times (42) Round 29: (5 SC, DEC) repeat 6 times (36) Round 30: (4 SC, DEC) repeat 6 times (30) Round 31: (3 SC, DEC) repeat 6 times (24) Round 32: SC in each stitch around (24)
Fasten off, leaving a long tail for attaching the head. Stuff the body firmly.
Front Legs (Make 2)
For each leg, you’ll create both brown and white sections. Starting with dark brown yarn:
Round 1: 6 SC in magic ring Round 2: INC in all 6 stitches (12) Round 3: (SC, INC) repeat 6 times (18) Round 4: (2 SC, INC) repeat 6 times (24) Round 5: SC in back loops only of each stitch around (24) Rounds 6-20: SC in each stitch around (24)
Switch to cream/off-white yarn at round 21: Rounds 21-25: SC in each stitch around (24)
Switch to light gray yarn for the hoof: Rounds 26-27: SC in each stitch around (24) Round 28: (2 SC, DEC) repeat 6 times (18) Round 29: (1 SC, DEC) repeat 6 times (12)
Stuff the leg firmly, especially at the top where it will join the body. Round 30: (DEC) repeat 6 times (6)
Fasten off, leaving a tail for sewing. Sew the legs to the body, positioning them evenly.
Back Legs (Make 2)
The back legs follow a similar pattern to the front but with slight modifications for a more realistic horse shape.
Starting with dark brown yarn: Round 1: 6 SC in magic ring Round 2: INC in all 6 stitches (12) Round 3: (SC, INC) repeat 6 times (18) Round 4: (2 SC, INC) repeat 6 times (24) Round 5: (3 SC, INC) repeat 6 times (30) Round 6: SC in back loops only of each stitch around (30) Rounds 7-18: SC in each stitch around (30) Round 19: (3 SC, DEC) repeat 6 times (24)
For the lower leg, continue with dark brown: Rounds 20-25: SC in each stitch around (24)
Switch to cream/off-white yarn for the white marking: Rounds 26-30: SC in each stitch around (24)
Switch to light gray yarn for the hoof: Rounds 31-32: SC in each stitch around (24) Round 33: (2 SC, DEC) repeat 6 times (18) Round 34: (1 SC, DEC) repeat 6 times (12) Round 35: (DEC) repeat 6 times (6)
Fasten off, leaving a tail for sewing. Stuff the leg firmly and sew to the body.
Tail Construction
For the tail, similar to the mane:
- Cut numerous strands of brown yarn, approximately 10-12 inches long
- Fold the strands in half
- Attach them to the back of the horse using your hook
- Brush out the tail with a wire brush for a fuller look (optional)
- Trim to desired length
Assembly and Finishing Touches
- Attach the head to the body using the long tail left from the body. Make sure it’s securely attached and properly positioned.
- Position and sew the four legs to the body, ensuring the horse can stand stably.
- Add any additional details, such as embroidering eyes if not using safety eyes, or adding additional facial features.
- Review your work and add more stuffing if needed to maintain shape.
- Brush the mane and tail gently for a more textured finish.
Customization Options
This horse amigurumi pattern can be customized in numerous ways:
- Change the colors for different horse breeds (black for a Friesian, palomino colors, appaloosa spots)
- Add a saddle and bridle for a riding horse
- Create a smaller version for a foal
- Add a blanket or other horse accessories
Check this out :Knitting Pattern Scooby-Doo Character Toy
Care Instructions
Your finished horse amigurumi should be spot cleaned only. If necessary, use a mild detergent and damp cloth to gently clean soiled areas. Allow to air dry completely. Store away from direct sunlight to prevent the yarn colors from fading.
Creating this beautiful horse amigurumi requires patience and attention to detail, but the result is a stunning handcrafted toy that captures the grace and beauty of these magnificent animals. Whether made as a gift or for yourself, this crocheted horse will surely become a treasured piece in any collection.
