Table of Contents
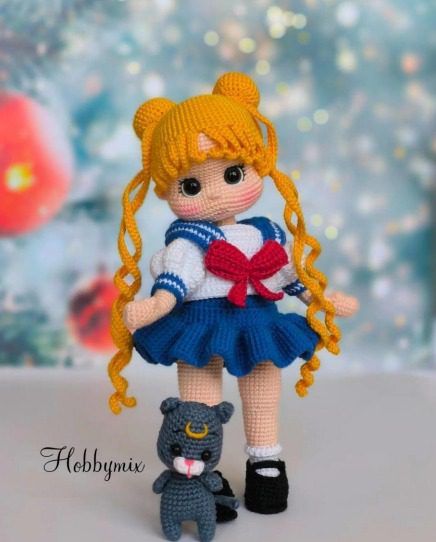
Amigurumi Inspired Amigurumi—the Japanese art of crocheting small stuffed dolls and creatures—has captivated crafters worldwide with its endless creative possibilities. This comprehensive guide will walk you through creating an adorable sailor-inspired amigurumi doll with her feline companion, perfect for anime fans and crochet enthusiasts alike. With detailed instructions and helpful tips, you’ll be able to craft this charming pair even if you’re relatively new to amigurumi.
Inspired Amigurumi Materials Needed
For the Doll
- Yarn colors:
- Skin tone (light peach or similar)
- Yellow (for hair)
- White (for shirt/collar)
- Red (for bow)
- Navy blue (for skirt and collar)
- Black (for shoes)
- White (for socks)
- Safety eyes (9-12mm black)
- Polyester fiberfill
- Yarn needle
- Stitch markers
- Crochet hooks: 2.0mm for fine details, 2.5mm for main body parts
- Scissors
- Pink embroidery thread or thin yarn (for facial features)
- Small amount of flesh-colored felt (for ears if needed)
- Thin wire (optional, for posable limbs)
For the Cat Companion
- Dark gray yarn
- Yellow yarn (for crescent moon symbol)
- White yarn (for teeth)
- Red yarn (for small bow if desired)
- Safety eyes (6-8mm black)
- Polyester fiberfill
- Yarn needle
Inspired Amigurumi Essential Techniques
Before beginning this project, familiarize yourself with these key amigurumi techniques:
- Magic ring/magic circle: Creates a tight center with no hole
- Invisible increase and decrease: Creates smoother-looking surfaces
- Working in continuous rounds: Most amigurumi is worked in spiral rounds
- Color changes: Clean transitions between colors
- Surface embroidery: For facial features and details
- Hair attachment: Special techniques for the distinctive hairstyle
Inspired Amigurumi Doll Head and Face Construction
Head
- With skin tone yarn, create a magic ring.
- Round 1: 6 SC into the ring (6)
- Round 2: INC in each stitch around (12)
- Round 3: (SC, INC) repeat 6 times (18)
- Round 4: (2 SC, INC) repeat 6 times (24)
- Round 5: (3 SC, INC) repeat 6 times (30)
- Round 6: (4 SC, INC) repeat 6 times (36)
- Round 7: (5 SC, INC) repeat 6 times (42)
- Round 8: (6 SC, INC) repeat 6 times (48)
- Rounds 9-16: SC in each stitch around (48)
- Round 17: (6 SC, DEC) repeat 6 times (42)
- Round 18: (5 SC, DEC) repeat 6 times (36)
- Round 19: (4 SC, DEC) repeat 6 times (30)
- Round 20: (3 SC, DEC) repeat 6 times (24)
Begin stuffing the head firmly at this point, continuing to add stuffing as you close.
- Round 21: (2 SC, DEC) repeat 6 times (18)
- Round 22: (SC, DEC) repeat 6 times (12)
- Round 23: DEC around (6)
Fasten off, leaving a tail for closing. Pull the tail through the front loops of the remaining 6 stitches and pull tight to close.
Face Details
- Insert safety eyes between rounds 11-12, approximately 8-10 stitches apart.
- With pink embroidery thread, create small rosy cheeks below the eyes.
- With pink or flesh-colored thread, embroider a small nose centered between and slightly below the eyes.
- With the same thread, stitch a small smile, slightly curved upward.
- Add thin eyebrows above the eyes if desired.
Inspired Amigurumi Body Construction
- With skin tone yarn, create a magic ring.
- Round 1: 6 SC into the ring (6)
- Round 2: INC in each stitch around (12)
- Round 3: (SC, INC) repeat 6 times (18)
- Round 4: (2 SC, INC) repeat 6 times (24)
- Round 5: (3 SC, INC) repeat 6 times (30)
- Rounds 6-14: SC in each stitch around (30)
At this point, you may insert wire for posable arms if desired.
- Round 15: (3 SC, DEC) repeat 6 times (24)
- Round 16: (2 SC, DEC) repeat 6 times (18)
- Rounds 17-18: SC in each stitch around (18)
Stuff the body firmly, especially the neck area to support the head.
Inspired Amigurumi Arms (Make 2)
- With skin tone yarn, create a magic ring.
- Round 1: 6 SC into the ring (6)
- Round 2: INC in each stitch around (12)
- Rounds 3-4: SC in each stitch around (12)
- Round 5: (4 SC, DEC) repeat 2 times (10)
- Rounds 6-20: SC in each stitch around (10)
Stuff lightly, more firmly at the hands. Fasten off, leaving a long tail for sewing to the body.
Legs (Make 2)
Shoes
- With black yarn, create a magic ring.
- Round 1: 6 SC into the ring (6)
- Round 2: INC in each stitch around (12)
- Round 3: (SC, INC) repeat 6 times (18)
- Round 4: SC in back loops only, around (18)
- Rounds 5-6: SC in each stitch around (18)
Socks
- Switch to white yarn:
- Rounds 7-12: SC in each stitch around (18)
Legs
- Switch to skin tone yarn:
- Rounds 13-22: SC in each stitch around (18)
Stuff firmly. Fasten off, leaving a long tail for sewing to the body.
Inspired Amigurumi Creating the Hairstyle
The distinctive hairstyle is what gives this doll her magical character. Here’s how to create it:
Wig Cap
- With yellow yarn, create a magic ring.
- Round 1: 6 SC into the ring (6)
- Round 2: INC in each stitch around (12)
- Round 3: (SC, INC) repeat 6 times (18)
- Round 4: (2 SC, INC) repeat 6 times (24)
- Round 5: (3 SC, INC) repeat 6 times (30)
- Round 6: (4 SC, INC) repeat 6 times (36)
- Round 7: (5 SC, INC) repeat 6 times (42)
- Round 8: (6 SC, INC) repeat 6 times (48)
- Rounds 9-12: SC in each stitch around (48)
Inspired Amigurumi Buns (Make 2)
- With yellow yarn, create a magic ring.
- Round 1: 6 SC into the ring (6)
- Round 2: INC in each stitch around (12)
- Round 3: (SC, INC) repeat 6 times (18)
- Round 4: SC in each stitch around (18)
- Round 5: (4 SC, DEC) repeat 3 times (15)
- Round 6: SC in each stitch around (15)
- Round 7: (3 SC, DEC) repeat 3 times (12)
- Stuff lightly and sew to the wig cap at the appropriate positions.
Inspired Amigurumi Pigtails
- For each pigtail, cut 25-30 strands of yellow yarn, each about 16 inches long.
- Fold the strands in half and attach them securely to the bottom of each bun.
- Divide the strands into three equal sections and braid loosely.
- Secure the end of each braid with a small piece of matching yarn.
- Create the curly effect by wrapping the ends around a pencil, misting with water, and allowing to dry completely before removing.
Inspired Amigurumi Sailor Outfit
Shirt
- With white yarn, chain 30 and join into a ring.
- Round 1: SC in each chain around (30)
- Rounds 2-7: SC in each stitch around (30)
- Round 8: SC 7, chain 4 (skip 4 stitches), SC 8, chain 4 (skip 4 stitches), SC 7 (30 including chains)
- Round 9: SC in each stitch and chain around (30)
- Rounds 10-12: SC in each stitch around (30)
Collar
- With navy blue yarn, join to the top of the shirt.
- Row 1: Chain 12, SC in 2nd chain from hook and in each chain across (11)
- Row 2: Chain 1, turn, SC in each stitch across (11)
- Repeat for the back collar.
- With white yarn, add 2 stripes along the edges of the collar.
Red Bow
- With red yarn, chain 20.
- Row 1: SC in 2nd chain from hook and in each chain across (19)
- Row 2: Chain 1, turn, SC in each stitch across (19)
- Row 3: Chain 1, turn, SC in each stitch across (19)
- Fold in half, pinch in the middle, and wrap with a strand of red yarn to create the bow shape.
- Attach to the center of the collar.
Pleated Skirt
- With navy blue yarn, chain 50 and join into a ring.
- Round 1: SC in each chain around (50)
- Round 2: SC 4, (SC, chain 1, skip 1) repeat 3 times, SC 4 repeat around (50)
- Round 3: SC in each stitch and chain around (50)
- Round 4: SC 3, FPDC around post of stitch 2 rows below, SC 3 repeat around to create pleats (50)
- Rounds 5-7: SC in each stitch around (50)
Cat Companion
Body
- With dark gray yarn, create a magic ring.
- Round 1: 6 SC into the ring (6)
- Round 2: INC in each stitch around (12)
- Round 3: (SC, INC) repeat 6 times (18)
- Round 4: (2 SC, INC) repeat 6 times (24)
- Rounds 5-8: SC in each stitch around (24)
- Round 9: (2 SC, DEC) repeat 6 times (18)
- Round 10: (SC, DEC) repeat 6 times (12)
- Round 11: DEC around (6)
Stuff firmly and close.
Head
- With dark gray yarn, create a magic ring.
- Round 1: 6 SC into the ring (6)
- Round 2: INC in each stitch around (12)
- Round 3: (SC, INC) repeat 6 times (18)
- Round 4: (2 SC, INC) repeat 6 times (24)
- Round 5: (3 SC, INC) repeat 6 times (30)
- Rounds 6-10: SC in each stitch around (30)
- Round 11: (3 SC, DEC) repeat 6 times (24)
- Round 12: (2 SC, DEC) repeat 6 times (18)
- Round 13: (SC, DEC) repeat 6 times (12)
Insert safety eyes and stuff firmly before closing.
Ears (Make 2)
- With dark gray yarn, create a magic ring.
- Round 1: 6 SC into the ring (6)
- Round 2: (SC, INC) repeat 3 times (9)
- Round 3: SC in each stitch around (9)
Flatten and sew to the head.
Tail
- With dark gray yarn, chain 15.
- Row 1: Starting from 2nd chain from hook, SC in each chain (14)
- Fasten off and sew to the body.
Crescent Moon Symbol
With yellow yarn, embroider a crescent moon on the forehead. Add any additional details like whiskers or a small red bow if desired.
Assembly
- Sew the head to the body securely.
- Attach the arms at shoulder height.
- Sew the legs to the bottom of the body.
- Dress the doll in the shirt and skirt.
- Attach the wig cap to the head. Sew it securely around the hairline.
- Position and sew the buns and attached pigtails to the wig cap.
- Add any final details or adjustments to the face and outfit.
- Assemble the cat companion and position it next to the doll.
Finishing Touches
- Use a soft brush to fluff the yarn hair if needed.
- Check all parts to ensure they’re securely attached.
- Add any additional accessories or decorative elements.
Customization Ideas
This base pattern can be modified in numerous ways:
- Create different sailor-inspired outfits with various color combinations
- Change the hair color and style
- Add accessories like a wand or scepter
- Create additional companion characters
- Scale the pattern up or down for different sized dolls
Display and Care Tips
To keep your amigurumi doll looking its best:
- Display away from direct sunlight to prevent color fading
- Dust gently with a soft brush
- For deeper cleaning, spot clean with mild soap and water
- Store in a clean, dry place
- Handle carefully, especially the hairstyle and small accessories
Check this out :Crochet an Adorable Snake Amigurumi Toy
Conclusion
Creating this magical sailor-inspired amigurumi doll and her feline friend is a rewarding project that combines various crochet techniques with creative details. The result is a charming character full of personality that will delight fans of magical girl anime and amigurumi collectors alike.
Whether you’re making this as a gift or for your personal collection, the attention to detail in the distinctive hairstyle, the iconic sailor outfit, and the adorable companion creates a truly special handcrafted piece that showcases your crochet skills.
Happy crocheting!



1 Comment