

Table of Contents
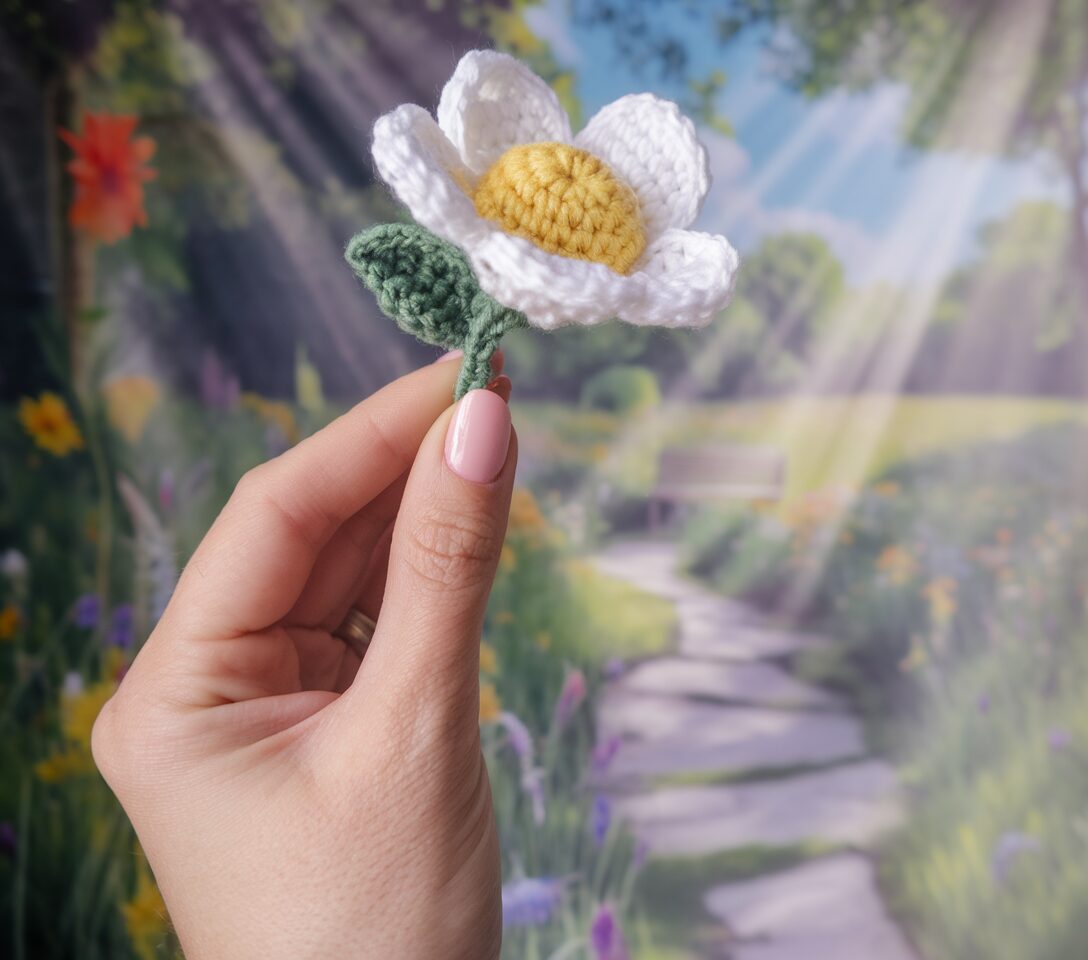
Looking for a delightful crochet project that works up quickly and adds a touch of nature to your home? This free amigurumi flower pattern creates an adorable crocheted flower complete with a sturdy stem, realistic leaves, and delicate petals. Perfect for beginners and experienced crocheters alike, this pattern uses simple techniques to create a flower that will never wilt or need watering!
Whether you’re creating a thoughtful handmade gift, decorating your home with everlasting blooms, or adding cheerful accents to other projects, this amigurumi flower pattern delivers charming results every time.
Materials Needed for Your Amigurumi Flower
- Yarn: Medium weight yarn in green (for stem and leaf), color of your choice for flower petals, and yellow or brown for the center
- Crochet hook: Size appropriate for your yarn (typically 3.5-4.0mm)
- Stuffing: Small amount of polyester fiberfill
- Wire: Thin craft or floral wire for the stem support
- Additional supplies:
- Medical tape or floral tape
- Wooden stick or pencil (for stuffing)
- Yarn needle
- Scissors
Abbreviations Used in This Pattern
- sc = single crochet
- inc = increase (2 single crochets in the same stitch)
- dec = decrease (2 stitches together)
- hdc = half double crochet
- sl st = slip stitch
- ch = chain
- MC = magic circle (magic ring)
- FL = front loops only
Detailed Amigurumi Flower Pattern Instructions
Stem

Use green yarn for the stem:
Round 1: 6 sc in magic circle [6]
Rounds 2-16: 6 sc in each round (15 rounds of 6 sc) [6]
Round 17: Working in front loops only – inc in each stitch around [12]
Round 18: (2 sc, inc) repeat 4 times around [16]
Round 19: (3 sc, inc) repeat 4 times around [20]
Fasten off and secure the yarn.
Leaf
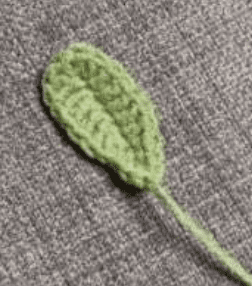
Use green yarn for the leaf:
Row 1: Make a chain of 10 ch. Starting from the 2nd chain from hook, work 3 sc, 5 hdc, 5 hdc in the last chain.
Row 2: Working on the opposite side of the foundation chain: 5 hdc, 2 sc, sl st.
Fasten off, leaving a tail for sewing the leaf to the stem.
Flower Center
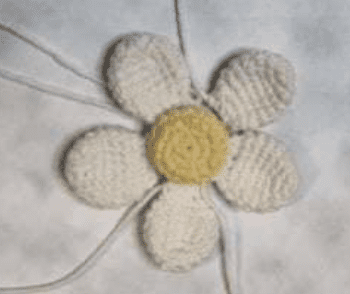
Use yellow or brown yarn for the flower center:
Round 1: 6 sc in magic circle [6]
Round 2: Inc in each stitch around [12]
Round 3: (1 sc, inc) repeat 6 times around [18]
Rounds 4-5: 18 sc in each round [18]
Round 6: (1 sc, dec) repeat 6 times around [12]
Round 7: Dec 6 times [6]
Fasten off and secure the yarn.
Petals (Make 5)
Use your chosen color for the petals:
Round 1: 6 sc in magic circle [6]
Round 2: Inc in each stitch around [12]
Round 3: (2 sc, inc) repeat 4 times around [16]
Rounds 4-6: 16 sc in each round (3 rounds of 16 sc) [16]
Round 7: (2 sc, dec) repeat 4 times around [12]
Round 8: (1 sc, dec) repeat 4 times around [8]
Round 9: Fold the petal in half and work 4 sc through both layers to close the petal.
Fasten off, leaving a tail for sewing the petal to the flower center.
Assembly Instructions for Your Amigurumi Flower
- Prepare the wire support: Take a piece of wire about twice the length of the stem. Fold it in half and wrap it with medical tape or floral tape for safety and stability.
- Insert the wire: Carefully insert the wrapped wire into the stem.
- Stuff the stem: Using a wooden stick or pencil, gently push small amounts of polyester fiberfill into the stem. Don’t overstuff – you want the stem to be firm but still flexible.
- Attach the flower center: Sew the flower center to the top of the stem, making sure it’s centered and secure.
- Attach the petals: Position the five petals evenly around the flower center and sew them in place. Arrange them to create a natural-looking bloom.
- Attach the leaf: Sew the leaf to the stem, positioning it at a natural angle.
- Final touches: Adjust the petals and leaf as needed to create the desired shape and arrangement.
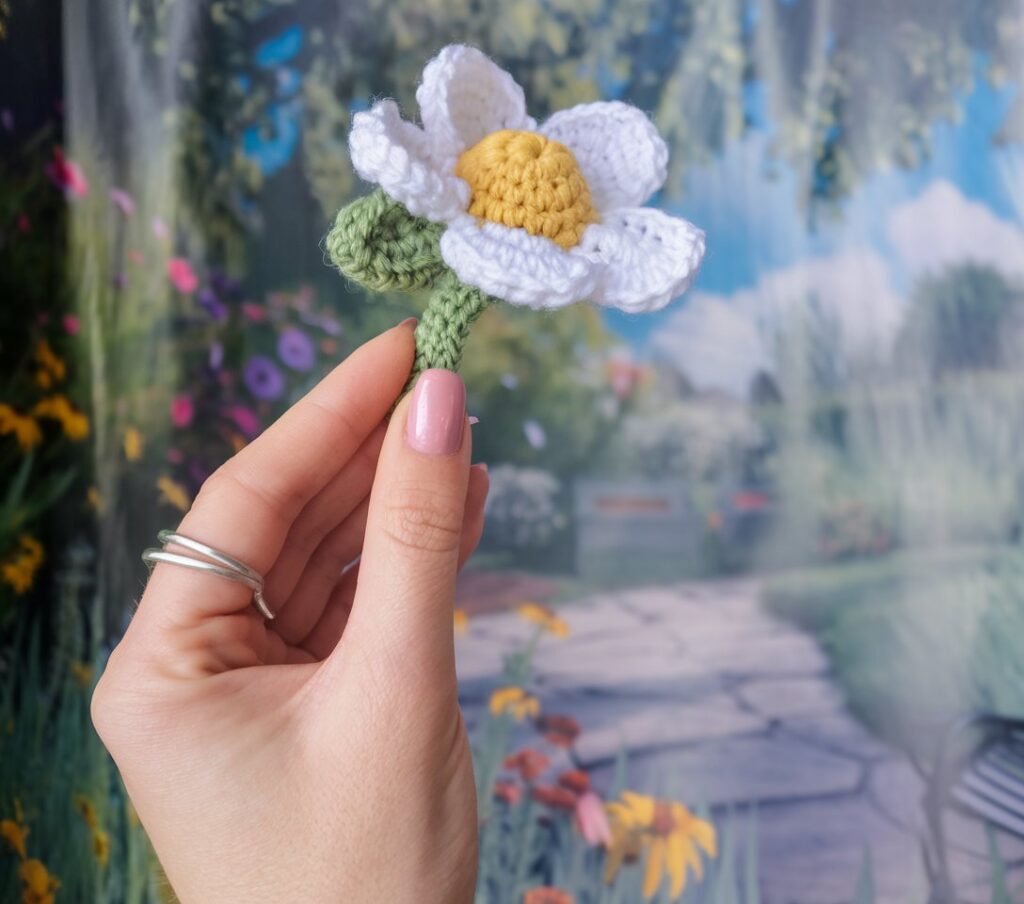
Your amigurumi flower is now complete!
Creative Variations for Your Amigurumi Flower
This basic pattern is incredibly versatile and can be adapted in numerous ways:
Different Flower Types:
- Create daisies by using white petals and a yellow center
- Make roses by using red or pink petals and arranging them in a spiral
- Design sunflowers with yellow petals and a dark brown center
- Craft tulips by changing the petal shape slightly
Size Variations:
- Use thinner yarn and a smaller hook for delicate mini flowers
- Try bulky yarn and a larger hook for statement blooms
- Make stems longer or shorter to suit your display needs
Decorative Elements:
- Add small embroidered details to the petals
- Incorporate beads into the flower center for texture
- Use variegated yarn for multicolored petals
- Add small leaves at different heights on the stem
Tips for Amigurumi Flower Success
- Wire Handling: Make sure all wire ends are properly covered with tape and tucked away to prevent poking through the yarn
- Petal Shaping: Slightly adjust the stuffing in each petal to create a more natural, uneven look
- Stem Posing: The wire inside allows you to bend and pose your flower – take advantage of this to create realistic arrangements
- Color Combinations: Nature offers endless inspiration – look at real flowers for beautiful color pairings
- Display Ideas: Consider creating multiple flowers at different heights for a bouquet, or attach them to a wreath base for a lasting decoration
Why This Amigurumi Flower Pattern Works
What makes this flower pattern special is its attention to detail while remaining accessible to crocheters of various skill levels. The construction method creates a flower that has dimension and character, with petals that curve naturally and a stem that can be posed.
The separated components (stem, leaf, center, and petals) allow for endless customization while following the same basic techniques. This makes it perfect for using up yarn scraps and experimenting with different color combinations.
Whether displayed alone in a small vase, grouped into a bouquet, or added as an embellishment to other projects, these amigurumi flowers bring a touch of handmade charm to any space.
Happy crocheting, and enjoy creating your own everlasting garden of amigurumi flowers!
Original pattern by @mishinsy, translated and adapted with permission. When sharing your creations on social media, please tag the original designer @mishinsy.
