

Table of Contents
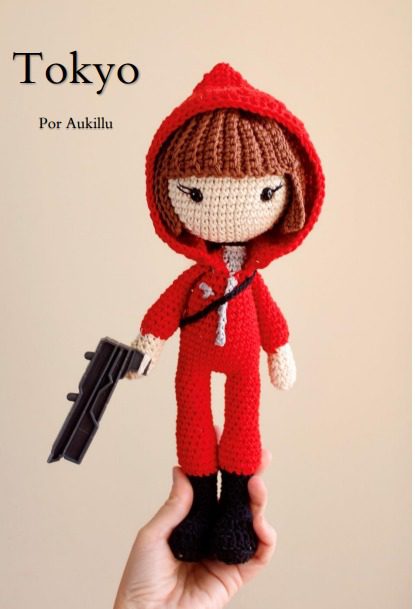
This Tokyo comprehensive pattern will guide you through creating a Tokyo character doll from Money Heist (La Casa de Papel), complete with her iconic red jumpsuit, hood, and accessories. Follow the round-by-round instructions for each part to create an approximately 9-inch tall amigurumi doll.
Tokyo Materials
- Worsted weight yarn in red (for jumpsuit)
- Worsted weight yarn in flesh tone (for head and hands)
- Worsted weight yarn in black (for boots)
- Worsted weight yarn in brown (for hair)
- Small amount of white yarn (for eye details)
- Black embroidery thread (for facial features)
- 2.5mm crochet hook (adjust if needed for correct tension)
- Polyester fiberfill stuffing
- Tapestry needle
- Scissors
- Small piece of black felt or craft foam (for prop)
- Gray or silver embroidery thread (for zipper detail)
- Stitch markers
Tokyo Abbreviations
- MC: Magic Circle
- CH: Chain
- SC: Single Crochet
- INC: Increase (2 SC in same stitch)
- DEC: Decrease (SC2TOG – Single crochet 2 stitches together)
- SL ST: Slip Stitch
- BLO: Back Loops Only
- FLO: Front Loops Only
- ( ): Repeat instructions between parentheses
- [ ]: Number of stitches at end of round
Tokyo Head
Use flesh tone yarn:
Round 1: 6 SC in magic circle [6] Round 2: INC in each stitch around [12] Round 3: (SC, INC) repeat 6 times [18] Round 4: (2 SC, INC) repeat 6 times [24] Round 5: (3 SC, INC) repeat 6 times [30] Round 6: (4 SC, INC) repeat 6 times [36] Round 7: (5 SC, INC) repeat 6 times [42] Round 8: (6 SC, INC) repeat 6 times [48] Round 9: (7 SC, INC) repeat 6 times [54] Round 10-16: SC in each stitch around [54] (7 rounds) Round 17: (7 SC, DEC) repeat 6 times [48] Round 18: (6 SC, DEC) repeat 6 times [42] Round 19: (5 SC, DEC) repeat 6 times [36] Round 20: (4 SC, DEC) repeat 6 times [30] Round 21: (3 SC, DEC) repeat 6 times [24] Round 22: (2 SC, DEC) repeat 6 times [18]
Stuff the head firmly.
Round 23: (1 SC, DEC) repeat 6 times [12] Round 24: DEC 6 times [6]
Fasten off, leaving a tail for sewing. Close the remaining hole by weaving the yarn through the front loops of the remaining 6 stitches and pulling tight.
Tokyo Body
Use red yarn:
Round 1: 6 SC in magic circle [6] Round 2: INC in each stitch around [12] Round 3: (SC, INC) repeat 6 times [18] Round 4: (2 SC, INC) repeat 6 times [24] Round 5: (3 SC, INC) repeat 6 times [30] Round 6: (4 SC, INC) repeat 6 times [36] Round 7: (5 SC, INC) repeat 6 times [42] Round 8-15: SC in each stitch around [42] (8 rounds)
Waist shaping: Round 16: (5 SC, DEC) repeat 6 times [36] Round 17: SC in each stitch around [36]
Hip shaping: Round 18: (5 SC, INC) repeat 6 times [42] Round 19-20: SC in each stitch around [42] (2 rounds)
Leg division (mark the middle front and back stitches): Round 21: SC in first 21 stitches [21] (for first leg)
Cut yarn and reattach to remaining 21 stitches for second leg.
Tokyo First Leg
Round 1-10: SC in each stitch around [21] (10 rounds) Round 11: (5 SC, DEC) repeat 3 times [18] Round 12-13: SC in each stitch around [18] (2 rounds) Round 14: (4 SC, DEC) repeat 3 times [15] Round 15-17: SC in each stitch around [15] (3 rounds)
Do not stuff the bottom part of the leg too firmly to keep it flexible.
Fasten off, leaving a long tail for sewing on the boot.
Tokyo Second Leg
Repeat rounds 1-17 as for the first leg.
Tokyo Arms (Make 2)
Use flesh tone yarn for hands, red yarn for sleeves:
Round 1: 6 SC in magic circle [6] Round 2: INC in each stitch around [12] Round 3: (1 SC, INC) repeat 6 times [18] Round 4-5: SC in each stitch around [18] (2 rounds)
Switch to red yarn:
Round 6: SC in each stitch around [18] Round 7: (4 SC, DEC) repeat 3 times [15] Round 8-9: SC in each stitch around [15] (2 rounds) Round 10: (3 SC, DEC) repeat 3 times [12] Round 11-20: SC in each stitch around [12] (10 rounds)
Stuff the arm lightly, leaving the top unstuffed for easier attachment.
Fasten off, leaving a long tail for sewing to the body.
Boots (Make 2)
Use black yarn:
Round 1: 6 SC in magic circle [6] Round 2: INC in each stitch around [12] Round 3: (1 SC, INC) repeat 6 times [18] Round 4: (2 SC, INC) repeat 6 times [24] Round 5: Working in BLO, SC in each stitch around [24] Round 6-8: SC in each stitch around [24] (3 rounds)
Flatten the opening and work 12 SC through both layers to close the top of the boot.
Fasten off, leaving a long tail for sewing to the legs.
Hood
Use red yarn:
Start with a foundation chain: Chain 36
Row 1: Starting from second chain from hook, SC in each chain across [35] Row 2-15: Chain 1 (does not count as a stitch), turn, SC in each stitch across [35] (14 rows)
Do not fasten off. Continue working SC around the entire perimeter of the rectangle, working 3 SC in each corner. Join with a slip stitch to the first SC.
Fasten off, leaving a long tail for sewing to the body.
Hair
Use brown yarn:
Option 1: Yarn Hair Method
- Cut approximately 60-80 strands of brown yarn, each about 7-8 inches long
- Fold each strand in half
- Using a crochet hook, pull the folded middle through a stitch on the head
- Pull the ends through the loop and tighten
- Repeat around the top and sides of the head
- Trim to desired length and style
Option 2: Crocheted Cap Method Round 1: 6 SC in magic circle [6] Round 2: INC in each stitch around [12] Round 3: (SC, INC) repeat 6 times [18] Round 4: (2 SC, INC) repeat 6 times [24] Round 5: (3 SC, INC) repeat 6 times [30] Round 6: (4 SC, INC) repeat 6 times [36] Round 7: (5 SC, INC) repeat 6 times [42] Round 8: (6 SC, INC) repeat 6 times [48] Round 9: (7 SC, INC) repeat 6 times [54]
Fasten off, leaving a long tail for sewing to the head.
For bangs and side hair, create chains of varying lengths (10-15 chains each) and attach them to the front and sides of the cap.
Assembly Instructions
- Facial Features:
- Position eyes between rounds 11-12, approximately 6-8 stitches apart
- Use black embroidery thread to create simple straight-line eyes
- Add small blush marks with pink yarn or fabric chalk if desired
- Body Assembly:
- Attach the head to the body, aligning it centrally
- Sew arms to the sides of the body at round 9-10
- Sew boots to the bottom of each leg
- Attach the hood to the back of the head and around the neck
- If using the crocheted hair cap, sew it to the head before attaching the hood
- Details:
- Use gray or silver thread to embroider a zipper line down the front of the jumpsuit
- Create a small prop from black felt and attach to one hand
Zipper Detail (Optional)
Cut a small piece of gray or silver thread and sew a straight line from the neck to the waist to represent the zipper. Add small horizontal stitches periodically to create the zipper teeth effect.
Prop Accessory
Using black felt or craft foam:
- Cut a small gun-shaped piece approximately 1-1.5 inches long
- Attach it to the doll’s hand using a few small stitches
Check this out :Crochet Baby Mickey Mouse Amigurumi Pattern
Final Touches
- Style the hair by trimming to desired length
- Make sure all parts are securely attached
- Add any additional embroidered details as desired
Your Tokyo Money Heist crochet doll is now complete! Position her standing or in an action pose for display.
Note: This is an unofficial fan pattern inspired by the character and is not affiliated with the official Money Heist production.
