

Table of Contents
Are you looking to create an adorable Baby Yoda (Grogu) amigurumi that will delight Star Wars fans of all ages? This comprehensive crochet pattern will guide you through creating your own handmade Baby Yoda plush toy, perfect for gifting or keeping as a cherished collectible.
Introduction to Baby Yoda Amigurumi
Crocheting a Baby Yoda amigurumi is a rewarding project that combines your love for Star Wars with the satisfying craft of crochet. This pattern has been specifically designed for a balanced difficulty level, making it accessible to crocheters with basic skills while still creating a recognizable and charming final product.
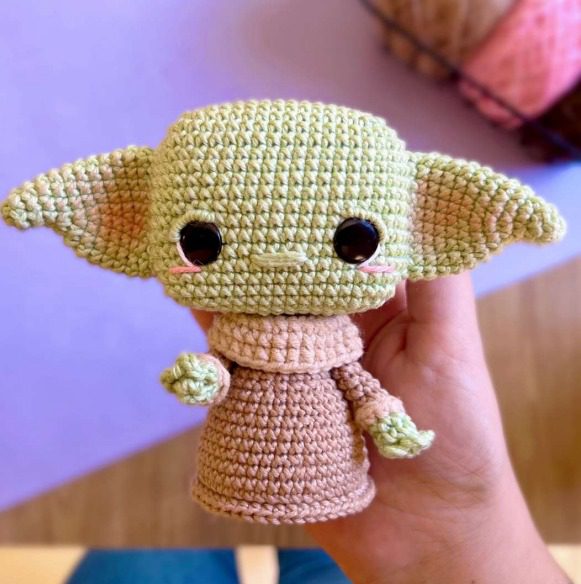
At approximately 13cm tall when completed, this Baby Yoda amigurumi features his iconic large ears, expressive eyes, and a simple yet charming robe. The estimated completion time is around 4 hours, though this may vary depending on your experience level.
Materials Needed for Baby Yoda Crochet Pattern
Before beginning your Baby Yoda amigurumi project, gather these materials:
- Amigurumi yarn in light green (color suggestion: peridot/parrot green)
- Amigurumi yarn in beige/light brown (color suggestion: chestnut)
- Soft amigurumi yarn in cream/craft color
- 12mm flat black safety eyes
- 2mm crochet hook
- Tapestry needle
- Doll needle
- Blush and small brush for cheeks
- Polyester fiberfill stuffing
- Scissors
- Pink thread for embroidering cheeks
- White thread for embroidering eye details
Abbreviations and Techniques
Familiarize yourself with these common crochet terms used throughout the pattern:
- Ch: Chain
- MC: Magic Circle
- Slst: Slip stitch
- Sc: Single crochet
- Sch: Single crochet in back loop only
- Inc: Increase (2 single crochet in same stitch)
- Dec: Decrease (2 single crochet together)
- BLO: Back loops only
Head Instructions
Start with the head using the light green yarn:
- Create a magic circle with 8 sc (8)
- Increase in each stitch around (16)
- (2 inc, 2 sc) repeated 4 times (24)
- 1 sc, 2 inc, (4 sc, 2 inc) repeated 3 times, 3 sc (32)
- 2 sc, 2 inc, (6 sc, 2 inc) repeated 3 times, 4 sc (40)
- 3 sc, 2 inc, (8 sc, 2 inc) repeated 3 times, 5 sc (48)
- 4 sc, 2 inc, (10 sc, 2 inc) repeated 3 times, 6 sc (56)
- 5 sc, 2 inc, (12 sc, 2 inc) repeated 3 times, 7 sc (64)
-
- Work 13 rounds of 64 sc (64)
-
Begin decreasing to form the head shape:
- 7 sc, 2 dec, (12 sc, 2 dec) repeated 3 times, 5 sc (56)
- 6 sc, 2 dec, (10 sc, 2 dec) repeated 3 times, 4 sc (48)
- 5 sc, 2 dec, (8 sc, 2 dec) repeated 3 times, 3 sc (40)
- 4 sc, 2 dec, (6 sc, 2 dec) repeated 3 times, 2 sc (32)
- 3 sc, 2 dec, (4 sc, 2 dec) repeated 3 times, 1 sc (24)
- (2 sc, 2 dec) repeated 4 times (16)
-
- Work 5 rounds of 16 sc (16)
-
Place the safety eyes between rounds 17 and 18, with approximately 8 stitches between them. Finish with a slip stitch, cut the yarn and secure the end.
Body Instructions
Using the beige/light brown yarn:
- Create a magic circle with 8 sc (8)
- Increase in each stitch around (16)
- (1 sc, inc) repeated 8 times (24)
- (2 sc, inc) repeated 8 times (32)
- (3 sc, inc) repeated 8 times (40)
- (4 sc, inc) repeated 8 times (48)
- 48 sc in BLO (48)
-
- Work 3 rounds of 48 sc (48)
-
- (4 sc, dec) repeated 8 times (40)
-
- Work 2 rounds of 40 sc (40)
-
- (3 sc, dec) repeated 8 times (32)
-
- Work 2 rounds of 32 sc (32)
-
- (2 sc, dec) repeated 8 times (24)
-
- Work 2 rounds of 24 sc (24)
-
- (2 sc, dec) repeated 6 times (18)
-
- Work 2 rounds of 18 sc (18)
-
Switch to the light green yarn:
- (1 sc, dec) repeated 6 times in BLO (12)
-
- Work 5 rounds of 12 sc (12)
-
- 6 decreases (6)
Finish with an inverted magic circle and leave a long tail. Insert beige/light brown yarn into the loops of round 7 and work 48 sc. Finish with a false sc and secure the end.
Arms Instructions
For each arm, use the light green yarn:
- Create a magic circle with 7 sc (7)
-
- Work 2 rounds of 7 sc (7)
-
Switch to the beige/light brown yarn:
- 7 sc in BLO (7)
-
- Work 5 rounds of 7 sc (7)
-
Insert cream/craft colored yarn into the loops of round 4 and work (1 inc, 5 sc, 1 inc). Cut the yarn and secure. No stuffing is needed for the arms.
Ears Instructions
For each ear, use the light green yarn:
- Create a magic circle with 6 sc (6)
- 6 sc (6)
- (1 sc, inc) repeated 3 times (9)
- 9 sc (9)
- 3 inc, 6 sc (12)
- (1 sc, inc) repeated 3 times, 6 sc (15)
- (2 sc, inc) repeated 3 times, 6 sc (18)
-
- Work 2 rounds of 18 sc (18)
-
- (5 sc, inc) repeated 3 times (21)
-
- Work 2 rounds of 21 sc (21)
-
Finish with a slip stitch and leave a long tail for sewing. Attach the ears to the sides of the head, between rounds 11 and 19, with approximately 5 stitches distance from each eye.
Collar Instructions
Using the cream/craft colored yarn:
- Chain 30, join with a slip stitch to the first chain to form a circle, and work 30 sc around.
-
- Work 2 rounds of 30 sc (30)
-
Finish with a false sc, cut the yarn, and secure. Fit around the neck after attaching the arms. Adjust the number of chains or stitches if needed.
Finishing Touches
- Sew the head to the body
- Attach the arms to the body
- Fit the collar around the neck
- Embroider the nose, cheeks, and white water line detail around the eyes
- Use a small brush to apply blush, pastel chalk, or fabric paint to the ears for a pink tint
Tips for Perfect Baby Yoda Amigurumi
- Stuff the head firmly, especially at the corners, to maintain its square shape
- For the palpebra (eyelid) embroidery, use a simple straight stitch to create expression
- When attaching limbs, use the same colored yarn for invisible seams
- The robes can be adjusted for size by adding or reducing rows
Check this out :Crochet Baby Yoda Amigurumi Grogu Pattern
Conclusion
With patience and attention to detail, you’ve now created your very own Baby Yoda amigurumi! This adorable character makes a wonderful gift for Star Wars enthusiasts or a charming addition to your own collection.
Remember that practice makes perfect, and each amigurumi you create will be unique. The joy of handmade items is in their personal touch and the love put into making them.
Happy crocheting, and may the Force be with your yarn!
