

Table of Contents
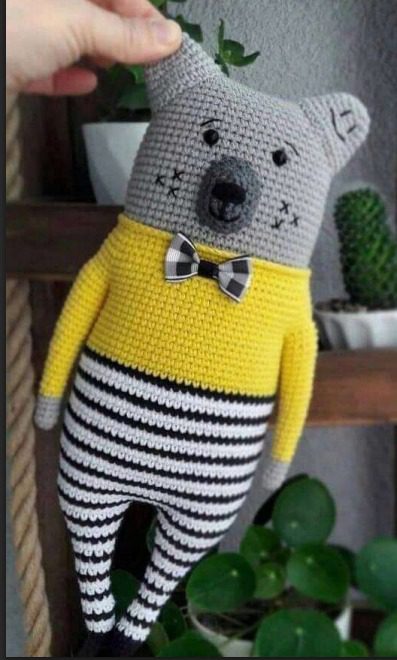
Looking Koala for a charming amigurumi project that combines cuteness with style? This detailed koala bear crochet pattern creates an irresistible stuffed toy with personality to spare. The finished koala features a bright yellow shirt and fashionable striped pants that will delight crafters of all skill levels. Perfect for gifting, selling at craft fairs, or adding a handmade touch to your home decor.
Why This Koala Amigurumi Pattern Stands Out
This pattern isn’t just another stuffed animal – it’s a character with style and charm. The modern outfit with contrasting black and white striped pants transforms a simple koala into a trendy companion that appeals to both children and adults. The detailed facial features give this amigurumi personality, while the careful construction ensures it will stand the test of time.
Koala Materials You’ll Need
- Gray yarn for head, arms and paws (medium weight acrylic or cotton)
- Yellow yarn for shirt/sweater
- White yarn for pants
- Black yarn for stripes
- Black safety eyes (7mm recommended)
- Black embroidery floss (for nose and facial details)
- Small amount of fiberfill stuffing
- Crochet hook size 3.5mm (E/4)
- Yarn needle for assembly
- Small checkered ribbon for bow tie (optional)
- Stitch markers
Koala Crochet Terminology Used
- sc – single crochet
- inc – increase (2 single crochets in same stitch)
- dec – decrease (2 stitches worked together)
- MR – magic ring
- ch – chain
- sl st – slip stitch
- BLO – back loops only
- FLO – front loops only
Koala Arms (Make 2)
Start with gray yarn:
- 6 sc in magic ring (6) 2-5. 6 sc in each round (6)
- Change to yellow: 5 sc, 1 inc (7) 7-8. 7 sc in each round (7)
- 6 sc, 1 inc (8) 10-11. 8 sc in each round (8)
- 7 sc, 1 inc (9) 13-14. 9 sc in each round (9)
- 8 sc, 1 inc (10) 16-17. 10 sc in each round (10)
- 9 sc, 1 inc (11) 19-20. 11 sc in each round (11)
- 10 sc, 1 inc (12)
- 12 sc (12)
- 11 sc, 1 inc (13) 24-25. 13 sc in each round (13)
Set pieces aside when finished.
Koala Legs (Make 2)
Work in rounds with slip stitch and chain 1 at end of each round. For the first 4 rounds use black yarn, then alternate 2 rows white, 1 row black.
- 6 sc in magic ring (6)
- 6 sc (6)
- (1 sc, 1 inc)*3 (9) 4-8. 9 sc in each round (9)
- 7 sc, 1 inc (10) 10-12. 8 sc (8)
- 7 sc, 1 inc (9)
- 9 sc (9)
- 8 sc, 1 inc (10)
- 10 sc (10)
- (4 sc, 1 inc)*2 (12)
- (5 sc, 1 inc)*2 (14)
- (6 sc, 1 inc)*2 (16)
- (7 sc, 1 inc)*2 (18)
- (8 sc, 1 inc)*2 (20)
- (9 sc, 1 inc)*2 (22)
- (10 sc, 1 inc)*2 (24)
For the second leg, don’t cut yarn at the end. Instead, join legs with 5 chain stitches and continue to the body.
Body
- Work 11 sc, 1 inc, 12 sc on first leg, 5 sc along the chain connecting legs, 11 sc, 1 inc, 12 sc on second leg, 5 sc along the other side of the chain = 60 sc
- Make one increase on each side of the piece (62)
- 62 sc (62)
- Make one increase on each side of the piece (64) 28-29. 64 sc (64)
- Make one increase on each side of the piece (66)
- 66 sc (66)
- Make one increase on each side of the piece (68) 33-34. 68 sc (68)
- Make one increase on each side of the piece (70) 36-46. 70 sc (70)
Change to yellow yarn for the shirt/sweater: 47-48. 70 sc (70) 49. Decrease one stitch on each side (68) 50-52. 68 sc (68) 53. Decrease one stitch on each side (66) 54-55. 66 sc (66) 56. Attach arms to body with slip stitches: 16 sc, 4 sc (joining along the arm), 28 sc, 4 sc (joining along the arm), 13 sc 57. 75 sc including the arm attachments 58-61. 75 sc (75) 62. 15 sc, 1 dec, 7 sc, 1 dec, 26 sc, 1 dec, 7 sc, 1 dec, 12 sc (71) 63. 71 sc (71) 64. 14 sc, 1 dec, 6 sc, 1 dec, 25 sc, 1 dec, 6 sc, 1 dec, 12 sc (67) 65. BLO: 67 sc (67)
Head
Continue with gray yarn: 65. In remaining loops from row 64: 13 sc, 1 dec, 5 sc, 1 dec, 24 sc, 1 dec, 5 sc, 1 dec, 12 sc (63) 66-70. 63 sc (63) 71. Decrease one stitch on each side (61) 72-73. 61 sc (61) 74. Decrease one stitch on each side (59) 75. 59 sc (59) 76. Decrease one stitch on each side (57) 77-78. 57 sc (57)
Install safety eyes between rows 13 and 14, approximately 8 stitches apart.
- Decrease one stitch on each side (55) 80-81. 55 sc (55)
- Decrease one stitch on each side (53) 83-84. 53 sc (53)
- Decrease one stitch on each side (51)
- Decrease one stitch on each side (49)
- Decrease one stitch on each side (47)
Finish stuffing the head with fiberfill and close the opening with a yarn needle.
Snout
- Chain 5
- Starting from 2nd stitch from hook: 3 sc, in last stitch work [3 sc], 2 sc, 1 inc (10)
- 1 inc, 2 sc, 3 inc, 2 sc, 2 inc (16)
- 16 sc (16)
- 1 sc, inc, 2 sc, (1 sc, inc)*3, 2 sc, (1 sc, inc)*2 (22)
Embroider the nose and smile on the snout.
Ears (Make 2)
- 5 sc in magic ring (10)
- Inc in each stitch (10)
- (1 sc, 1 inc)*5 (15) 4-5. 15 sc (15)
- (2 sc, 1 inc)*5 (20)
- 20 sc (20)
- (3 sc, 1 inc)*5 (25)
- 25 sc (25)
Assembly Instructions
- Sew the snout to the head, positioning it between the eyes
- Attach ears to the top sides of the head
- Embroider small “x” stitches on the snout to complete the facial details
- Add a checkered bow tie at the neck (optional)
- Weave in all loose ends
Tips For Perfect Results
- Use consistent tension throughout your work for a professional finish
- Stuff the body firmly but not overstuffed for best posture
- When changing colors, try to hide the yarn transitions inside the piece
- For the striped pants, carry the unused yarn inside the piece rather than cutting it each time
- Block the finished amigurumi lightly with a damp cloth to perfect its shape
- For best safety eye placement, position them before closing the head
Variations To Try
- Change the yellow shirt to any bright color for a different look
- Create pants with different patterns – polka dots or solid colors work well
- Add small accessories like a tiny backpack or hat
- Embroider additional details like eyebrows for more personality
- Make a mini version by using thinner yarn and a smaller hook
- Create a family by making different sizes
Special Notes
This adorable koala amigurumi makes a wonderful gift for children and adults alike. The finished toy stands approximately 12 inches tall and can sit unassisted. The pattern combines simple techniques with careful construction to create a charming character that will become a cherished keepsake.
The contrasting colors of the gray koala, bright yellow shirt, and striped pants create visual interest that stands out in any collection. The detailed facial features add personality that brings this handmade creation to life.
Remember that tension varies between crocheters, so your finished size may differ slightly. The most important thing is consistency throughout your work.
Whether you’re making this lovable koala for yourself, as a gift, or to sell at craft fairs, you’ll enjoy the process of watching this adorable character come to life, stitch by stitch.
Happy crocheting!
Check this out :Crocheting Your Own Adorable Bunny Doll With Dress and Purse
Final Thoughts
Amigurumi projects combine the joy of crocheting with the satisfaction of creating something truly special. This koala pattern is designed to be accessible for intermediate crocheters while offering enough detail to create a professional-looking finished piece. The careful balance of simple shapes and thoughtful details results in a character with genuine charm and personality.
Remember to share photos of your finished koala with the original pattern designer if you post them online – it’s a wonderful way to show appreciation for their creative work and connect with the wider crafting community.
