

Table of Contents
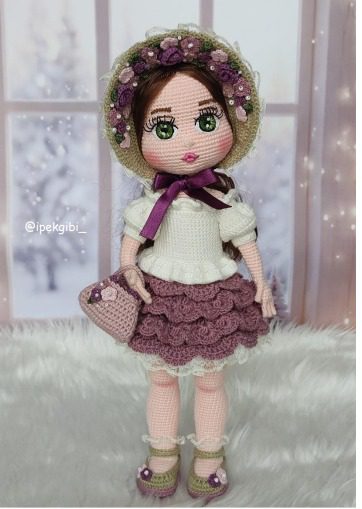
Creating a stunning amigurumi doll with exquisite details elevates your crochet skills and results in an heirloom-quality piece that delights collectors and children alike. This elegant crochet doll pattern features a charming character with lifelike proportions, a delicate floral bonnet, textured layered skirt, and carefully crafted accessories that showcase advanced amigurumi techniques.
The Charm of Handcrafted Amigurumi Dolls
Amigurumi dolls have captivated crochet enthusiasts worldwide, transforming simple yarn into characters bursting with personality. This particular doll design represents the pinnacle of the craft, combining classic styling with modern techniques to create a sophisticated finished piece.
The defining features of this beautiful doll include her expressive green eyes, delicately embroidered facial features, and thoughtfully designed outfit elements. From her bonnet adorned with tiny purple flowers to her textured layered skirt and matching purse, every detail demonstrates meticulous attention to craftsmanship.
Materials Required for Your Crochet Doll
To create this elegant amigurumi doll, you’ll need the following materials:
- Skin-tone yarn (light peach or your preferred shade) for head, arms, and legs
- Cream/off-white yarn for the sweater/top
- Dusty mauve/purple yarn for the skirt
- Light olive/sage green yarn for bonnet base and shoe details
- Purple yarn in various shades for flowers and accessories
- White yarn for underskirt details
- Fine embroidery thread for facial features
- Safety eyes (green, 8-10mm)
- Small pearls or beads for decoration
- Fiberfill stuffing
- Crochet hooks (sizes 2.0mm and 2.5mm)
- Yarn needle
- Thin ribbon in purple for bonnet ties
- Wire for internal structure (optional)
Crafting the Perfect Doll Body
The foundation of this beautiful doll begins with properly proportioned body parts. Each component requires careful attention to shaping and tension for a professional result.
Head and Face Creation
The doll’s head features a round shape with subtle contouring around the cheeks and chin. Work in continuous spiral rounds, increasing gradually to form the proper shape before decreasing to close the form.
Head (work in continuous rounds):
- Create a magic ring with 6 single crochet (6)
- Increase in each stitch around (12)
- Single crochet in first stitch, increase in next stitch repeat around (18)
- Single crochet in first 2 stitches, increase in next stitch repeat around (24)
- Single crochet in first 3 stitches, increase in next stitch repeat around (30)
- Single crochet in first 4 stitches, increase in next stitch repeat around (36)
- Single crochet in first 5 stitches, increase in next stitch repeat around (42)
- Single crochet in first 6 stitches, increase in next stitch repeat around (48)
- Single crochet in first 7 stitches, increase in next stitch repeat around (54)
- Single crochet in first 8 stitches, increase in next stitch repeat around (60) 11-18. Single crochet in each stitch around for 8 rounds (60)
- Single crochet in first 8 stitches, decrease over next 2 stitches repeat around (54)
- Single crochet in first 7 stitches, decrease over next 2 stitches repeat around (48)
- Single crochet in first 6 stitches, decrease over next 2 stitches repeat around (42)
- Single crochet in first 5 stitches, decrease over next 2 stitches repeat around (36)
- Single crochet in first 4 stitches, decrease over next 2 stitches repeat around (30)
- Single crochet in first 3 stitches, decrease over next 2 stitches repeat around (24)
- Single crochet in first 2 stitches, decrease over next 2 stitches repeat around (18)
- Single crochet in first stitch, decrease over next 2 stitches repeat around (12)
- Decrease around to close the opening (6)
The face embroidery represents one of the most crucial aspects of your doll. Position the green safety eyes between rounds 15-16, approximately 8-10 stitches apart, ensuring symmetrical placement. Secure eyes before closing the head. Use fine embroidery thread to create delicate eyebrows, a small nose, and a mouth with visible lips. Adding a touch of pink blush to the cheeks enhances the doll’s lifelike appearance.
Arms and Legs
The doll’s slender arms and legs require attention to proper proportions. Create these limbs using skin-tone yarn, working from the extremities upward.
Arms (make 2, work in continuous rounds):
- Create a magic ring with 6 single crochet (6)
- Increase in each stitch around (12)
- Single crochet in each stitch around (12)
- Single crochet in first 4 stitches, decrease over next 2 stitches repeat around (10) 5-20. Single crochet in each stitch around for 16 rounds (10)
- Single crochet in first 3 stitches, decrease over next 2 stitches repeat around (8) 22-30. Single crochet in each stitch around for 9 rounds (8)
Leave a long tail for sewing to the body. For the hands, incorporate subtle shaping for the thumbs by working extra stitches in specific places.
Legs (make 2, work in continuous rounds):
- Create a magic ring with 6 single crochet (6)
- Increase in each stitch around (12)
- Single crochet in first stitch, increase in next stitch repeat around (18)
- Single crochet in first 2 stitches, increase in next stitch repeat around (24) 5-8. Single crochet in each stitch around for 4 rounds (24)
- Single crochet in first 10 stitches, decrease over next 2 stitches repeat around (22)
- Single crochet in first 9 stitches, decrease over next 2 stitches repeat around (20)
- Single crochet in each stitch around (20)
- Single crochet in first 8 stitches, decrease over next 2 stitches repeat around (18) 13-15. Single crochet in each stitch around for 3 rounds (18)
- Single crochet in first 7 stitches, decrease over next 2 stitches repeat around (16) 17-38. Single crochet in each stitch around for 22 rounds (16)
- Single crochet in first 6 stitches, decrease over next 2 stitches repeat around (14)
- Single crochet in first 5 stitches, decrease over next 2 stitches repeat around (12)
- Single crochet in first 4 stitches, decrease over next 2 stitches repeat around (10)
- Single crochet in first 3 stitches, decrease over next 2 stitches repeat around (8)
The feet deserve special attention, with shaping that allows the doll to wear the decorative sage green shoes with purple flower embellishments.
Creating the Exquisite Outfit
The doll’s outfit consists of several carefully designed components that work together harmoniously.
Cream Sweater with Texture
The cream sweater features a textured pattern that adds visual interest and dimension. Work this piece from the bottom up, incorporating ribbing at the wrists and waist.
Sweater (worked in rounds, join each round with a slip stitch):
- Chain 40, join with slip stitch to form a ring, being careful not to twist the chain
- Chain 1 (doesn’t count as a stitch), single crochet in each chain around (40)
- Chain 1, front post single crochet, back post single crochet repeat around, join with slip stitch (40)
- Chain 1, back post single crochet, front post single crochet repeat around, join with slip stitch (40) 5-6. Repeat rounds 3-4 once more for ribbing pattern
- Chain 1, single crochet in each stitch around, join with slip stitch (40)
- Chain 1, skip 1 stitch, 3 double crochet in next stitch, skip 1 stitch, single crochet in next stitch repeat around, join with slip stitch 9-14. Repeat round 8 for textured pattern
- Chain 1, single crochet in each stitch around, join with slip stitch (40)
- Chain 1, single crochet in first 7 stitches, chain 5 (for armhole), skip 6 stitches, single crochet in next 14 stitches, chain 5 (for armhole), skip 6 stitches, single crochet in last 7 stitches, join with slip stitch (32 stitches plus two 5-chain spaces)
- Chain 1, single crochet in first 7 stitches, 5 single crochet in chain space, single crochet in next 14 stitches, 5 single crochet in chain space, single crochet in last 7 stitches, join with slip stitch (38) 18-22. Chain 1, single crochet in each stitch around, join with slip stitch (38)
- Chain 1, single crochet in next 4 stitches, decrease over next 2 stitches repeat around, join with slip stitch (32) 24-25. Chain 1, single crochet in each stitch around, join with slip stitch (32)
- Chain 1, single crochet in next 3 stitches, decrease over next 2 stitches repeat around, join with slip stitch (26)
- Chain 1, single crochet in each stitch around, join with slip stitch (26)
The neckline should be finished with care to maintain a clean edge that frames the doll’s face beautifully. For the sleeves, pick up stitches around the armhole and work in rounds, decreasing gradually toward the wrist, then finish with the same ribbing pattern as the bottom of the sweater.
Layered Mauve Skirt
The skirt represents the centerpiece of the outfit with its beautiful layered design in dusty mauve. Each layer features a scalloped or shell-like pattern that creates wonderful texture and movement.
Underskirt (worked in rows):
- With white yarn, chain 60, join with slip stitch to form a ring
- Chain 1, single crochet in each chain around, join with slip stitch (60)
- Chain 1, single crochet in each stitch around, join with slip stitch (60)
- Chain 3 (counts as first double crochet), skip 2 stitches, 5 double crochet in next stitch, skip 2 stitches, double crochet in next stitch repeat around, join with slip stitch to top of beginning chain-3
- Chain 1, single crochet in each stitch around, join with slip stitch
- Chain 1, single crochet in next stitch, chain 2, skip 1 stitch repeat around, join with slip stitch
Mauve Layered Skirt (worked in rows):
- With mauve yarn, chain 60, join with slip stitch to form a ring
- Chain 1, single crochet in each chain around, join with slip stitch (60)
- Chain 1, single crochet in each stitch around, join with slip stitch (60)
- Chain 3 (counts as first double crochet), skip 1 stitch, 3 double crochet in next stitch, skip 1 stitch, double crochet in next stitch repeat around, join with slip stitch to top of beginning chain-3
- Chain 3, double crochet in same stitch, skip 2 stitches, 3 double crochet in next stitch repeat around, skip last 2 stitches, join with slip stitch to top of beginning chain-3
First Scalloped Layer: 6. Chain 1, single crochet in same stitch, chain 3, skip 2 stitches, single crochet in next stitch repeat around, chain 3, join with slip stitch to first single crochet 7. Slip stitch into first chain-3 space, chain 1, 5 single crochet in chain-3 space, single crochet in next single crochet repeat around, join with slip stitch to first single crochet
Second Scalloped Layer: 8. Chain 3, 5 double crochet in middle (3rd) single crochet of next 5-single crochet group, single crochet in next stitch repeat around, join with slip stitch to top of beginning chain-3 9. Chain 1, single crochet in same stitch, chain 4, skip 2 stitches, single crochet in next stitch, chain 4, skip 2 stitches, single crochet in next stitch repeat around, join with slip stitch to first single crochet 10. Slip stitch into first chain-4 space, chain 1, 7 single crochet in chain-4 space, single crochet in next single crochet repeat around, join with slip stitch to first single crochet
Third Scalloped Layer: 11. Chain 3, 7 double crochet in middle (4th) single crochet of next 7-single crochet group, single crochet in next stitch repeat around, join with slip stitch to top of beginning chain-3 12. Chain 1, single crochet in same stitch, chain 5, skip 3 stitches, single crochet in next stitch, chain 5, skip 3 stitches, single crochet in next stitch repeat around, join with slip stitch to first single crochet 13. Slip stitch into first chain-5 space, chain 1, 9 single crochet in chain-5 space, single crochet in next single crochet repeat around, join with slip stitch to first single crochet
The gradual expansion of each tier creates the full, layered effect. The underskirt peeking beneath the mauve layers adds contrast and visual interest with its crisp white edging.
Sage Green Bonnet with Floral Crown
The bonnet combines functionality and beauty with its sage green base and stunning floral decoration. Construct the bonnet base first, working in rounds to create the proper shape to frame the doll’s face.
Bonnet Base (worked in rounds):
- With sage green yarn, chain 4, join with slip stitch to form a ring
- Chain 3 (counts as first double crochet), 11 double crochet in ring, join with slip stitch to top of beginning chain-3 (12)
- Chain 3, double crochet in same stitch, 2 double crochet in each stitch around, join with slip stitch to top of beginning chain-3 (24)
- Chain 3, double crochet in same stitch, double crochet in next stitch, 2 double crochet in next stitch, double crochet in next stitch repeat around, join with slip stitch to top of beginning chain-3 (36)
- Chain 3, double crochet in each stitch around, join with slip stitch to top of beginning chain-3 (36)
- Chain 3, double crochet in same stitch, double crochet in next 2 stitches, 2 double crochet in next stitch, double crochet in next 2 stitches repeat around, join with slip stitch to top of beginning chain-3 (48)
- Chain 3, double crochet in each stitch around, join with slip stitch to top of beginning chain-3 (48)
- Chain 3, front post double crochet around next stitch, back post double crochet around next stitch repeat around, join with slip stitch to top of beginning chain-3 (48)
- Chain 3, double crochet in next 23 stitches, chain 2, skip 24 stitches (this forms the opening for the face), join with slip stitch to top of beginning chain-3
- Chain 3, double crochet in each stitch and chain around, join with slip stitch to top of beginning chain-3 (26) 11-15. Repeat round 10 for 5 more rounds
- Chain 1, single crochet in each stitch around, join with slip stitch to first single crochet (26)
- Chain 1, single crochet in next stitch, chain 1 repeat around, join with slip stitch to first single crochet
The edging should be finished with precision to create a clean line.
Small Purple Flowers (make 12-15):
- With light purple yarn, chain 4, join with slip stitch to form a ring
- Chain 1, work 10 single crochet in ring, join with slip stitch to first single crochet
- Chain 1, single crochet in next stitch, chain 3, single crochet in same stitch repeat around to create 10 petals, join with slip stitch to first single crochet
- Fasten off, leaving a long tail for sewing
Medium Purple Flowers (make 8-10):
- With medium purple yarn, chain 5, join with slip stitch to form a ring
- Chain 3, work 14 double crochet in ring, join with slip stitch to top of beginning chain-3
- Chain 1, single crochet in next stitch, half double crochet in next stitch, double crochet in next stitch, half double crochet in next stitch, single crochet in next stitch repeat around to create 5 petals, join with slip stitch to first single crochet
- Fasten off, leaving a long tail for sewing
Tiny Flower Buds (make 15-20):
- With dark purple yarn, chain 3, join with slip stitch to form a ring
- Chain 1, work 5 single crochet in ring, join with slip stitch to first single crochet
- Chain 1, single crochet in next stitch, chain 2, single crochet in same stitch repeat around to create 5 small petals, join with slip stitch to first single crochet
- Fasten off, leaving a long tail for sewing
The purple floral crown transforms the bonnet into a statement piece. Arrange and sew the flowers around the edge of the bonnet, concentrating them more heavily at the top and sides. Intersperse tiny pearl beads or French knots among the flowers for added dimension and detail.
Finish the bonnet with purple ribbon ties (approximately 12 inches long) attached at each side of the face opening to allow it to be secured beneath the doll’s chin.
Matching Accessories
Complete the doll’s ensemble with accessories that complement the main outfit.
Mauve Purse:
- With mauve yarn, chain 15, join with slip stitch to form a ring
- Chain 1, single crochet in each chain around, join with slip stitch to first single crochet (15)
- Chain 1, single crochet in each stitch around, join with slip stitch to first single crochet (15)
- Chain 1, single crochet in next stitch, 2 single crochet in next stitch repeat around, join with slip stitch to first single crochet (22) 5-8. Chain 1, single crochet in each stitch around, join with slip stitch to first single crochet (22)
- Chain 1, single crochet in next stitch, single crochet decrease over next 2 stitches repeat around, join with slip stitch to first single crochet (15)
- Chain 1, working in back loops only, single crochet in each stitch around, join with slip stitch to first single crochet (15)
- Chain 15 for purse strap, skip 7 stitches of round 10, slip stitch in next stitch, chain 1, single crochet in each chain back to beginning, slip stitch to first stitch of round 10
- Fasten off and weave in ends
Sage Green Shoes (make 2):
- With sage green yarn, chain 8
- Single crochet in 2nd chain from hook and in next 5 chains, 3 single crochet in last chain, continue around working in unworked loops of starting chain: single crochet in next 5 chains, 2 single crochet in last chain, join with slip stitch to first single crochet (16)
- Chain 1, single crochet in first 5 stitches, 2 single crochet in each of next 3 stitches, single crochet in next 5 stitches, 2 single crochet in each of next 3 stitches, join with slip stitch to first single crochet (22)
- Chain 1, single crochet in each stitch around, join with slip stitch to first single crochet (22)
- Chain 1, working in back loops only, single crochet in each stitch around, join with slip stitch to first single crochet (22)
- Chain 1, single crochet in first 9 stitches, single crochet decrease over next 2 stitches 2 times, single crochet in next 9 stitches, join with slip stitch to first single crochet (20)
- Chain 1, single crochet in first 8 stitches, single crochet decrease over next 2 stitches 2 times, single crochet in next 8 stitches, join with slip stitch to first single crochet (18)
- Chain 1, single crochet in first 7 stitches, single crochet decrease over next 2 stitches 2 times, single crochet in next 7 stitches, join with slip stitch to first single crochet (16)
- Chain 1, single crochet in each stitch around, join with slip stitch to first single crochet (16)
- Repeat round 9
- Chain 1, single crochet in next 6 stitches, single crochet decrease over next 2 stitches repeat around, join with slip stitch to first single crochet (14)
- Chain 1, single crochet in each stitch around, join with slip stitch to first single crochet (14)
- Chain 1, single crochet in next 5 stitches, single crochet decrease over next 2 stitches repeat around, join with slip stitch to first single crochet (12)
- Chain 1, single crochet in each stitch around, join with slip stitch to first single crochet (12)
- Chain 1, working through both loops, slip stitch in each stitch around, join with slip stitch to first slip stitch (12)
Purple Flower Embellishments for Shoes (make 2):
- With light purple yarn, chain 4, join with slip stitch to form a ring
- Chain 1, work 8 single crochet in ring, join with slip stitch to first single crochet
- Chain 1, single crochet in next stitch, chain 2, single crochet in same stitch repeat around to create 8 petals, join with slip stitch to first single crochet
- Fasten off, leaving a long tail for sewing to shoes
The small purse in matching mauve connects visually with the skirt, while the sage green shoes with purple flower details tie together the color story of the entire design.
Assembly Techniques for Professional Results
Achieving a polished, professional finish requires careful assembly techniques. Position each component precisely before joining, using pins to hold pieces in place if necessary.
When attaching the head to the body, ensure proper alignment for a natural pose. The arms should be attached at shoulder height with slight forward positioning. Legs should be joined with attention to proper hip width and alignment.
For the outfit components, use invisible seaming techniques to join pieces without obvious stitching. The skirt should sit naturally at the doll’s waist, while the sweater should fit smoothly over the upper body.
Enhancing Your Doll with Special Details
The difference between an ordinary crochet doll and an exceptional one often lies in the small details. Consider these enhancements for your creation:
- Add subtle wire supports inside the arms and legs for poseability
- Incorporate fine hair using specialized doll hair techniques or fine yarn
- Create dimension in the clothing with careful blocking and shaping
- Add tiny buttons or embellishments to the sweater
- Include delicate embroidery details on the outfit edges
Displaying Your Finished Amigurumi Doll
Once completed, your beautiful crochet doll deserves proper display. Consider creating a small stand or seat that complements the doll’s style. Position the doll with care, arranging the skirt layers and accessories for maximum visual impact.
If giving as a gift, present the doll in an attractive box with tissue paper to protect the delicate details. Include care instructions to ensure the doll remains beautiful for years to come.
Advancing Your Amigurumi Doll Crafting Skills
This elegant doll represents an advanced amigurumi project that builds numerous skills. As you work through the pattern, you’ll develop expertise in:
- Facial feature embroidery and expression creation
- Proper body proportioning for realistic figures
- Advanced clothing construction techniques
- Textural stitch patterns for dimensional effects
- Small-scale floral creation
- Accessory design and integration
Each of these skills transfers to future doll projects, allowing you to develop your own unique doll designs and styles.
Creating Custom Variations
While the original design features a stunning color combination of cream, mauve, sage green, and purple accents, you can customize your doll with different color schemes:
- Winter palette: Ice blue, silver, white, and crystal beading
- Spring garden: Soft green, pink, yellow, and flower details
- Autumn harvest: Rust, golden yellow, brown, and leaf details
- Summer seaside: Navy, coral, white, and shell embellishments
You might also adjust the outfit style while maintaining the doll’s proportions. Consider creating:
- A holiday-themed variation with seasonal colors and details
- A wedding doll with miniature white dress and veil
- A vintage-inspired doll with period-appropriate clothing
- A fantasy character with imaginative costume elements
Caring for Your Crochet Doll Creation
To maintain your doll’s beauty over time, store it away from direct sunlight to prevent color fading. Dust gently with a soft brush or compressed air. Avoid washing if possible, but spot clean with a barely damp cloth if necessary.
Check this out :Christmas Amigurumi Crochet Pattern
Conclusion
Creating this beautiful crochet doll with its floral bonnet and layered skirt represents a rewarding journey into advanced amigurumi techniques. The combination of careful shaping, thoughtful color choices, and exquisite details results in a finished piece that showcases your crochet mastery and artistic vision.
Whether created as a personal keepsake, a special gift, or a centerpiece for your collection, this elegant doll pattern produces a truly remarkable result that will be treasured for generations.
