

Table of Contents
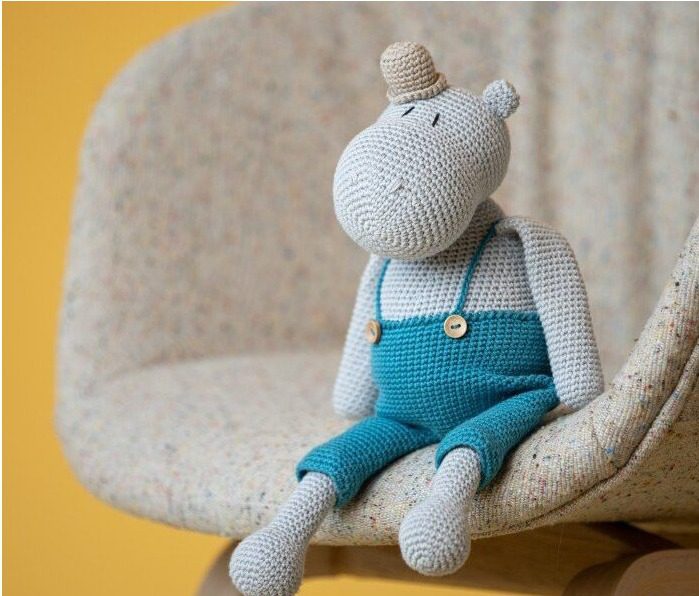
Discover the joy of creating an adorable Amigurumi Hippo wearing stylish overalls with this comprehensive crochet guide. Perfect for both beginners and experienced crocheters, this detailed Amigurumi Hippo will lead you through every step of crafting a huggable 35 cm (approximately 14 inches) tall hippo companion that’s sure to delight crafters and recipients alike. This endearing plush toy combines classic amigurumi techniques with charming details like a jaunty hat and button-up overalls for a truly distinctive handmade creation.
Essential Materials for Your Amigurumi Hippo
Before diving into this delightful project, gather these supplies:
- 2 skeins of Rainbow Cotton 8/4 yarn in color 016 (main hippo color)
- 1 skein of Rainbow Cotton 8/4 yarn in color 035 (for the overalls)
- Small amount of black scrap yarn for embroidering the eyes
- Small amount of beige scrap yarn for the hat
- 2.5 mm crochet hook
- 2 small buttons for the overalls
- Polyester fiberfill stuffing
- Yarn needle for assembly
Understanding Amigurumi HippoTerminology
Familiarize yourself with these common crochet terms used throughout the pattern:
- Magic ring (mr): A technique to begin crocheting in the round with an adjustable center
- Chain stitch (ch): The foundation stitch in crochet
- Single crochet (sc): The most basic crochet stitch, used extensively in amigurumi
- Slip stitch (sl st): Used to join rounds or create smooth edges
- Back loop (bl): Working through only the back loop of a stitch
- Front loop (fl): Working through only the front loop of a stitch
- Increase (inc): Creating two stitches in the same stitch
- Decrease (dec): Working two stitches together to reduce stitch count
- Crab stitch: A decorative edge stitch worked from left to right (reverse single crochet)
Amigurumi Hippo Important Crafting Tips
For the best results with your amigurumi hippo:
- Always stuff the head and body firmly for proper shape retention
- Place stuffing between the head and body during attachment to prevent wobbling
- Work stitches tightly to prevent stuffing from showing through
- All components are worked in continuous spiral rounds without joining
- Use stitch markers to track the beginning of each round
Creating Amigurumi Hippo Head
The head features a distinctive hippo shape with a wide snout:
Begin with 6 single crochets in a magic ring. For round 2, increase in each stitch by working 2 single crochets in each stitch around (12 stitches). Round 3 follows a pattern of 1 single crochet followed by an increase, repeated 6 times (18 stitches). Continue this pattern of increasing with one additional single crochet before each increase:
- Round 4: (2 single crochets, increase) 6 times (24 stitches)
- Round 5: (3 single crochets, increase) 6 times (30 stitches)
- Round 6: (4 single crochets, increase) 6 times (36 stitches)
- Round 7: (5 single crochets, increase) 6 times (42 stitches)
- Round 8: (6 single crochets, increase) 6 times (48 stitches)
- Round 9: (7 single crochets, increase) 6 times (54 stitches)
For rounds 10 through 17, work 1 single crochet in each stitch, maintaining 54 stitches and creating the top portion of the head. Consider adding stuffing progressively as you work to maintain the proper shape.
Begin decreasing to create the neck area:
- Round 18: (7 single crochets, decrease) 6 times (48 stitches)
- Round 19: 1 single crochet in each stitch (48 stitches)
- Round 20: (6 single crochets, decrease) 6 times (42 stitches)
- Round 21: 1 single crochet in each stitch (42 stitches)
Now, create the distinctive snout shape by increasing again:
- Round 22: (6 single crochets, increase) 6 times (48 stitches)
- Round 23: (7 single crochets, increase) 6 times (54 stitches)
- Rounds 24-29: 1 single crochet in each stitch (54 stitches)
Decrease again to complete the head shape:
- Round 30: (7 single crochets, decrease) 6 times (48 stitches)
- Round 31: 1 single crochet in each stitch (48 stitches)
- Round 32: (6 single crochets, decrease) 6 times (42 stitches)
- Round 33: 1 single crochet in each stitch (42 stitches)
- Round 34: (5 single crochets, decrease) 6 times (36 stitches)
- Round 35: (4 single crochets, decrease) 6 times (30 stitches)
- Round 36: (3 single crochets, decrease) 6 times (24 stitches)
- Round 37: (2 single crochets, decrease) 6 times (18 stitches)
- Round 38: (1 single crochet, decrease) 6 times (12 stitches)
- Round 39: (2 single crochets, decrease) 3 times (9 stitches)
Ensure the head is firmly stuffed with fiberfill before completing. Fasten off, leaving a tail long enough for gathering the remaining 9 stitches. Use a yarn needle to work through the front loops of these stitches and pull gently to close the opening neatly. Secure and weave in the end.
Forming Amigurumi Hippo Body
The body provides the main structure and substance of your amigurumi:
Begin with 6 single crochets in a magic ring. For round 2, increase in each stitch around (12 stitches). Follow the increasing pattern:
- Round 3: (1 single crochet, increase) 6 times (18 stitches)
- Round 4: (2 single crochets, increase) 6 times (24 stitches)
- Round 5: (3 single crochets, increase) 6 times (30 stitches)
- Round 6: (4 single crochets, increase) 6 times (36 stitches)
- Round 7: (5 single crochets, increase) 6 times (42 stitches)
- Round 8: (6 single crochets, increase) 6 times (48 stitches)
- Round 9: (7 single crochets, increase) 6 times (54 stitches)
- Round 10: (8 single crochets, increase) 6 times (60 stitches)
- Round 11: (9 single crochets, increase) 6 times (66 stitches)
- Round 12: (10 single crochets, increase) 6 times (72 stitches)
Work rounds 13 through 24 with 1 single crochet in each stitch, maintaining 72 stitches and creating the widest part of the body.
Begin decreasing gradually to shape the lower body:
- Round 25: (10 single crochets, decrease) 6 times (66 stitches)
- Rounds 26-28: 1 single crochet in each stitch (66 stitches)
- Round 29: (9 single crochets, decrease) 6 times (60 stitches)
- Rounds 30-31: 1 single crochet in each stitch (60 stitches)
- Round 32: (8 single crochets, decrease) 6 times (54 stitches)
- Rounds 33-34: 1 single crochet in each stitch (54 stitches)
- Round 35: (7 single crochets, decrease) 6 times (48 stitches)
- Rounds 36-37: 1 single crochet in each stitch (48 stitches)
- Round 38: (6 single crochets, decrease) 6 times (42 stitches)
- Round 39: 1 single crochet in each stitch (42 stitches)
- Round 40: (5 single crochets, decrease) 6 times (36 stitches)
- Round 41: 1 single crochet in each stitch (36 stitches)
- Round 42: (4 single crochets, decrease) 6 times (30 stitches)
- Round 43: 1 single crochet in each stitch (30 stitches)
- Round 44: (3 single crochets, decrease) 6 times (24 stitches)
- Round 45: (2 single crochets, decrease) 6 times (18 stitches)
Ensure the body is well stuffed with fiberfill before completing. Fasten off, leaving sufficient yarn for attaching to other components.
Amigurumi Hippo Crafting the Ears
The hippo’s small rounded ears add character to the finished toy:
For each ear, begin with 6 single crochets in a magic ring. For round 2, increase in each stitch around (12 stitches). Work rounds 3 and 4 with 1 single crochet in each stitch, maintaining 12 stitches.
For round 5, work (1 single crochet, decrease) 4 times, followed by 1 slip stitch (8 stitches). Fasten off, leaving enough yarn for attaching the ear to the head.
Make a second ear following the same pattern.
Amigurumi Hippo Creating the Arms
The arms will be positioned on either side of the body:
For each arm, begin with 6 single crochets in a magic ring. For round 2, increase in each stitch around (12 stitches). For round 3, work (1 single crochet, increase) 6 times (18 stitches).
Stuff the hand portion lightly with fiberfill.
Work rounds 4 through 33 with 1 single crochet in each stitch, maintaining 18 stitches and creating the length of the arm.
For round 34, work (4 single crochets, decrease) 3 times (15 stitches). Complete with rounds 35 and 36, working 1 single crochet in each stitch (15 stitches).
Fasten off, leaving sufficient yarn for attaching the arm to the body.
Make a second arm following the same pattern.
Amigurumi Hippo Shaping the Legs
The legs support your hippo and will extend through the overalls:
For each leg, begin with 6 single crochets in a magic ring. For round 2, increase in each stitch around (12 stitches). Follow the increasing pattern:
- Round 3: (1 single crochet, increase) 6 times (18 stitches)
- Round 4: (2 single crochets, increase) 6 times (24 stitches)
- Round 5: (3 single crochets, increase) 6 times (30 stitches)
Work rounds 6 through 9 with 1 single crochet in each stitch, maintaining 30 stitches and creating the foot shape.
Begin decreasing to form the ankle:
- Round 10: (3 single crochets, decrease) 6 times (24 stitches)
- Round 11: 1 single crochet in each stitch (24 stitches)
- Round 12: (2 single crochets, decrease) 6 times (18 stitches)
- Round 13: 1 single crochet in each stitch (18 stitches)
- Round 14: (4 single crochets, decrease) 3 times (15 stitches)
Stuff the foot portion firmly while adding only very light stuffing to the leg section for better flexibility.
Work rounds 15 through 46 with 1 single crochet in each stitch, maintaining 15 stitches and creating the length of the leg.
Fasten off, leaving enough yarn for attachment to the body.
Make a second leg following the same pattern.
Amigurumi Hippo Forming the Tail
The tail adds a finishing touch to your hippo’s silhouette:
Begin with 5 single crochets in a magic ring. For round 2, work 1 increase followed by 4 single crochets (6 stitches). Continue increasing at the beginning of each round:
- Round 3: Increase, 5 single crochets (7 stitches)
- Round 4: Increase, 6 single crochets (8 stitches)
- Round 5: Increase, 7 single crochets (9 stitches)
- Round 6: Increase, 8 single crochets (10 stitches)
- Round 7: Increase, 9 single crochets (11 stitches)
- Round 8: Increase, 10 single crochets (12 stitches)
- Round 9: (3 single crochets, increase) 3 times (15 stitches)
Work rounds 10 and 11 with 1 single crochet in each stitch (15 stitches).
Begin decreasing:
- Round 12: (3 single crochets, decrease) 3 times (12 stitches)
- Round 13: (2 single crochets, decrease) 3 times (9 stitches)
Stuff only the tip of the tail with fiberfill.
Work rounds 14 through 25 with 1 single crochet in each stitch, maintaining 9 stitches and creating the length of the tail.
Fasten off, leaving enough yarn for attaching to the body.
Crafting the Hat
The jaunty hat adds personality to your hippo:
Using beige yarn, begin with 6 single crochets in a magic ring. For round 2, increase in each stitch around (12 stitches). For round 3, work (1 single crochet, increase) 6 times (18 stitches).
For round 4, work 1 single crochet in each stitch, working in the back loops only (18 stitches). This creates a visible ridge for the hat brim.
Work rounds 5 through 9 with 1 single crochet in each stitch, maintaining 18 stitches.
For round 10, work in the front loops only: (2 single crochets, increase) 6 times (24 stitches). This creates the expanded top of the hat.
For round 11, work 1 single crochet in each stitch, followed by 1 slip stitch (24 stitches).
Fasten off, leaving enough yarn for attaching the hat to the head.
Creating the Overalls
The distinctive overalls give your hippo extra character:
Pants Legs
Using color 035 yarn, chain 24 stitches and join into a ring with a slip stitch. For round 2, work 1 single crochet in each stitch (24 stitches).
For round 3, work 1 single crochet around each single crochet from the previous round. This technique creates a neat finished edge at the bottom of the pants leg.
Work rounds 4 through 18 with 1 single crochet in each stitch, maintaining 24 stitches.
Fasten off and cut the yarn.
Make a second identical pants leg, but do not cut the yarn after completion. You’ll continue with this attached yarn to create the main body of the overalls.
Pantsuit Body
Continuing from the second pants leg, chain 12 stitches and attach to the first pants leg.
For round 2, work 1 single crochet in each stitch around the first pants leg, then 1 single crochet in each chain between the legs, followed by 1 single crochet in each stitch around the second pants leg, and finally 1 single crochet in each chain on the other side (72 stitches total).
Work rounds 3 through 27 with 1 single crochet in each stitch, maintaining 72 stitches.
For round 28, work 1 crab stitch (reverse single crochet) in each stitch around (72 stitches) to create a decorative edge.
Fasten off, leaving enough yarn for any necessary adjustments.
Straps
Attach the yarn at the back side of the pants where you finished the last round. Chain 48 stitches and attach to the front of the overalls with a slip stitch.
Repeat for the second strap.
Final Assembly and Details
Bringing all components together creates your finished amigurumi hippo:
- Pull the hippo’s legs through the pants legs and fold the pants slightly to create a natural “puffed” appearance.
- Sew the legs to the body, positioning them approximately at the 7th round from the bottom of the body with 9 stitches between them.
- Attach the head securely to the body, ensuring firm stuffing between the components to prevent wobbling.
- Sew the arms to the body at round 7.
- Position and attach the ears at round 9 (counted from the back of the head) with 9 stitches between them.
- Sew the hat in place just in front of one ear for a jaunty, asymmetrical look.
- Using black yarn, carefully embroider the eyes between rounds 20-23 (counting from the snout) with 3 stitches between the upper portions.
- Embroider nostrils on rounds 7-9 with 8 stitches between them.
- Attach the tail to the center of the back side.
- Sew one button to each strap at the front edge of the overalls.
Take a moment to adjust the positioning of all components to ensure a balanced, appealing appearance. Gently reshape any areas that need definition, and trim any excess yarn ends for a professional finish.
Check this out :Crochet Ballerina Elephant Amigurumi Pattern
Congratulations on Your Amigurumi Hippo
Your handcrafted amigurumi hippo with overalls is now complete! Standing approximately 35 cm (14 inches) tall, this charming creation showcases your crochet skills and attention to detail. The combination of the hippo’s expressive face, distinctive snout, and stylish outfit creates a character full of personality and charm.
This amigurumi hippo makes a wonderful gift for children and adults alike, or a delightful addition to your own handmade collection. Each stitch represents your creativity and craftsmanship, resulting in a one-of-a-kind plush companion that will surely be treasured.
The techniques you’ve practiced in this project—from shaping the characteristic hippo features to creating functional clothing elements—will enhance your amigurumi skills and inspire future crochet adventures. Enjoy your adorable hippo creation and the satisfaction that comes from bringing this charming character to life through your own handwork.
