

Table of Contents
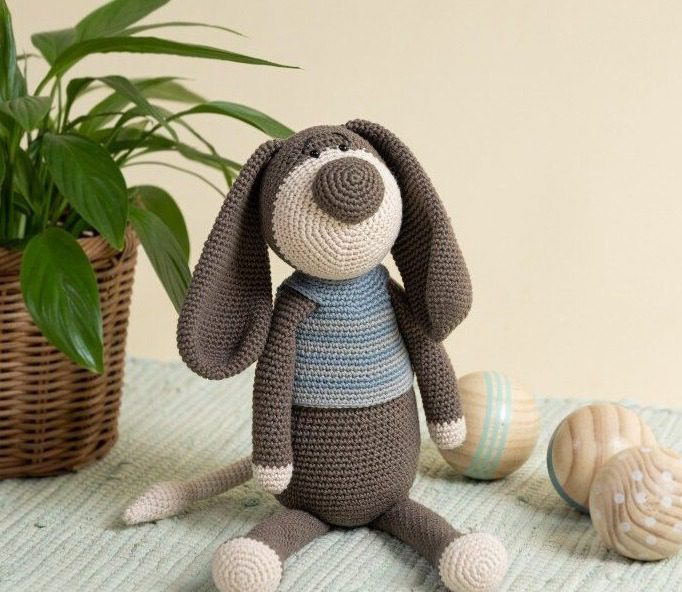
Creating Amigurumi Dog your own cuddly crochet companion is a rewarding craft project that yields a charming result. This comprehensive guide will walk you through crafting a delightful amigurumi dog that stands approximately 37 cm (14.5 inches) tall. Perfect for beginners looking to expand their crochet skills, this project combines simple techniques to create an adorable plush pet that will surely become a treasured keepsake or thoughtful gift.
What You’ll Need for Your Amigurumi Dog
Before diving into the crochet process, gather these essential materials:
- 2.50 mm crochet hook
- Rainbow Cotton 8/4 yarn in the following colors:
- Grey Brown (005) – 2 skeins
- Nude (003) – 1 skein
- Silver Grey (014) – 1 skein
- Baby Blue (032) – 1 skein
- Two 6 mm safety eyes
- Small amount of black scrap yarn for eyebrows
- Polyester fiberfill stuffing
- Yarn needle for assembly
Understanding Amigurumi Dog Terminology
To successfully follow this pattern, familiarize yourself with these common crochet abbreviations:
- Chain stitch (ch)
- Single crochet (sc)
- Slip stitch (sl st)
- Magic ring (mr)
- Half double crochet (hdc)
- Increase in half double crochets (hdc inc)
- Increase (inc) – two stitches in the same stitch
- Decrease (dec) – two stitches worked together
- Round (rnd)
Amigurumi Dog Creating the Body
The body forms the main structure of your amigurumi dog and is worked in Grey Brown yarn:
Begin with 6 single crochets in a magic ring. For round 2, increase in each stitch around (12 stitches). Round 3 follows a pattern of 1 single crochet followed by an increase, repeated 6 times (18 stitches). Continue this pattern of increasing with one additional single crochet before each increase:
- Round 4: (2 single crochets, increase) 6 times (24 stitches)
- Round 5: (3 single crochets, increase) 6 times (30 stitches)
- Round 6: (4 single crochets, increase) 6 times (36 stitches)
- Round 7: (5 single crochets, increase) 6 times (42 stitches)
- Round 8: (6 single crochets, increase) 6 times (48 stitches)
- Round 9: (7 single crochets, increase) 6 times (54 stitches)
- Round 10: (8 single crochets, increase) 6 times (60 stitches)
- Round 11: (9 single crochets, increase) 6 times (66 stitches)
For rounds 12 through 20, work 1 single crochet in each stitch, maintaining 66 stitches and creating the widest part of the body.
Begin decreasing with round 21: (9 single crochets, decrease) 6 times (60 stitches). Maintain 60 stitches for rounds 22-25. Continue decreasing gradually:
- Round 26: (8 single crochets, decrease) 6 times (54 stitches)
- Rounds 27-30: 1 single crochet in each stitch (54 stitches)
- Round 31: (7 single crochets, decrease) 6 times (48 stitches)
- Rounds 32-34: 1 single crochet in each stitch (48 stitches)
- Round 35: (6 single crochets, decrease) 6 times (42 stitches)
- Rounds 36-39: 1 single crochet in each stitch (42 stitches)
- Round 40: (5 single crochets, decrease) 6 times (36 stitches)
- Rounds 41-43: 1 single crochet in each stitch (36 stitches)
- Round 44: (4 single crochets, decrease) 6 times (30 stitches)
- Rounds 45-47: 1 single crochet in each stitch (30 stitches)
- Round 48: (3 single crochets, decrease) 6 times (24 stitches)
- Round 49: 1 single crochet in each stitch (24 stitches)
Fasten off, leaving enough yarn for sewing the body to other components later.
Amigurumi Dog Crafting the Head
The head begins with Nude yarn for the muzzle area:
Start with 6 single crochets in a magic ring. Follow the increasing pattern:
- Round 2: Increase in each stitch (12 stitches)
- Round 3: (1 single crochet, increase) 6 times (18 stitches)
- Round 4: (2 single crochets, increase) 6 times (24 stitches)
- Round 5: (3 single crochets, increase) 6 times (30 stitches)
- Round 6: (4 single crochets, increase) 6 times (36 stitches)
- Round 7: (5 single crochets, increase) 6 times (42 stitches)
- Round 8: (6 single crochets, increase) 6 times (48 stitches)
For rounds 9 through 14, work 1 single crochet in each stitch, maintaining 48 stitches.
Switch to Grey Brown yarn at round 15. For this round, work (half double crochet increase) 6 times, followed by (6 single crochets, increase) 6 times (60 stitches). Round 16 continues with (1 half double crochet, half double crochet increase) 6 times, followed by 48 single crochets (66 stitches). Round 17 is simply 1 single crochet in each stitch around (66 stitches).
Insert the safety eyes between rounds 14 and 15 at the color change point, positioned below the half double crochet increases, with the second eye placed in the fifth half double crochet increase and 4 half double crochets between eyes.
Continue with even rounds (18-23) of 1 single crochet in each stitch. Remember to stuff the head firmly as you work.
Begin decreasing to shape the top of the head:
- Round 24: (9 single crochets, decrease) 6 times (60 stitches)
- Round 25: (8 single crochets, decrease) 6 times (54 stitches)
- Round 26: (7 single crochets, decrease) 6 times (48 stitches)
- Round 27: (6 single crochets, decrease) 6 times (42 stitches)
- Round 28: 1 single crochet in each stitch (42 stitches)
- Round 29: (5 single crochets, decrease) 6 times (36 stitches)
- Round 30: (4 single crochets, decrease) 6 times (30 stitches)
- Round 31: (3 single crochets, decrease) 6 times (24 stitches)
- Round 32: (2 single crochets, decrease) 6 times (18 stitches)
- Round 33: (1 single crochet, decrease) 6 times (12 stitches)
- Round 34: (2 single crochets, decrease) 3 times (9 stitches)
Fasten off and use a needle to gather the remaining 9 stitches by working through the front loops. Pull tight to close the hole neatly, then weave in the end.
Amigurumi Dog Forming the Ears
The dog’s floppy ears add character and are worked in Grey Brown yarn:
For each ear, begin with 6 single crochets in a magic ring. Follow this increasing pattern:
- Round 2: Increase in each stitch (12 stitches)
- Round 3: (1 single crochet, increase) 6 times (18 stitches)
- Round 4: (2 single crochets, increase) 6 times (24 stitches)
- Round 5: (3 single crochets, increase) 6 times (30 stitches)
- Round 6: (4 single crochets, increase) 6 times (36 stitches)
- Round 7: (5 single crochets, increase) 6 times (42 stitches)
Work rounds 8-16 with 1 single crochet in each stitch (42 stitches), creating the flat part of the ear.
Begin shaping with decreases:
- Round 17: (5 single crochets, decrease) 6 times (36 stitches)
- Rounds 18-22: 1 single crochet in each stitch (36 stitches)
- Round 23: (10 single crochets, decrease) 3 times (33 stitches)
- Rounds 24-26: 1 single crochet in each stitch (33 stitches)
- Round 27: (9 single crochets, decrease) 3 times (30 stitches)
- Rounds 28-30: 1 single crochet in each stitch (30 stitches)
- Round 31: (8 single crochets, decrease) 3 times (27 stitches)
- Rounds 32-34: 1 single crochet in each stitch (27 stitches)
- Round 35: (7 single crochets, decrease) 3 times (24 stitches)
- Rounds 36-37: 1 single crochet in each stitch (24 stitches)
- Round 38: (6 single crochets, decrease) 3 times (21 stitches)
- Rounds 39-40: 1 single crochet in each stitch (21 stitches)
- Round 41: (5 single crochets, decrease) 3 times (18 stitches)
- Rounds 42-43: 1 single crochet in each stitch (18 stitches)
- Round 44: (4 single crochets, decrease) 3 times (15 stitches)
- Round 45: 1 single crochet in each stitch (15 stitches)
Fasten off, leaving enough yarn for sewing the ear to the head.
Amigurumi Dog Creating the Arms
The arms incorporate both skin tone and fur coloration:
For each arm, begin with 6 single crochets in a magic ring using Nude yarn. Follow this pattern:
- Round 2: Increase in each stitch (12 stitches)
- Round 3: (3 single crochets, increase) 3 times (15 stitches)
Work rounds 4-6 with 1 single crochet in each stitch (15 stitches), maintaining the hand shape.
Remember to stuff the hand portion lightly with fiberfill as you work, but only fill it halfway up.
Switch to Grey Brown yarn at round 7, and work rounds 7-35 with 1 single crochet in each stitch (15 stitches), creating the elongated arm shape. Leave the upper portion unstuffed for easier positioning during assembly.
Fasten off, leaving enough yarn for sewing the arm to the body.
Amigurumi Dog Shaping the Legs
The legs follow a similar two-tone approach:
For each leg, begin with 6 single crochets in a magic ring using Nude yarn. Follow this pattern to create the foot:
- Round 2: Increase in each stitch (12 stitches)
- Round 3: (1 single crochet, increase) 6 times (18 stitches)
- Round 4: (2 single crochets, increase) 6 times (24 stitches)
- Round 5: (3 single crochets, increase) 6 times (30 stitches)
Work rounds 6-7 with 1 single crochet in each stitch (30 stitches), maintaining the foot shape.
Switch to Grey Brown yarn at round 8. Work rounds 8-9 with 1 single crochet in each stitch (30 stitches).
Begin decreasing to shape the ankle area:
- Round 10: (3 single crochets, decrease) 6 times (24 stitches)
- Round 11: 1 single crochet in each stitch (24 stitches)
- Round 12: (2 single crochets, decrease) 6 times (18 stitches)
- Round 13: 1 single crochet in each stitch (18 stitches)
- Round 14: (4 single crochets, decrease) 3 times (15 stitches)
Stuff the foot portion firmly with fiberfill. For the remainder of the leg, add only light stuffing to maintain flexibility.
Work rounds 15-46 with 1 single crochet in each stitch (15 stitches), creating the length of the leg.
Fasten off, leaving enough yarn for sewing the leg to the body.
Amigurumi Dog Crafting the Snout
The Silver Grey snout adds dimension to your dog’s face:
Begin with 6 single crochets in a magic ring. Follow this pattern:
- Round 2: Increase in each stitch (12 stitches)
- Round 3: (1 single crochet, increase) 6 times (18 stitches)
- Round 4: (2 single crochets, increase) 6 times (24 stitches)
- Round 5: (3 single crochets, increase) 6 times (30 stitches)
Work rounds 6-8 with 1 single crochet in each stitch (30 stitches), maintaining the round shape. Finish round 8 with a slip stitch.
Fasten off, leaving sufficient yarn for attaching the snout to the head.
Creating the Striped Sweatshirt
The stylish Baby Blue and Silver Grey sweatshirt elevates your amigurumi:
Begin with Baby Blue yarn. Create a foundation chain of 33 stitches and join into a ring with a slip stitch in the first chain.
Follow this pattern:
- Rounds 2-3: 1 single crochet in each stitch (32 stitches)
- Round 4: (7 single crochets, increase) 4 times (36 stitches)
- Round 5: (5 single crochets, increase) 6 times (42 stitches)
For round 6, create armhole openings: 4 single crochets, increase, chain 10, skip 9 stitches, 4 single crochets, increase, 4 single crochets, increase, chain 10, skip 9 stitches, 4 single crochets, increase, 4 single crochets (48 stitches total including the chain arches for sleeves).
Round 7: 6 single crochets, 12 single crochets worked around the chain (not into the actual chain), 5 single crochets, increase, 6 single crochets, 12 single crochets around the second chain, 5 single crochets, increase, 4 single crochets (54 stitches).
Round 8: 1 single crochet in each stitch (54 stitches).
Create stripes by alternating colors:
- Switch to Silver Grey for rounds 9-10: 1 single crochet in each stitch (54 stitches)
- Switch to Baby Blue for rounds 11-12: 1 single crochet in each stitch (54 stitches)
- Switch to Silver Grey for rounds 13-14: 1 single crochet in each stitch (54 stitches)
- Switch to Baby Blue for round 15: (8 single crochets, increase) 6 times (60 stitches)
- Round 16: 1 single crochet in each stitch (60 stitches)
- Switch to Silver Grey for rounds 17-18: 1 single crochet in each stitch (60 stitches)
- Switch to Baby Blue for round 19: (9 single crochets, increase) 6 times (66 stitches)
- Round 20: 1 single crochet in each stitch (66 stitches)
- Switch to Silver Grey for rounds 21-23: 1 single crochet in each stitch (66 stitches)
Fasten off. The finished garment will accommodate the dog’s body perfectly with 66 stitches at the widest point.
Forming the Tail
The tail begins with Nude yarn and adds movement to your creation:
Start with 5 single crochets in a magic ring. Follow this pattern of increasing at the beginning of each round:
- Round 2: Increase, 4 single crochets (6 stitches)
- Round 3: Increase, 5 single crochets (7 stitches)
- Round 4: Increase, 6 single crochets (8 stitches)
- Round 5: Increase, 7 single crochets (9 stitches)
- Round 6: Increase, 8 single crochets (10 stitches)
- Round 7: Increase, 9 single crochets (11 stitches)
- Round 8: Increase, 10 single crochets (12 stitches)
- Round 9: (3 single crochets, increase) 3 times (15 stitches)
Work rounds 10-11 with 1 single crochet in each stitch (15 stitches).
Begin decreasing to shape the base:
- Round 12: (3 single crochets, decrease) 3 times (12 stitches)
- Round 13: (2 single crochets, decrease) 3 times (9 stitches)
Stuff the tip of the tail firmly with fiberfill.
Work rounds 14-43 with 1 single crochet in each stitch (9 stitches), creating the length of the tail.
Fasten off, leaving enough yarn for sewing the tail to the body.
Assembling Your Amigurumi Dog
Bringing all components together transforms individual pieces into a charming character:
- Ensure both body and head are firmly stuffed before assembly.
- Slide the sweatshirt over the body.
- Position the arms through the sleeve openings and secure them near the top of the body.
- Attach the head to the body, aligning the front edge with the color change between muzzle and head.
- Sew the ears onto the head, positioned approximately between rounds 20-25 with 10 stitches between them.
- Attach the snout to the front of the head, covering rounds 1-9.
- Embroider diagonal eyebrows just above the eyes using black yarn.
- Secure the legs to the lower body between rounds 5-10.
- Attach the tail to the center of the back.
Finishing Touches
Once assembled, take a moment to adjust the positioning of each component, ensuring your amigurumi dog has a balanced, appealing appearance. Gently reshape any areas that may need additional definition, and trim any excess yarn ends for a neat finish.
Check this out :Cuddly Amigurumi Bunny Crochet Pattern
Conclusion: Your Amigurumi Dog Masterpiece
Congratulations! Your handcrafted amigurumi dog is now complete and ready to become a cherished companion. Standing at approximately 37 cm (14.5 inches) tall, this adorable creation combines the warmth of handmade crochet with the charm of a personalized plush toy.
The combination of the expressive face with carefully positioned eyes and eyebrows, floppy ears, and stylish striped sweatshirt creates a character full of personality and charm. Each element – from the two-toned limbs to the carefully shaped snout – contributes to the overall appeal of this endearing crochet dog.
This amigurumi project not only produces a wonderful decorative piece or gift but also helps develop and refine essential crochet skills. The varying stitch patterns, color changes, and assembly techniques provide valuable experience that will benefit your future crochet endeavors.
Whether created as a gift for a child, a decorative accent for your home, or a personal project to showcase your crochet abilities, this amigurumi dog represents the beautiful intersection of craftsmanship and creativity. The step-by-step process of bringing this character to life is both meditative and rewarding.
Remember that each handmade amigurumi carries the unique touch of its creator. Don’t be afraid to experiment with different color combinations for the sweatshirt or even modify certain features to create your own variation. The possibilities are endless, and each creation will have its own distinct personality.
Share your completed amigurumi dog on social media platforms to inspire fellow crochet enthusiasts, or consider making a collection of amigurumi animals to create a charming handmade menagerie. Whatever you choose, your amigurumi dog will certainly bring joy and a sense of accomplishment that only comes from creating something special with your own hands.
Happy crocheting, and may your amigurumi adventures continue to bring you satisfaction and delight!
