

Table of Contents
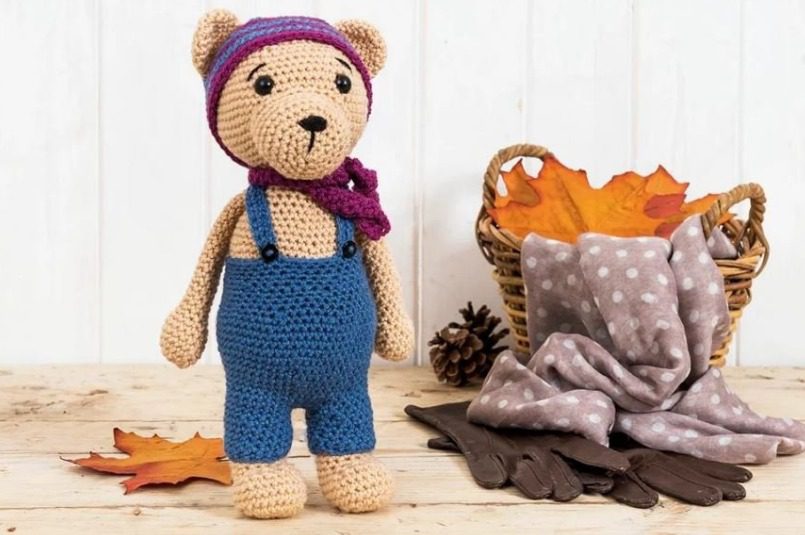
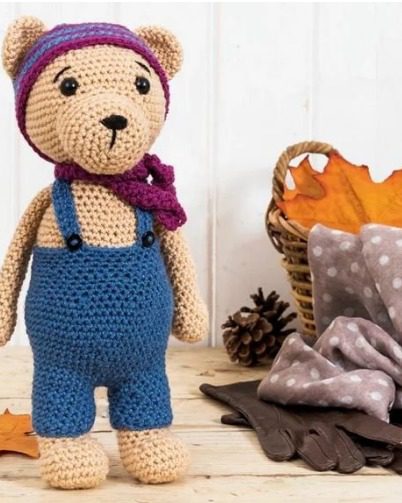
Creating Teddy Bear your own handmade teddy bear is a rewarding experience that brings joy not only to the maker but also to whoever receives this adorable gift. This Teddy Bear comprehensive amigurumi teddy bear pattern guides you through creating a charming 12-inch tall bear wearing stylish dungarees and a cute striped hat. Perfect for beginners and experienced crocheters alike, this teddy bear will become a treasured companion or heartfelt gift.
Materials Needed For Your Amigurumi Bear
Before starting your Teddy Bear journey, gather these supplies:
- Stylecraft Special DK yarn (or any equivalent double knit yarn) in:
- Stone (main body color)
- Denim (for dungarees)
- Plum (for hat accents)
- Black (for details)
- 4mm crochet hook
- Embroidery needle for sewing pieces together
- Stitch marker to keep track of rounds
- Toy stuffing for a huggable finish
- Pins for positioning parts (optional but helpful)
- 2 black safety eyes (12mm)
- 2 black or brown buttons (9mm) for dungarees
The finished bear will measure approximately 31cm (12 inches) tall when completed.
Teddy Bear Important Notes Before You Begin
While tension isn’t critical for this project, maintaining tight stitches ensures the stuffing won’t show through. The pattern follows a logical construction sequence: you’ll work the legs first, join them, then continue upward to form the body and head as one piece. The dungarees are created separately and slipped onto the finished bear. For best results, attach the dungaree straps and buttons when the bear is wearing them to ensure proper placement.
Creating The Bear Body
Teddy Bear First Leg
Start with Stone yarn and create a magic loop. Round 1: Work 8 double crochet stitches into the magic loop. Round 2: Make 2 double crochet stitches in each stitch around, increasing to 16 stitches. Round 3: Work pattern of 1 double crochet, then 2 double crochet in next stitch, repeated 8 times, increasing to 24 stitches. Rounds 4-6: Work double crochet in each stitch around, maintaining 24 stitches. Round 7: Work 7 double crochet, decrease over next 2 stitches 5 times, work 7 double crochet, reducing to 19 stitches. Round 8: Work 5 double crochet, decrease over next 2 stitches 4 times, work 6 double crochet, reducing to 15 stitches. Rounds 9-16: Work double crochet in each stitch around, maintaining 15 stitches.
Fasten off the first leg only.
Teddy Bear Second Leg
Repeat the same pattern as the first leg but do not fasten off. When at the back of the leg, work about 4 double crochet stitches to reach the inside of the leg. Round 17: Chain 3 stitches. Attach to the first leg with double crochet (align both legs to find the correct stitch). Work double crochet around both legs, including both sides of the chain stitches, creating 36 stitches total.
Teddy Bear Body
Fill the legs with stuffing. Rounds 18-21: Work double crochet in each stitch around, maintaining 36 stitches. Round 22: Work pattern of 8 double crochet, then 2 double crochet in next stitch, repeated 4 times, increasing to 40 stitches. Round 23: Work double crochet in each stitch around, maintaining 40 stitches. Round 24: Work pattern of 9 double crochet, then 2 double crochet in next stitch, repeated 4 times, increasing to 44 stitches.
Continue this increasing pattern through rounds 25-30, following the original instructions for stitch counts, until you reach 56 stitches.
Rounds 31-33: Work double crochet in each stitch around, maintaining 56 stitches.
Then begin decreasing gradually through rounds 34-43, following the decrease pattern in the original instructions until you reach 36 stitches.
Add stuffing at this point.
Continue decreasing through rounds 44-51, following the original instructions until you reach 12 stitches.
Teddy Bear Head
Add stuffing and continue to form the head. Round 52: Work 2 double crochet in each stitch, increasing to 24 stitches. Round 53: Work pattern of 3 double crochet, then 2 double crochet in next stitch, repeated 6 times, increasing to 30 stitches.
Continue increasing through rounds 54-58 following the pattern until you reach 60 stitches.
Rounds 59-66: Work double crochet in each stitch around, maintaining 60 stitches.
Attach safety eyes between rounds 61-62, positioned 12 stitches apart.
Begin decreasing through rounds 67-75, following the original decreasing pattern until you reach 6 stitches.
Sew to close the hole and fasten off.
Facial Features and Appendages
Mouth
Using Stone yarn, create a magic loop. Round 1: Work 6 double crochet into the loop. Round 2: Work 2 double crochet in each stitch, increasing to 12 stitches. Round 3: Work pattern of 1 double crochet, then 2 double crochet in next stitch, repeated 6 times, increasing to 18 stitches. Round 4: Work pattern of 2 double crochet, then 2 double crochet in next stitch, repeated 6 times, increasing to 24 stitches. Round 5: Work pattern of 3 double crochet, then 2 double crochet in next stitch, repeated 6 times, increasing to 30 stitches. Rounds 6-9: Work double crochet in each stitch around, maintaining 30 stitches.
Slip stitch and fasten off, leaving a long tail for attaching to the face.
Arms (Make 2)
Using Stone yarn, create a magic loop. Round 1: Work 6 double crochet into the loop. Round 2: Work 2 double crochet in each stitch, increasing to 12 stitches. Round 3: Work pattern of 3 double crochet, then 2 double crochet in next stitch, repeated 3 times, increasing to 15 stitches. Rounds 4-6: Work double crochet in each stitch around, maintaining 15 stitches. Round 7: Work pattern of 1 double crochet, decrease over next 2 stitches, repeated 5 times, reducing to 10 stitches. Rounds 8-29: Work double crochet in each stitch around, maintaining 10 stitches.
Slip stitch and fasten off, leaving a long tail for sewing. Stuff only the hands.
Creating The Clothing
Dungarees
First Leg
Using Denim yarn, start at leg hole. Round 1: Chain 18 stitches, slip stitch to first stitch to form a circle, creating 18 stitches. Rounds 2-8: Work double crochet in each stitch around, maintaining 18 stitches. Slip stitch on first leg only.
Second Leg
Work same as first leg through round 8. Round 9: Chain 4, slip stitch to first leg. Work double crochet all the way around, including both sides of chain stitches, creating 44 stitches total. Rounds 10-13: Work double crochet in each stitch around, maintaining 44 stitches.
Continue increasing through rounds 14-18 following the pattern until you reach 56 stitches.
Rounds 19-23: Work double crochet in each stitch around, maintaining 56 stitches.
Begin decreasing through rounds 24-30 following the pattern until you reach 32 stitches.
Rounds 31-33: Work double crochet in each stitch around, maintaining 32 stitches.
Slip stitch and fasten off. Sew in loose ends.
Straps (Make 2)
Using Denim yarn, start with long yarn to help sew later. Chain 25 stitches. Round 1: Work double crochet in second chain from hook and across all chains. Chain 1, turn (24 stitches). Round 2: Work double crochet in each stitch across, maintaining 24 stitches.
Fasten off, leaving a long tail for sewing. Each strap should measure about 5 inches across.
Button Loops (Make 2)
Find the middle of the dungarees. Move 4 stitches to the right. Using Denim yarn, slip stitch, chain 3, then slip stitch to the next stitch to create your first loop. Leave long yarn for sewing ends.
Repeat for the left loop, 6 stitches from the right loop.
Hat
Using Denim yarn, create a magic loop. Round 1: Work 6 double crochet into the loop. Round 2: Work 2 double crochet in each stitch, increasing to 12 stitches.
Change to Plum yarn. Round 3: Work pattern of 1 double crochet, then 2 double crochet in next stitch, repeated 6 times, increasing to 18 stitches. Round 4: Work pattern of 2 double crochet, then 2 double crochet in next stitch, repeated 6 times, increasing to 24 stitches.
Continue alternating colors every 2 rounds while increasing through rounds 5-9 until you reach 54 stitches.
Rounds 10-21: Work double crochet in each stitch around, maintaining 54 stitches, continuing to alternate colors every 2 rounds.
Slip stitch, fasten off, leaving a long tail for sewing.
Ears (Make 2)
Using Stone yarn, create a magic loop. Round 1: Work 6 double crochet into the loop. Round 2: Work 2 double crochet in each stitch, increasing to 12 stitches. Round 3: Work pattern of 1 double crochet, then 2 double crochet in next stitch, repeated 6 times, increasing to 18 stitches. Rounds 4-8: Work double crochet in each stitch around, maintaining 18 stitches.
Slip stitch and fasten off, leaving a long tail for attaching to the hat.
Pom-pom
Using Plum yarn, wrap yarn around three fingers 20 times. Cut a long piece of yarn and tie around the middle, securing tightly. Cut the loops and trim to shape into a round pom-pom. Leave a long piece of yarn for attaching to the hat.
Scarf
Using Plum yarn, start with long yarn for sewing later. Chain 61 stitches. Round 1: Work double crochet in second chain from hook and in each stitch across. Chain 1, turn (60 stitches). Round 2: Work double crochet in each stitch across. Chain 1, turn (60 stitches). Round 3: Repeat round 2, but don’t chain 1 or turn at end.
Fasten off, leaving a long tail for sewing.
Assembling Your Teddy Bear
- Attach the mouth to the head, stuffing evenly before completing. Use pins to hold in position while sewing if needed.
- Using black yarn, create the nose in the middle of the mouth piece by sewing back and forth in the same stitches.
- Make a line down from the nose to create the mouth.
- Add two eyebrows above the eyes using black yarn. Secure ends at the back of the head where they’ll be covered by the hat.
- Attach ears to the hat. If sewing the hat directly to the head, you can sew the ears through both layers.
- Attach the pom-pom to the hat first if securing permanently.
- Sew any loose ends on the dungarees.
- Attach buttons to one side of each strap.
- Place the bear into the dungarees, slip buttons through buttonholes, and position straps across shoulders, criss-crossing at the back.
- Secure the back straps by sewing them to the dungarees once properly positioned.
- Tie the scarf around the bear’s neck, sewing in place if you want it to be permanent.
Congratulations! You’ve completed your adorable teddy bear amigurumi with dungarees and hat. Your handcrafted bear is now ready to bring smiles and warm hugs to its new owner.
Whether making this bear as a gift or keeping it for yourself, this charming amigurumi creation showcases your crochet skills while providing a cuddly companion that will be treasured for years to come.
Check this out :Crochet an Adorable Amigurumi Dinosaur Pattern
Conclusion
Amigurumi teddy bears hold a special place in the world of crochet projects. This pattern offers a perfect balance of challenge and satisfaction, resulting in a huggable friend with personality and charm. The detailed dungarees, striped hat, and sweet facial features transform a simple bear into a character with real presence.
The beauty of creating amigurumi bears lies not just in the finished product, but in the mindful process of crafting each stitch. As your hook moves through the rounds, you’ll find a rhythm that many crafters describe as meditative. This teddy bear pattern, with its clear instructions and delightful details, provides both beginners and experienced crocheters an opportunity to create something truly special.
Remember that small variations in your work make your bear unique. Embrace these little differences as part of your bear’s individual character. You might choose different colors for the dungarees or hat, add patches or embroidery to the clothing, or modify the facial expression to create your own signature teddy.
The most rewarding moment comes when you add the final touches and see your bear’s personality emerge. That moment captures the magic of amigurumi – bringing yarn to life through the work of your hands. Your teddy bear isn’t just a stuffed toy; it’s a handcrafted treasure that carries your creativity and care in every stitch.
Share your creation with pride, knowing you’ve mastered a beautiful craft that brings joy to both maker and recipient. Happy crocheting!
