

Table of Contents
Looking to create Amigurumi Dinosaur a charming amigurumi dinosaur that will delight children and adults alike? This comprehensive guide walks you through creating your own adorable crochet dinosaur from start to finish. With detailed instructions and expert tips, you’ll be able to craft this prehistoric creature even if you’re new to amigurumi techniques.
Essential Materials for Your Amigurumi Dinosaur
Before beginning your Amigurumi Dinosaur project, gather these supplies to ensure a smooth crocheting experience:
Amigurumi Dinosaur Yarn Selection
For the perfect dinosaur, you’ll need three yarn colors:
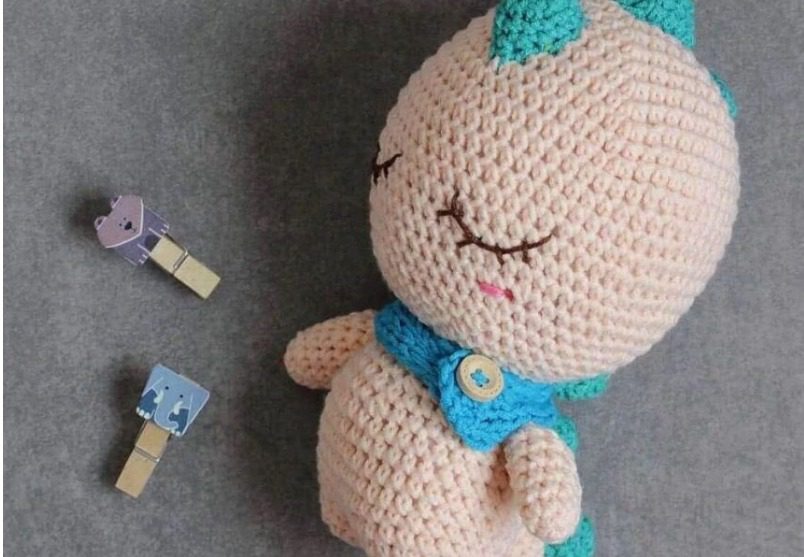
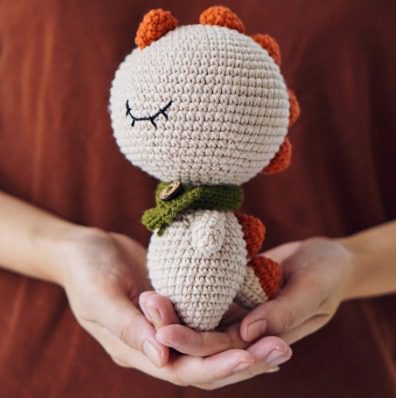
- Skin-colored yarn (YarnArt Jeans 73 or similar, 50g/160m) for the body, head, legs, arms, and tail
- Turquoise yarn (Alize Cotton Gold 610 or similar, 100g/330m) for the decorative horns
- Blue yarn (YarnArt Jeans 55 or similar, 50g/160m) for the cozy scarf
Amigurumi Dinosaur Tools and Accessories
- Crochet hook (2-2.5mm size)
- Knitting needles (3.5-4mm size) for the scarf
- One wooden button for the scarf closure
- Brown embroidery thread for the eyes
- Pink embroidery thread for the cheeks
- Tapestry needles for assembly and detail work
- Pins for positioning pieces during assembly
- Stitch markers to track your progress
- Scissors for trimming yarn
Understanding Amigurumi Dinosaur Terminology
This pattern uses standard US crochet terms:
- Magic Ring: Creates a tight circle to begin your work
- Single Crochet (sc): The primary stitch used throughout
- Increase (inc): Two single crochets worked in one stitch
- Decrease (dec): Two stitches combined into one
- Half Double Crochet (hdc): A medium-height stitch
- Slip Stitch (slst): Used for joining or creating subtle texture
- Double Crochet (dc): Creates height in your project
- Treble Crochet (tr): The tallest basic stitch used
- Back Loop Only (BLO): Working through just the back loop
- Front Loop Only (FLO): Working through just the front loop
Creating Your Dinosaur Step by Step
Crafting the Legs (Skin-Colored Yarn)
Begin by making two identical legs:
Round 1: Create a magic ring and work 6 single crochets into it (6 stitches total) Round 2: Work 1 single crochet, then increase – repeat this pattern 3 times around the circle (9 stitches total) Round 3: Work 2 single crochets, then increase – repeat this pattern 3 times around (12 stitches total) Round 4: Work 3 single crochets, then increase – repeat this pattern 3 times around (15 stitches total)
For the first leg, cut the yarn leaving a tail for later sewing. For the second leg, complete the same pattern but keep your yarn attached after finishing. To connect both legs, work 15 single crochets across the first leg, then continue with 15 single crochets across the second leg (creating a total of 30 stitches). This forms the foundation for your dinosaur’s body.
Building the Body (Skin-Colored Yarn)
Continue working in rounds from the joined legs:
Round 1: Work 4 single crochets, then increase – repeat this pattern 6 times around (36 stitches total) Rounds 2-7: Work a single crochet in each stitch around for 6 complete rounds, maintaining 36 stitches in each round Round 8: Work 4 single crochets, then decrease – repeat this pattern 6 times around (30 stitches total) Round 9: Work a single crochet in each stitch around (30 stitches total) Round 10: Work 3 single crochets, then decrease – repeat this pattern 6 times around (24 stitches total) Round 11: Work a single crochet in each stitch around (24 stitches total) Round 12: Work 2 single crochets, then decrease – repeat this pattern 6 times around (18 stitches total) Round 13: Work a single crochet in each stitch around (18 stitches total)
Leave a long yarn tail for sewing later. Before closing completely, stuff the body firmly to give your dinosaur a plump, huggable shape. The stuffing should be dense enough to hold its shape but not so tight that it distorts the stitches.
Forming the Arms (Skin-Colored Yarn)
Create two identical arms:
Round 1: Create a magic ring and work 6 single crochets into it (6 stitches total) Round 2: Work 1 single crochet, then increase – repeat this pattern 3 times around (9 stitches total) Rounds 3-7: Work a single crochet in each stitch around for 5 complete rounds, maintaining 9 stitches in each round Round 8: Decrease once, then work a single crochet in each of the remaining 7 stitches (8 stitches total) Round 9: Decrease once, then work a single crochet in each of the remaining 6 stitches (7 stitches total) Round 10: Decrease once, then work a single crochet in each of the remaining 5 stitches (6 stitches total)
Leave a long tail of yarn for future assembly. Add a small amount of stuffing to give shape without making the arms too stiff, then fold and sew the edges together to close each arm.
Shaping the Head (Skin-Colored Yarn)
The head requires the most detailed work:
Round 1: Create a magic ring and work 6 single crochets into it (6 stitches total) Round 2: Increase in each stitch around (working 2 single crochets in each stitch) (12 stitches total) Round 3: Work 1 single crochet, then increase – repeat this pattern 6 times around (18 stitches total) Round 4: Work 2 single crochets, then increase – repeat this pattern 6 times around (24 stitches total) Round 5: Work 3 single crochets, then increase – repeat this pattern 6 times around (30 stitches total) Round 6: Work 4 single crochets, then increase – repeat this pattern 6 times around (36 stitches total) Round 7: Work 5 single crochets, then increase – repeat this pattern 6 times around (42 stitches total) Round 8: Work 6 single crochets, then increase – repeat this pattern 6 times around (48 stitches total) Round 9: Work 7 single crochets, then increase – repeat this pattern 6 times around (54 stitches total) Round 10: Work a single crochet in each stitch around (54 stitches total) Round 11: Work 8 single crochets, then increase – repeat this pattern 6 times around (60 stitches total) Rounds 12-19: Work a single crochet in each stitch around for 8 complete rounds, maintaining 60 stitches in each round Round 20: Work 8 single crochets, then decrease – repeat this pattern 6 times around (54 stitches total) Round 21: Work a single crochet in each stitch around (54 stitches total) Round 22: Work 7 single crochets, then decrease – repeat this pattern 6 times around (48 stitches total) Round 23: Work 6 single crochets, then decrease – repeat this pattern 6 times around (42 stitches total) Round 24: Work 5 single crochets, then decrease – repeat this pattern 6 times around (36 stitches total) Round 25: Work 4 single crochets, then decrease – repeat this pattern 6 times around (30 stitches total) Round 26: Work 3 single crochets, then decrease – repeat this pattern 6 times around (24 stitches total) Round 27: Work 2 single crochets, then decrease – repeat this pattern 6 times around (18 stitches total)
Leave a long tail for attaching the head to the body. Stuff the head firmly, ensuring you work the stuffing into all areas for a well-formed shape.
Creating the Tail (Skin-Colored Yarn)
The dinosaur’s tail adds balance and character:
Round 1: Create a magic ring and work 4 single crochets into it (4 stitches total) Round 2: Work 1 single crochet, increase in the next stitch, increase in the next stitch, work 1 single crochet (6 stitches total) Round 3: Work 2 single crochets, increase in the next stitch, increase in the next stitch, work 2 single crochets (8 stitches total) Round 4: Work 3 single crochets, increase in the next stitch, increase in the next stitch, work 3 single crochets (10 stitches total) Round 5: Work 4 single crochets, increase in the next stitch, increase in the next stitch, work 4 single crochets (12 stitches total) Rounds 6-7: Work a single crochet in each stitch around for 2 complete rounds (12 stitches total)
Leave a long tail for attaching to the body. Add just enough stuffing to maintain the tail’s shape without making it too rigid.
Adding Decorative Horns
Create seven identical horns using turquoise yarn:
Round 1: Create a magic ring and work 6 single crochets into it (6 stitches) Round 2: Work [1 single crochet, increase] 3 times (9 stitches) Round 3: Work [2 single crochets, increase] 3 times (12 stitches) Round 4: Work 12 single crochets around (12 stitches)
Leave a long tail on each horn for attachment. Add a small amount of stuffing to each horn.
Later, you’ll attach three horns to the dinosaur’s body and four horns to the head for that distinctive dinosaur appearance.
Knitting the Scarf
Using blue yarn and knitting needles:
Row 1: Cast on 6 stitches (6 stitches) Row 2: Knit 6 stitches (6 stitches) Row 3: Purl 6 stitches (6 stitches)
Repeat Rows 2 and 3 until your scarf reaches approximately 15cm in length. Cast off, break the yarn, and weave in the remaining yarn. Use a tapestry needle to attach the wooden button to one end of the scarf.
Assembly and Finishing Touches
Now it’s time to bring your dinosaur to life by assembling all the components:
- Position the head: Place the head on top of the body, using pins to hold it in position before sewing. Use the long tail from the head to sew it securely to the body.
- Attach the arms: Position the arms on either side of the body, slightly toward the front. Sew them in place using the long tails you left.
- Secure the tail: Attach the tail to the back of the body, positioning it appropriately.
- Add the horns: Sew three horns along the dinosaur’s back and four horns on top of the head for that classic dinosaur silhouette.
- Create facial features: Use brown embroidery thread to carefully stitch the eyes. Add pink cheeks with pink embroidery thread for a friendly expression.
- Wrap the scarf: Position the scarf around the dinosaur’s neck and secure with the button for a cozy, finished look.
Tips for Perfect Results
- Maintain consistent tension throughout your work for a professional finish
- Count stitches at the end of each round to avoid mistakes
- Use stitch markers to track the beginning of rounds
- Stuff firmly but not too tightly, especially in smaller parts
- Take time with facial embroidery as it defines your dinosaur’s personality
- Position horns asymmetrically for a more natural appearance
Creative Variations to Make Your Dinosaur Unique
Personalize your dinosaur with these creative ideas:
- Experiment with different yarn colors for fantasy-colored dinosaurs
- Add additional details like embroidered scales or spots
- Create various sizes by changing hook size and yarn weight
- Add accessories like a tiny hat or backpack
- Change the horn placement for different dinosaur species
Care Instructions for Your Finished Amigurumi
To keep your handcrafted dinosaur looking its best:
- Spot clean with a damp cloth and mild soap as needed
- Allow to air dry completely
- Avoid machine washing or drying
- Store away from direct sunlight to prevent color fading
- Reshape gently if needed after cleaning
Beyond Creating Your Dinosaur: Reflections and Insights
Creating an amigurumi dinosaur isn’t just about following a pattern—it’s about embarking on a creative journey that connects you to the timeless tradition of handcrafting. As you put the finishing touches on your prehistoric friend, take a moment to appreciate what you’ve accomplished.
The Therapeutic Value of Amigurumi
Many crafters discover that making amigurumi offers benefits beyond the finished product:
The rhythmic nature of crochet creates a meditative state that reduces stress and anxiety. The focused attention required to count stitches and follow patterns provides a welcome break from digital distractions. There’s a special satisfaction in transforming simple yarn into a three-dimensional character with personality and charm. Each completed project builds confidence and mastery, encouraging you to tackle more complex designs.
Research has shown that crafting activities like crochet can release dopamine—a natural mood booster. The tactile experience of working with yarn engages multiple senses, creating a richer, more mindful experience than many modern leisure activities.
Personalizing Your Dinosaur Character
While the pattern provides structure, your dinosaur becomes truly unique through your personal touches:
Consider giving your dinosaur a name and backstory. Is it a friendly herbivore who loves adventures? A sleepy dinosaur who guards a child’s dreams at night? The personality you imagine will influence how you position the limbs, embroider the face, and display the finished creation.
Some crafters keep a journal documenting each project, noting modifications, challenges, and inspirations. These records become valuable resources for future projects and wonderful keepsakes of your creative journey.
Sharing the Joy of Handmade Creations
Handcrafted dinosaurs make meaningful gifts that stand out in our mass-produced world:
For children, receiving a handmade toy creates a special connection—something made just for them with hours of loving attention. Many parents appreciate amigurumi as heirloom-quality toys that can be passed down through generations. Fellow crafters understand the time and skill involved, making your dinosaur a respected display of your abilities.
If gifting your dinosaur, consider including a small card explaining that it was handmade especially for the recipient. You might also include care instructions to help them preserve their prehistoric pal.
Building Your Amigurumi Skills
This dinosaur pattern incorporates several techniques that will benefit your future projects:
Working with increases and decreases to create three-dimensional shapes Joining separate components to form a cohesive character Creating and attaching decorative elements Embroidering facial features to bring your creation to life Working with multiple yarn colors for visual interest
Each amigurumi project you complete refines these skills. Consider keeping notes about what worked well and what you might do differently next time.
Creating a Prehistoric Collection
Many crafters find that one dinosaur leads to another, and soon a collection emerges:
Try varying colors to create different dinosaur species Experiment with size by changing hook size and yarn weight Add distinctive features like longer necks, different tail shapes, or varying numbers of horns Create themed scenes with volcanoes, palm trees, or prehistoric landscapes made from felt or other materials Design dinosaur eggs using the same basic amigurumi techniques
Preserving Your Creation
To ensure your dinosaur remains a treasured item for years to come:
Keep finished amigurumi away from pets who might mistake them for toys Store in a clean, dry place away from direct sunlight to prevent color fading If displaying on a shelf, rotate periodically to prevent dust accumulation on one side For heirloom-quality preservation, store in an acid-free box when not displayed Take photos of your creation to document your crafting journey
Joining the Amigurumi Community
The amigurumi crafting community is welcoming and supportive:
Consider sharing photos of your completed dinosaur on social media, craft forums, or local crafting groups Participate in amigurumi-along events where crafters create the same pattern simultaneously Attend fiber festivals or crafting meetups to connect with fellow enthusiasts Explore pattern-sharing platforms to find inspiration for your next project
Check this out :Adorable Amigurumi Lion Crochet Pattern
Final Thoughts on Your Dinosaur Journey
As your yarn transforms into this charming prehistoric creature, remember that imperfections are part of the handmade charm. Every stitch represents your time, creativity, and developing skill. The slightly uneven embroidery or the horn that leans a bit to one side aren’t flaws—they’re signatures of a unique, handcrafted item.
Whether this dinosaur becomes a child’s beloved companion, a decorative accent in your home, or a gift that brings joy to someone special, it carries with it the irreplaceable value of something made by human hands with care and attention.
Happy crocheting, and may your dinosaur be the first of many delightful amigurumi creations!
