

Table of Contents
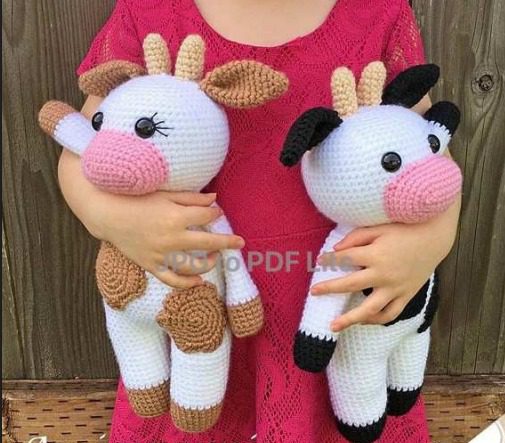
Creating handmade amigurumi toys has become increasingly popular among crafting enthusiasts, and this charming cow pattern offers a delightful project for crocheters of all skill levels. These huggable farm animals, with their distinctive spotted patterns and expressive faces, make perfect gifts for children or charming decorative pieces for any farm-themed collection. Following this comprehensive tutorial, you’ll create a sweet cow that stands approximately 13 centimeters tall, showcasing your crochet skills while producing an irresistible handcrafted treasure.
Materials Needed for Your Cow Amigurumi
Before beginning your cow amigurumi project, gather these essential materials:
- Worsted weight yarn (size 4): 150g of white yarn, plus small amounts of black or brown for spots, beige for horns, and pink for the nose
- 3.5mm crochet hook
- 15mm safety eyes
- Black embroidery thread for eyelashes (optional)
- Tapestry needle for assembly
- Polyester fiberfill stuffing
- Stitch markers
If you prefer not to use 15mm safety eyes, you can create crocheted eyes following a separate tutorial for an excellent alternative. This pattern uses standard crochet terminology and works in continuous rounds. Using stitch markers at the beginning of each round is recommended for easier tracking.
Creating the Legs and Body
Begin by making the cow’s legs with either black or brown yarn, depending on which color pattern you prefer:
Legs (Make 2)
Round 1: Create 6 single crochet (sc) in a magic ring (6) Round 2: Increase in each stitch around (12) Round 3: 1 sc, 1 increase repeat 6 times (18) Round 4: 2 sc, 1 increase repeat 6 times (24) Round 5: Work 24 sc in back loops only (24) Rounds 6-10: 24 sc in each round (24)
Switch to white yarn: Rounds 11-21: 24 sc in each round (24)
Fasten off after completing the first leg. For the second leg, do not fasten off, as you’ll continue to form the body.
Joining the Legs and Creating the Body
After completing both legs, chain 3 and join to the first leg with a single crochet. Work single crochet around the first leg, then single crochet in each of the 3 chain stitches, continue with single crochet around the second leg, and finish with 3 more single crochet in the chain space, creating a total of 54 stitches.
Rounds 23-38: 54 sc in each round (54) Round 39: 7 sc, 1 decrease repeat 6 times (48) Round 40: 48 sc (48) Round 41: 6 sc, 1 decrease repeat 6 times (42) Round 42: 42 sc (42) Round 43: 5 sc, 1 decrease repeat 6 times (36) Round 44: 36 sc (36) Round 45: 4 sc, 1 decrease repeat 6 times (30) Rounds 46-47: 30 sc in each round (30)
Fasten off, leaving a long tail for sewing the head to the body.
Crafting the Head
The head gives your cow its distinctive character and charm:
Round 1: 6 sc in magic ring (6) Round 2: Increase in each stitch around (12) Round 3: 1 sc, 1 increase repeat 6 times (18) Round 4: 2 sc, 1 increase repeat 6 times (24) Round 5: 3 sc, 1 increase repeat 6 times (30) Round 6: 4 sc, 1 increase repeat 6 times (36) Round 7: 5 sc, 1 increase repeat 6 times (42) Round 8: 6 sc, 1 increase repeat 6 times (48) Round 9: 7 sc, 1 increase repeat 6 times (54) Round 10: 8 sc, 1 increase repeat 6 times (60) Rounds 11-21: 60 sc in each round (60)
Position the safety eyes between rounds 17-19, approximately 6 stitches apart. If you wish to add eyelashes, embroider them before securing the safety eyes.
Round 22: 8 sc, 1 decrease repeat 6 times (54) Round 23: 7 sc, 1 decrease repeat 6 times (48) Round 24: 6 sc, 1 decrease repeat 6 times (42) Round 25: 5 sc, 1 decrease repeat 6 times (36) Round 26: 4 sc, 1 decrease repeat 6 times (30) Round 27: 3 sc, 1 decrease repeat 6 times (24) Round 28: 2 sc, 1 decrease repeat 6 times (18) Round 29: 1 sc, 1 decrease repeat 6 times (12) Round 30: Decrease 6 times (6)
Close the opening and fasten off, leaving a long tail for attaching the head to the body.
Creating the Nose and Mouth
The nose and mouth give your cow its expressive face. This piece is worked in rows, crocheting on both sides of the initial chain to create an oval shape:
Chain 10 (keep your chains fairly tight to avoid visible holes) Row 1: Starting in the 2nd chain from hook, work 1 sc, 7 sc, 3 sc in the last chain. Turn and work along the opposite side of the chain, 7 sc, 2 sc in the last stitch (which is also the first chain you started with) (20) Row 2: 1 increase, 7 sc, 3 increases, 7 sc, 2 increases (26) Row 3: 1 increase, 9 sc, 4 increases, 9 sc, 3 increases (34) Rows 4-7: 34 sc in each row (34)
Fasten off, leaving a long tail for sewing to the head.
Shaping the Ears and Horns
Ears (Make 2 with black or brown yarn)
Round 1: 8 sc in magic ring (8) Rounds 2-3: 8 sc in each round (8) Round 4: 1 sc, 1 increase repeat 4 times (12) Round 5: 12 sc (12) Round 6: 2 sc, 1 increase repeat 4 times (16) Rounds 7-13: 16 sc in each round (16)
Fold the ear in half and slip stitch across the top to close. Fasten off, leaving a long tail for sewing to the head.
Horns (Make 2 with beige yarn)
Round 1: 9 sc in magic ring (9) Rounds 2-7: 9 sc in each round (9)
Fasten off, leaving a long tail for sewing to the head.
Assembling the Facial Features
Create the cow’s distinctive expression:
- Sew the nose/mouth piece to the head, centered between the eyes. Use pins to hold it in position if needed. Lightly stuff the nose before completing the sewing.
- Attach the ears to the head at the 6th round on each side.
- Position and sew the horns evenly between the ears.
Creating the Arms
Arms (Make 2 with black or brown yarn, lightly stuff the bottom portion)
Round 1: 8 sc in magic ring (8) Round 2: Increase in each stitch around (16) Round 3: 16 sc in back loops only (16) Rounds 4-7: 16 sc in each round (16)
Switch to white yarn: Rounds 8-23: 16 sc in each round (16)
At the end of round 23, flatten the arm and work 8 sc through both layers to close. Fasten off, leaving a long tail for sewing to the body.
Making the Distinctive Spots
Large Spots (Make 2)
Round 1: 6 sc in magic ring (6) Round 2: Increase in each stitch around (12) Round 3: 1 sc, 1 increase repeat 6 times (18) Round 4: 2 sc, 1 increase repeat 6 times (24) Round 5: 3 sc, 1 increase repeat 6 times (30) Round 6: 3 sc, 2 double crochet increases repeat 6 times (42)
Fasten off, leaving a long tail for sewing.
Medium Spots (Make 2)
Round 1: 6 sc in magic ring (6) Round 2: Increase in each stitch around (12) Round 3: 1 sc, 1 increase repeat 6 times (18) Round 4: 2 sc, 1 increase repeat 6 times (24) Round 5: 2 sc, 2 double crochet increases repeat 6 times (36)
Fasten off, leaving a long tail for sewing.
Check this out :Crochet the Adorable Momo Amigurumi Doll
Final Assembly
Bring your cow to life with these finishing steps:
- Attach the head to the body, ensuring the facial features are centered. Add extra stuffing as needed to maintain firmness.
- Sew the arms to the body at the 46th round, centered with the head.
- Position and sew one large and one medium spot on both the front and back of the cow’s body.
Your adorable farm cow amigurumi is now complete! This sweet handcrafted toy stands approximately 13 centimeters tall and features a distinctive spotted pattern that makes each one unique. Whether created as a gift for a child, a decorative accent, or an addition to your amigurumi collection, this charming cow brings country farmyard charm to any space.
Crafters appreciate that this pattern uses simple techniques while creating a professional-looking finished project. Feel free to experiment with different color combinations—create a traditional black and white Holstein dairy cow, a brown and white Jersey cow, or even invent your own colorful variation for a truly one-of-a-kind creation.
