

Table of Contents
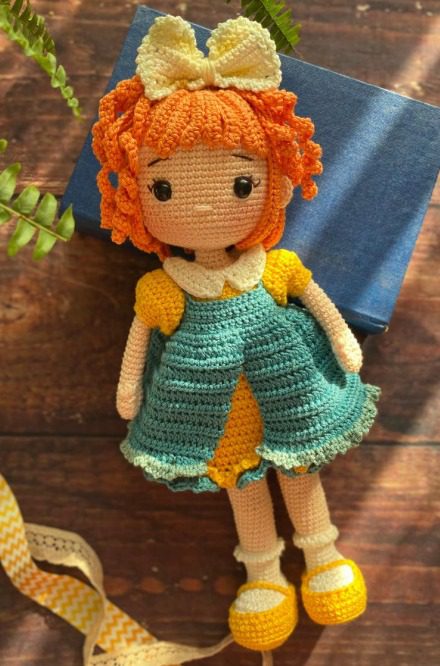
Creating Momo amigurumi dolls has become increasingly popular among crochet enthusiasts seeking to craft personalized handmade toys with character and charm. The Momo Doll pattern designed by Merutoys offers a delightful project that combines various crochet techniques to create a sweet, stylish character with distinctive features and customizable clothing options. Standing at approximately 25 centimeters tall, this doll showcases intricate details from its expressive face to its fashionable outfit that will appeal to crafters looking for an intermediate-level amigurumi challenge.
Materials Required for Your Momo Doll
Before beginning this charming amigurumi project, gather these essential materials:
Momo Yarn Selection
- Schachenmayr Catania (50g/125m) in skin tone (TR263)
- Schachenmayr Catania (50g/125m) in pure white
- Schachenmayr Catania (50g/125m) in blue
- Schachenmayr Catania (50g/125m) in light peach (291)
- Additional yarn in orange for hair, dark green and light green for the apron, and yellow for shoes
Momo Tools and Notions
- Crochet hooks: 2mm and 2.5mm sizes
- 10mm safety eyes
- Polyester fiberfill for stuffing
- Scissors and sewing needle
- Black, brown, and white embroidery thread for facial details
- 40cm length of wire and tape for internal structure
- Soft pastel crayons for adding blush to the cheeks
- Small buttons for clothing closures
- Fabric glue for securing hair
Momo Understanding the Pattern Terminology
Familiarize yourself with these standard crochet abbreviations used throughout the pattern:
- Mr: Magic ring
- Ch: Chain stitch
- Sc: Single crochet
- Inc: Increase (two single crochet in one stitch)
- Dec: Decrease (two stitches worked together)
- Sl st: Slip stitch
- Hdc: Half double crochet
- Hdcinc: Half double crochet increase
- Blo: Back loop only
- Flo: Front loop only
Creating the Momo Head
The head forms the foundation of your Momo doll’s character and expression. Work with skin-colored yarn and a 2mm hook:
Round 1: Create 7 single crochet in a magic ring (7 stitches) Round 2: Increase in each stitch around (14 stitches) Round 3: Alternate single crochet and increase around (21 stitches) Round 4: One single crochet, one increase, then repeat pattern of 2 single crochet and increase six times, finishing with one single crochet (28 stitches) Round 5: Repeat pattern of 3 single crochet and increase seven times (35 stitches) Round 6: Two single crochet, increase, then repeat pattern of 4 single crochet and increase six times, finishing with 2 single crochet (42 stitches) Round 7: Repeat pattern of 5 single crochet and increase seven times (49 stitches) Round 8: Three single crochet, increase, then repeat pattern of 6 single crochet and increase six times, finishing with 3 single crochet (56 stitches) Round 9: Repeat pattern of 7 single crochet and increase seven times (63 stitches) Rounds 10-26: Work 63 single crochet for 17 rounds
Position safety eyes between rounds 19 and 20, with approximately 12 stitches between them. Begin decreasing to shape the head:
Round 27: Repeat pattern of 7 single crochet and decrease seven times (56 stitches) Round 28: Three single crochet, decrease, then repeat pattern of 6 single crochet and decrease six times, finishing with 3 single crochet (49 stitches) Round 29: Repeat pattern of 5 single crochet and decrease seven times (42 stitches) Round 30: Two single crochet, decrease, then repeat pattern of 4 single crochet and decrease six times, finishing with 2 single crochet (35 stitches) Round 31: Repeat pattern of 3 single crochet and decrease seven times (28 stitches) Round 32: One single crochet, decrease, then repeat pattern of 2 single crochet and decrease six times, finishing with one single crochet (21 stitches) Round 33: Repeat pattern of 5 single crochet and decrease three times (18 stitches) Round 34: Repeat pattern of 4 single crochet and decrease three times (15 stitches)
Stuff the head firmly before closing.
Embellishing the Face
The facial features bring personality to your Momo doll:
- Using two strands of brown embroidery thread, create delicate eyelashes extending from the safety eyes
- Add white highlights to the eyes using a single strand of white embroidery thread
- Create expressive eyebrows with two strands of black embroidery thread
- Embroider a simple nose between rounds 22 and 23, spanning approximately 3 stitches
- Apply soft pastel crayon to add gentle blush to the cheeks
Momo Creating the Hair
The distinctive hairstyle adds character to your Momo doll. Use orange yarn and a 2.5mm hook:
Round 1: Create 7 single crochet in a magic ring (7 stitches) Round 2: Increase in each stitch around (14 stitches) Round 3: Alternate single crochet and increase around (21 stitches) Round 4: Repeat pattern of 2 single crochet and increase seven times (28 stitches) Round 5: Repeat pattern of 3 single crochet and increase seven times (35 stitches)
For the flowing hair strands:
- On round 6, create 5 hair strands by chaining 30, then working 29 half double crochet back along the chain starting from the second chain from the hook. Skip one stitch on the base and slip stitch to the second chain
- Create 8 shorter bangs by chaining 12, then working 11 half double crochet back along the chain starting from the second chain from the hook
- Continue with 8 more longer strands following the same method as the first set
- For the top bun, chain 45 and create a patterned stitch sequence, repeating to form 8 strands. Twist these strands together and secure to the top of the head
Attach the hair to the head using fabric glue, positioning the right side of the wig against the head.
Crafting the Ears
For each ear:
- Create 5 single crochet in a magic ring
- Chain 1 and turn
- Increase in each stitch (10 stitches)
Sew the ears to the head, positioning them approximately 5 stitches apart from the eyes.
Creating the Arms
The arms include wire supports for posability:
- Create 6 single crochet in a magic ring (6 stitches)
- Increase in each stitch around (12 stitches)
- Repeat pattern of increase and 3 single crochet three times (15 stitches)
- Rounds 4-5: Work 15 single crochet (15 stitches)
- Round 6: Decrease once, followed by 13 single crochet (14 stitches)
- Round 7: Decrease once, puff stitch, followed by 11 single crochet (13 stitches)
- Round 8: Decrease once, followed by 11 single crochet (12 stitches)
- Rounds 9-29: Work 12 single crochet (12 stitches)
Cut 18cm lengths of wire for each arm. Fold approximately 3cm at one end and insert into the arm. Leave the arms unstuffed, twisting the excess wire for neck support.
Forming the Legs and Shoes
Begin with yellow yarn for the shoes:
- Chain 7, then starting from the second chain from the hook: 5 single crochet, 4 single crochet in the last chain, work 4 single crochet along the opposite side, increase once (15 stitches)
- Work increases following specific pattern to reach 36 stitches by round 4
- Round 5: 36 single crochet
- Round 6: Work in back loops only, 36 single crochet
- Rounds 7-8: 36 single crochet
- Round 9: 7 single crochet, alternate single crochet and decrease 7 times, 8 single crochet (29 stitches)
- Round 10: For the first leg, 7 single crochet, alternate decrease 7 times, 8 single crochet (22 stitches). For the second leg, 7 single crochet, chain 11 and skip 14 stitches, 8 single crochet
Continue shaping the leg:
- Round 11: 6 single crochet, decrease 4 times, 6 single crochet, decrease once (17 stitches)
- Round 12: Decrease once, 15 single crochet (16 stitches)
- Rounds 13-18: 16 single crochet
Switch to skin-colored yarn:
- Round 19: Working in back loops only, increase once, 15 single crochet (17 stitches)
- Round 20: Single crochet, increase, 15 single crochet (18 stitches)
- Rounds 21-44: 18 single crochet
Create decorative ruffles using the front loops of round 19 with the white yarn: chain 2, single crochet around.
Assembling the Body
Join the legs with a chain of 3 stitches:
- Work 18 single crochet on first leg, 3 single crochet along the chain, 18 single crochet on second leg, 3 single crochet along the other side of the chain (42 stitches total)
- Rounds 2-13: 42 single crochet
- Round 14: Repeat pattern of 5 single crochet and decrease six times (36 stitches)
- Rounds 15-26: 36 single crochet
- Round 27: Repeat pattern of 4 single crochet and decrease six times (30 stitches)
Attach the arms in round 30:
- 5 single crochet, 6 single crochet through arm and body simultaneously, 10 single crochet, 6 single crochet through second arm and body simultaneously, 3 single crochet (position thumbs facing forward)
- Round 31: 30 single crochet
- Round 32: Repeat pattern of 3 single crochet and decrease six times (24 stitches)
- Round 33: Repeat pattern of 2 single crochet and decrease six times (18 stitches)
- Round 34: Repeat pattern of 4 single crochet and decrease three times (15 stitches)
- Rounds 35-36: 15 single crochet
Twist the wire supports together and secure with tape for neck stability. Attach the head to the body securely.
Creating the Dress
Using apricot-colored yarn:
- Chain 37, begin working in the 7th chain from the hook (leaving 6 chains for button hole)
- Row 1: 30 single crochet
- Row 2: Repeat pattern of 2 single crochet and increase 10 times (40 stitches)
- Row 3: 7 single crochet, chain 8 and skip 7 stitches, 12 single crochet, chain 8 and skip 7 stitches, 7 single crochet
- Rows 4-11: 42 single crochet
- Row 12: Join ends with slip stitch and repeat pattern of half double crochet increase and half double crochet 21 times (63 stitches)
- Rows 13-26: 63 half double crochet
- Row 27: Working in front loops only, alternate chain 3 and single crochet around
Add blue trim using back loops only, working 3 double crochet in each stitch around. Attach a button at the back closure.
Create the collar in two sections, working from back to front on right side and from middle to back on left side, following the specific increase pattern.
For sleeves:
- Round 1: Half double crochet increase 15 times (30 stitches)
- Rounds 2-4: 30 half double crochet
- Round 5: Decrease 15 times (15 stitches)
- Rounds 6-7: 15 single crochet
Crafting the Apron
Using dark green yarn:
- Chain 52
- Row 1: 8 single crochet, chain 10 and skip 11 single crochet, 15 single crochet, chain 10 and skip 11 single crochet, 8 single crochet
- Row 2: 53 single crochet
- Row 3: Chain 6 for button hole, 53 single crochet
- Rows 4-5: 53 single crochet
Divide the work in half (leaving 1 single crochet in the middle):
- On each half, work half double crochet increases to reach 52 stitches
- Alternate working in front and back loops for 11 rows to create texture
- Change to light green yarn for trim, chain 3 and single crochet to the end
Add a button to secure the apron at the back.
Momo Final Accessories
For the bow:
- Using white yarn, chain 18
- Rows 1-8: 17 single crochet
- Row 9: Alternate chain 2 and single crochet around the perimeter
- Pinch the center and wrap with yarn to create the bow shape
- Add color with soft pastel if desired
Check this out :Crochet a Winter Kitten Amigurumi
Conclusion
The Momo Doll pattern offers a comprehensive crochet experience that combines multiple techniques to create a charming character full of personality. From the detailed facial features to the fashionable clothing options, this doll provides ample opportunity for customization through color choices and embellishments.
When completed, your Momo Doll stands as a testament to your crochet skills and attention to detail. The wire supports in the arms allow for posability, while the carefully constructed outfit can be removed and changed, adding play value and display versatility to your finished creation.
Whether crafted as a special gift or added to your own collection, this amigurumi doll brings joy through its expressive features and sophisticated design. The satisfaction of creating such a detailed character from simple yarn and hook makes the Momo Doll a rewarding project for intermediate crocheters looking to expand their amigurumi repertoire.
