

Table of Contents
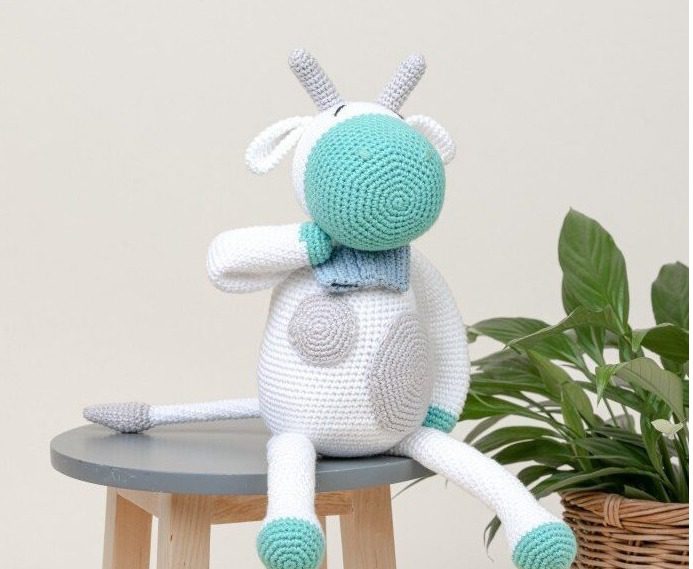
Are you looking to create Bull Amigurumi a charming, huggable bull amigurumi? This beginner-friendly crochet pattern produces an adorable stuffed bull standing approximately 37 cm (14.5 inches) tall. With a mint-colored face and feet, crisp white body, and distinctive gray spots and horns, this bull makes a perfect gift for children or a delightful addition to your amigurumi collection.
What You’ll Need for Your Bull Amigurumi
Before beginning your bull amigurumi project, gather these materials:
- Rainbow Cotton 8/4 yarn in:
- White (#001) – 2 skeins
- Pearl Grey (#073) – 1 skein
- Mint (#024) – 1 skein
- Crochet hook size 2.50 mm
- Black scrap yarn for embroidering the eyes
- Scrap yarn in the color of your choice for the bow
- Polyester fiberfill for stuffing
- Tapestry needle for assembly
- Scissors
- Stitch markers (optional)
Understanding the Bull Amigurumi Terminology
Familiarize yourself with these standard crochet abbreviations used throughout the pattern:
- ch – chain stitch
- sc – single crochet
- sl st – slip stitch
- mr – magic ring
- inc – increase (2 single crochet in same stitch)
- dec – decrease (2 stitches worked together)
- rnd(s) – round(s)
- (xx) – number of stitches after completed round
Helpful Tips Before You Begin
- Work the stitches tightly to avoid gaps between them
- Stuff the head and body firmly for better shape retention
- Add extra stuffing between the head and body when attaching them to prevent wobbling
- All pieces are worked in continuous rounds without joining (except for the bow)
- Use stitch markers to keep track of your rounds
Creating Your Bull Amigurumi Step by Step
Head
Start with Mint yarn:
- Create a magic ring and work 6 sc into it (6)
- Increase in each stitch around (12)
- [1 sc, increase] repeat 6 times (18)
- [2 sc, increase] repeat 6 times (24)
- [3 sc, increase] repeat 6 times (30)
- [4 sc, increase] repeat 6 times (36)
- [5 sc, increase] repeat 6 times (42)
- [6 sc, increase] repeat 6 times (48)
- [7 sc, increase] repeat 6 times (54) 10-17. Work 1 sc in each stitch for 8 rounds (54)
- [7 sc, decrease] repeat 6 times (48)
Change to White yarn: 19. Work 1 sc in each stitch (48) 20. [7 sc, increase] repeat 6 times (54) 21-26. Work 1 sc in each stitch for 6 rounds (54)
Remember to stuff the head with fiberfill as you work.
- [7 sc, decrease] repeat 6 times (48)
- Work 1 sc in each stitch (48)
- [6 sc, decrease] repeat 6 times (42)
- Work 1 sc in each stitch (42)
- [5 sc, decrease] repeat 6 times (36)
- Work 1 sc in each stitch (36)
- [4 sc, decrease] repeat 6 times (30)
- [3 sc, decrease] repeat 6 times (24)
- [2 sc, decrease] repeat 6 times (18)
- [1 sc, decrease] repeat 6 times (12)
- [2 sc, decrease] repeat 3 times (9)
To finish, use a tapestry needle to gather the front loops of the remaining 9 stitches. Pull the yarn tight to close the opening neatly, and weave in the end.
Bull Amigurumi Body
Using White yarn:
- Create a magic ring and work 6 sc into it (6)
- Increase in each stitch around (12)
- [1 sc, increase] repeat 6 times (18)
- [2 sc, increase] repeat 6 times (24)
- [3 sc, increase] repeat 6 times (30)
- [4 sc, increase] repeat 6 times (36)
- [5 sc, increase] repeat 6 times (42)
- [6 sc, increase] repeat 6 times (48)
- [7 sc, increase] repeat 6 times (54)
- [8 sc, increase] repeat 6 times (60)
- [9 sc, increase] repeat 6 times (66)
- [10 sc, increase] repeat 6 times (72) 13-24. Work 1 sc in each stitch for 12 rounds (72)
- [10 sc, decrease] repeat 6 times (66) 26-28. Work 1 sc in each stitch for 3 rounds (66)
- [9 sc, decrease] repeat 6 times (60) 30-31. Work 1 sc in each stitch for 2 rounds (60)
- [8 sc, decrease] repeat 6 times (54) 33-34. Work 1 sc in each stitch for 2 rounds (54)
- [7 sc, decrease] repeat 6 times (48) 36-37. Work 1 sc in each stitch for 2 rounds (48)
- [6 sc, decrease] repeat 6 times (42)
- Work 1 sc in each stitch (42)
- [5 sc, decrease] repeat 6 times (36)
- Work 1 sc in each stitch (36)
- [4 sc, decrease] repeat 6 times (30)
- Work 1 sc in each stitch (30)
- [3 sc, decrease] repeat 6 times (24)
- [2 sc, decrease] repeat 6 times (18)
Fasten off, leaving a tail long enough for attaching the head to the body.
Bull Amigurumi Ears (Make 2)
Using White yarn:
- Create a magic ring and work 6 sc into it (6)
- [1 sc, increase] repeat 3 times (9)
- [2 sc, increase] repeat 3 times (12)
- [3 sc, increase] repeat 3 times (15)
- [4 sc, increase] repeat 3 times (18) 6-10. Work 1 sc in each stitch for 5 rounds (18)
- [4 sc, decrease] repeat 3 times (15)
- [3 sc, decrease] repeat a times (12)
Fold the ear flat and join the edges with 3 sc. Fasten off, leaving a tail long enough for attaching to the head.
Bull Amigurumi Horns (Make 2)
Using Pearl Grey yarn:
- Create a magic ring and work 6 sc into it (6)
- [1 sc, increase] repeat 3 times (9) 3-12. Work 1 sc in each stitch for 10 rounds (9)
Fasten off, leaving a tail long enough for attaching to the head.
Bull Amigurumi Arms (Make 2)
Starting with Mint yarn:
- Create a magic ring and work 6 sc into it (6)
- Increase in each stitch around (12)
- [1 sc, increase] repeat 6 times (18) 4-5. Work 1 sc in each stitch for 2 rounds (18)
Stuff the arm lightly with fiberfill, but only halfway up.
Change to White yarn: 6-33. Work 1 sc in each stitch for 28 rounds (18) 34. [4 sc, decrease] repeat 3 times (15) 35-36. Work 1 sc in each stitch for 2 rounds (15)
Fasten off, leaving a tail long enough for attaching to the body.
Bull Amigurumi Legs (Make 2)
Starting with Mint yarn:
- Create a magic ring and work 6 sc into it (6)
- Increase in each stitch around (12)
- [1 sc, increase] repeat 6 times (18)
- [2 sc, increase] repeat 6 times (24)
- [3 sc, increase] repeat 6 times (30) 6-7. Work 1 sc in each stitch for 2 rounds (30)
Change to White yarn: 8-9. Work 1 sc in each stitch for 2 rounds (30) 10. [3 sc, decrease] repeat 6 times (24) 11. Work 1 sc in each stitch (24) 12. [2 sc, decrease] repeat 6 times (18) 13. Work 1 sc in each stitch (18) 14. [4 sc, decrease] repeat 3 times (15)
Stuff the foot firmly with fiberfill. Stuff the remainder of the leg lightly. 15-46. Work 1 sc in each stitch for 32 rounds (15)
Fasten off, leaving a tail long enough for attaching to the body.
Spots
Large Spot
Using Pearl Grey yarn:
- Create a magic ring and work 6 sc into it (6)
- Increase in each stitch around (12)
- [1 sc, increase] repeat 6 times (18)
- [2 sc, increase] repeat 6 times (24)
- [3 sc, increase] repeat 6 times (30)
- [4 sc, increase] repeat 6 times (36)
- [5 sc, increase] repeat 6 times (42)
- [6 sc, increase] repeat 6 times (48)
- [7 sc, increase] repeat 6 times (54)
- Work 1 sc in each stitch, finish with 1 slip stitch (54)
Fasten off, leaving a tail long enough for sewing.
Small Spot
Using Pearl Grey yarn:
- Create a magic ring and work 6 sc into it (6)
- Increase in each stitch around (12)
- [1 sc, increase] repeat 6 times (18)
- [2 sc, increase] repeat 6 times (24)
- [3 sc, increase] repeat 6 times (30)
- Work 1 sc in each stitch, finish with 1 slip stitch (30)
Fasten off, leaving a tail long enough for sewing.
Medium Spot
Using Pearl Grey yarn:
- Create a magic ring and work 6 sc into it (6)
- Increase in each stitch around (12)
- [1 sc, increase] repeat 6 times (18)
- [2 sc, increase] repeat 6 times (24)
- [3 sc, increase] repeat 6 times (30)
- [4 sc, increase] repeat 6 times (36)
- [5 sc, increase] repeat 6 times (42)
- Work 1 sc in each stitch, finish with 1 slip stitch (42)
Fasten off, leaving a tail long enough for sewing.
Tail
Start with Pearl Grey yarn:
- Create a magic ring and work 5 sc into it (5)
- Increase, 4 sc (6)
- Increase, 5 sc (7)
- Increase, 6 sc (8)
- Increase, 7 sc (9)
- Increase, 8 sc (10)
- Increase, 9 sc (11)
- Increase, 10 sc (12)
- [3 sc, increase] repeat 3 times (15) 10-11. Work 1 sc in each stitch for 2 rounds (15)
- [3 sc, decrease] repeat 3 times (12)
- [2 sc, decrease] repeat 3 times (9)
Change to White yarn and stuff the tip with fiberfill: 14-43. Work 1 sc in each stitch for 30 rounds (9)
Fasten off, leaving a tail long enough for attaching to the body.
Bow
Using yarn in the color of your choice:
- Chain 9
- Beginning in the 2nd chain from the hook, work 7 sc, chain 1, turn (7) 3-32. Work 7 sc, chain 1, turn (7) for 30 more rows
After completing the last row, sew or crochet the ends together. Fasten off.
Ribbon for Middle of Bow
Using yarn in the color of your choice:
- Chain 4
- Beginning in the 2nd chain from the hook, work 2 sc, chain 1, turn (2) 3-14. Work 2 sc, chain 1, turn (2) for 12 more rows
Fasten off, leaving a tail long enough for attaching to the bow. Place the ribbon around the middle of the bow (hiding the seam), tighten it, and sew it securely in place.
Assembly Instructions
- Body Preparation: Stuff the body firmly with fiberfill.
- Spots: Sew the small and large spots on the front of the body, positioning them offset from each other. Attach the medium spot to the back of the body.
- Arms: Sew the arms to the body at round 5 counted from the neck.
- Head: Attach the head to the body, adding extra stuffing in between to prevent wobbling.
- Ears and Horns: Sew the ears to the head between rounds 8-10 counted from the back. Position the lightly stuffed horns on rounds 8-10 from the back of the head, with 2 single crochet between each ear and horn.
- Bow: Attach the bow under the head.
- Legs: Sew the legs to the body at round 6 counted from the bottom, with 8-10 single crochet between them.
- Facial Features: Embroider the nostrils at rounds 7-9 at the increases, with 9 single crochet between each nostril. Add diagonal eyebrows on rounds 4-7 on the white part of the head, with 4 single crochet between the upper parts of the eyes and 8 single crochet between the lower parts.
- Tail: Attach the tail to the middle of the backside.
Customization Ideas
While this pattern creates a charming mint, white, and gray bull, consider these creative variations:
- Color Combinations: Try different colors for the face and feet, like blue, pink, or purple
- Spotted Variations: Create additional spots in different sizes for a more unique pattern
- Accessory Options: Add a flower crown, scarf, or different bow style
- Size Adjustments: Use thicker yarn and a larger hook for a bigger bull, or thinner yarn and a smaller hook for a mini version
Perfect as a Gift
This bull amigurumi makes an excellent present for:
- Children who love farm animals
- Nursery or playroom decoration
- Zodiac enthusiasts (especially Taurus)
- Someone starting an amigurumi collection
- A farming or agricultural enthusiast
Care Instructions
To keep your bull amigurumi looking its best:
- Spot clean with mild soap and water
- Air dry completely
- Avoid direct sunlight to prevent color fading
- Store in a clean, dry place
- For heavily soiled items, hand wash gently and reshape while damp
Check this out :Beautiful Crochet Doll Pattern With Floral Bonnet and Layered Skirt
Conclusion
Creating this bull amigurumi is a delightful project for beginners looking to expand their crochet skills. The detailed pattern produces a charming character with personality and style. Whether you’re making it for yourself or as a gift, this crocheted bull combines cuteness with craftsmanship in a way that’s sure to bring smiles.
Happy crocheting!
This pattern has been adapted for clarity and SEO purposes while maintaining the original design’s integrity.
