

Table of Contents
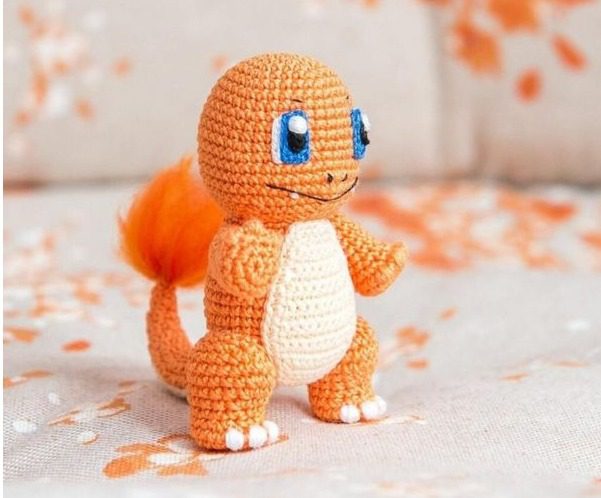
Pokémon enthusiasts and crochet lovers alike can rejoice with this detailed guide to creating your very own Charmander amigurumi. This Charmander beloved fire-type starter Pokémon comes to life with its distinctive orange body, cream-colored stomach, and signature flame-tipped tail. At approximately 8.5 cm tall when completed, this miniature Charmander makes for an adorable collectible, perfect for displaying or gifting to fellow Pokémon fans.
Charmander Essential Materials
Before embarking on your Charmander crochet journey, gather these materials:
- Crochet hooks: 0.75 mm and 1.00 mm hooks
- Yarn:
- Orange (for body, head, legs, and tail)
- Flesh-colored/cream (for stomach and part of tail)
- White (for eye details)
- Navy blue (DMC 798) for eyes
- Black (DMC 310) for pupils and facial details
- Specialty materials:
- Orange, yellow, and red carded merino wool (18 mic thickness) for the flame
- Polyester wadding for stuffing
- Tools:
- Sewing needle
- Stitch markers
- Scissors
For the best results, use 100% cotton yarn (like “Garden 10” with 280m/50g). The main body should be crocheted with single yarn using a 1.00 mm hook, while the eyes require a 0.75 mm hook with thinner yarn.
Understanding Charmander Terminology
This pattern uses standard amigurumi abbreviations:
- Ch: Chain
- Sl: Slip stitch
- Sc: Single crochet
- Dc: Double crochet
- HDc: Half double crochet
- INC: Increase (2 single crochets in one stitch)
- INVDEC: Invisible decrease
- INCHDc: 2 half double crochets crocheted in one stitch
Additionally, when working on the tail, you’ll encounter bicolor stitches marked with an asterisk (*) to indicate flesh-colored yarn.
Charmander Important Tips Before Starting
- Tight stitches are essential – Work with tight tension to prevent stuffing from showing through gaps in the fabric.
- Use stitch markers – Place a marker in the last loop of each row to keep track of your position.
- Work in continuous spirals – All parts are crocheted in a spiral without slip stitches or chain lifts.
- Finish with slip stitches – Complete all spiral-crocheted details with a slip stitch to avoid uneven edges.
- Pay attention to stuffing – Ensure nose and other shaped areas are firmly stuffed to maintain their form.
Creating Charmander’s Head
Using orange yarn and your 1.00 mm hook:
Round 1: 6 Sc in magic ring (6) Round 2: INC in each stitch around (12) Round 3: [1 Sc, INC] repeat 6 times (18) Round 4: [2 Sc, INC] repeat 6 times (24) Round 5: [3 Sc, INC] repeat 6 times (30) Round 6: [4 Sc, INC] repeat 6 times (36) Rounds 7-8: Sc in each stitch around (36) Round 9: [11 Sc, INC] repeat 3 times (39) Rounds 10-11: Sc in each stitch around (39) Round 12: 11 Sc, INC, 4 Sc, INVDEC, 4 Sc, INVDEC, 4 Sc, INC, 10 Sc (39) Round 13: 12 Sc, INC, 2 Sc, INC, 1 Sc, INC, 4 Sc, INC, 1 Sc, INC, 2 Sc, INC, 11 Sc (45) Round 14: 22 Sc, 2 INC (nose), 21 Sc (47) Round 15: 22 Sc, 2 INVDEC (nose), 21 Sc, 1 Sc (extra stitch to conceal uneven edges) (45) Round 16: 5 Sc, INVDEC, 6 Sc, INVDEC, 5 Sc, INVDEC, 6 Sc, INVDEC, 5 Sc, INVDEC, 6 Sc, INVDEC (39) Round 17: 4 Sc, INVDEC, 5 Sc, INVDEC, 4 Sc, INVDEC, 5 Sc, INVDEC, 4 Sc, INVDEC, 5 Sc, INVDEC (33) Round 18: 3 Sc, INVDEC, 4 Sc, INVDEC, 3 Sc, INVDEC, 4 Sc, INVDEC, 3 Sc, INVDEC, 4 Sc, INVDEC (27)
Now stuff the head firmly, especially the nose area, and continue:
Round 19: 2 Sc, INVDEC, 3 Sc, INVDEC, 2 Sc, INVDEC, 3 Sc, INVDEC, 2 Sc, INVDEC, 3 Sc, INVDEC (21) Round 20: 1 Sc, INVDEC, 2 Sc, INVDEC, 1 Sc, INVDEC, 2 Sc, INVDEC, 1 Sc, INVDEC, 2 Sc, INVDEC (15) Round 21: INVDEC, 1 Sc, 2 INVDEC, 1 Sc, 2 INVDEC, 1 Sc, INVDEC (9) Round 22: [1 Sc, INVDEC] repeat 3 times (6), slip stitch to finish
Tighten all stitches, cut the yarn, and hide the end inside the head.
Charmander Crafting the Body
With orange yarn and your 1.00 mm hook:
Round 1: 6 Sc in magic ring (6) Round 2: INC in each stitch around (12) Round 3: [1 Sc, INC] repeat 6 times (18) Round 4: [2 Sc, INC] repeat 6 times (24) Round 5: [3 Sc, INC] repeat 6 times (30) Round 6: [4 Sc, INC] repeat 6 times (36) Rounds 7-10: Sc in each stitch around (36) Round 11: [10 Sc, INVDEC] repeat 3 times (33) Rounds 12-13: Sc in each stitch around (33) Round 14: [4 Sc, INVDEC, 5 Sc] repeat 3 times (30) Rounds 15-16: Sc in each stitch around (30) Round 17: [8 Sc, INVDEC] repeat 3 times (27) Round 18: Sc in each stitch around (27) Round 19: [7 Sc, INVDEC] repeat 3 times (24), slip stitch to finish
Cut the yarn, leaving a long end for sewing. Stuff the body firmly with polyester wadding.
Charmander Shaping the Forelegs
For each foreleg, using orange yarn and 1.00 mm hook:
Round 1: 6 Sc in magic ring (6) Round 2: INC in each stitch around (12) Round 3: INC, 3 Sc, 4 INC, 4 Sc (17) Round 4: Sc in each stitch around, plus 1 extra Sc (to conceal edges) (17) Round 5: 5 Sc, 4 INVDEC, 4 Sc (13) Rounds 6-9: Sc in each stitch around (13) Round 10: INVDEC, 11 Sc (12)
Stuff the foreleg with polyester wadding and continue:
Round 11: Sc in each stitch around (12) Round 12: 6 INVDEC (6), slip stitch to finish
Cut the yarn, leaving a long tail for sewing. Make 2 forelegs.
Adding Foreleg Claws
Connect orange yarn to the center of the increases (from row 3) and decreases (from row 5). Embroider three claws through row 4 with a few stitches each. Fasten and hide the end. Repeat for the second foreleg.
Charmander Creating the Hind Legs
For each hind leg, using orange yarn and 1.00 mm hook:
Round 1: 7 Sc in magic ring (7) Round 2: INC in each stitch around (14) Round 3: 5 Sc, 4 INC, 5 Sc (18) Round 4: Sc in each stitch around, plus 1 extra Sc (to conceal edges) (18) Round 5: 5 Sc, 4 INVDEC, 5 Sc (14) Round 6: Sc in each stitch around (14) Round 7: 6 Sc, 2 INC, 6 Sc (16) Round 8: 7 Sc, 2 INC, 7 Sc (18) Round 9: 8 Sc, 2 INC, 8 Sc (20) Round 10: Sc in each stitch around (20) Round 11: 8 Sc, 2 INVDEC, 8 Sc (18)
Stuff the foot part with polyester wadding and continue:
Round 12: [1 Sc, INVDEC] repeat 6 times (12) Round 13: 6 INVDEC (6), slip stitch to finish
Cut the yarn, leaving a long end for sewing. Make 2 hind legs.
Squish the top of each hind leg as shown in the pattern photos.
Adding Hind Leg Claws
Connect white yarn to the center of the increases (from row 3) and decreases (from row 5). Embroider three claws through row 4 with a few stitches each. Fasten and hide the end. Repeat for the second hind leg.
Crafting the Distinctive Tail
Using orange yarn and your 1.00 mm hook:
Round 1: 3 Sc in magic ring (3) Round 2: INC, 2 Sc (4) Round 3: INC, 3 Sc (5) Round 4: INC, 2 Sc, 1 HDc, 1 Sc (6)
At this point, connect flesh-colored yarn in the next row where you’ll crochet the second HDc from the first INC. Flesh-colored stitches will be marked with an asterisk (*):
Round 5: 1 HDc, 3 Sc, (INCHDc: 1 HDc, *1 HDc), INCHDc (8) Round 6: 1 HDc, 3 Sc, 1 HDc, *2 HDc, 1 HDc (8) Round 7: 1 HDc, 4 Sc, 1 HDc, *INCHDc, (INCHDc: *1 HDc, 1 HDc) (10) Round 8: 1 HDc, 4 Sc, 1 HDc, *4 HDc (10) Round 9: 2 HDc, 4 Sc, 1 HDc, *1 HDc, *2 INCHDc (12) Round 10: 2 HDc, 5 Sc, *5 HDc (12) Round 11: 2 HDc, 5 Sc, 1 HDc, *2 HDc, *2 INCHDc (14) Round 12: 2 HDc, 6 Sc, 1 HDc, *5 HDc (14) Round 13: 2 HDc, 6 Sc, 1 HDc, *3 HDc, *2 INCHDc (16) Round 14: 2 HDc, 7 Sc, 1 HDc, *6 HDc (16) Round 15: 2 HDc, 7 Sc, 2 HDc, *3 HDc, *2 INCHDc (18) Round 16: 3 HDc, 9 Sc, *6 HDc (18) Round 17: 11 HDc (11), slip stitch (unfinished row)
Cut the yarn, leaving long ends of both colors for sewing. Stuff the tail with polyester wadding and bend it slightly as shown in the pattern photos.
Creating the Cream Stomach
Using flesh-colored yarn and your 1.00 mm hook:
Row 1: Chain 6 Row 2: Sc in second stitch from hook, 4 Sc, chain and turn (5) Row 3: INC, 3 Sc, INC, chain and turn (7) Row 4: 7 Sc, chain and turn (7) Row 5: INC, 6 Sc, chain and turn (8) Row 6: 8 Sc, chain and turn (8) Row 7: 7 Sc, INC, chain and turn (9) Row 8: 9 Sc, chain and turn (9) Row 9: INC, 8 Sc, chain and turn (10) Row 10: INC, 9 Sc, chain and turn (11) Rows 11-13: 11 Sc, chain and turn after each row (11) Row 14: 9 Sc, INVDEC, chain and turn (10) Row 15: 10 Sc, chain and turn (10) Row 16: INVDEC, 8 Sc, chain and turn (9) Row 17: 9 Sc, chain and turn (9) Row 18: 7 Sc, INVDEC, chain and turn (8) Row 19: 8 Sc, chain and turn (8) Row 20: INVDEC, 6 Sc, chain and turn (7) Rows 21-23: 7 Sc, chain and turn after each row (7) Row 24: 7 Sc, then crochet around the entire piece: 1 Sc in the same stitch (7th Sc), 22 Sc into transverse loops, INC at corner, 3 Sc, INC at corner, 24 Sc into transverse loops (61), slip stitch to finish
Cut the yarn, leaving a long end for sewing.
Detailing the Eyes
First Part (Navy Blue)
Using navy blue yarn (three threads of DMC 798) and 0.75 mm hook:
Row 1: Chain 8 Row 2: Dc in third stitch from hook, 5 Dc (6)
Cut the yarn, leaving a long end for sewing. Make 2 identical pieces.
Second Part (White)
Using white yarn (three threads of DMC B5200) and 0.75 mm hook:
Row 1: Chain 6
Cut the yarn, leaving a long end for sewing. Make 2 identical pieces.
Pupils
Using black yarn (two threads of DMC 310) and 0.75 mm hook:
Row 1: Chain 3 Row 2: Sc in second stitch from hook, 3 Sc in the next stitch (crocheting around), 2 Sc in the next stitch (that already has the first single crochet) (6)
Cut the yarn, leaving a long end for sewing. Make 2 identical pieces.
Final Assembly
- Attaching the body to the head:
- Position the body under the bottom center of the head, aligning it with the nose
- Sew securely with the orange yarn end left from the body
- Fasten, cut, and hide the end inside the body
- Adding the stomach:
- Place the stomach on the front of the body so its bottom reaches the tail connection point
- Secure with pins and sew with the flesh-colored yarn
- If orange shows through, use flesh-colored yarn to cover those spots
- Fasten, cut, and hide the end inside the body
- Attaching the hind legs:
- Place symmetrically at the bottom of the body with squished parts against the body
- Secure with pins and sew with the orange yarn ends
- No need to make it perfectly balanced as Charmander will lean on its tail
- Fasten, cut, and hide the ends inside the body
- Positioning the forelegs:
- Place on either side of the body, slightly below the head-body connection
- Raise one arm slightly and secure both with pins
- Sew with the orange yarn ends
- Fasten, cut, and hide the ends inside the body
- Attaching the tail:
- Position at the back of the body, matching colors perfectly with the stomach
- Secure with pins and sew using both flesh-colored and orange yarn ends
- Fasten, cut, and hide the ends inside the body
- Finishing the eyes:
- Place the navy blue and white parts together as shown in the pattern
- Trim unnecessary yarn ends from the beginning of crocheting
- Split the white yarn end into strands, keeping only one for sewing
- Sew the two parts together along the back edges with invisible stitches
- Place the eyes symmetrically just above the nose and secure with pins
- Sew to the head along the entire circumference, maintaining color coordination
- Place and sew the pupils to the center of the navy blue part
- Adding facial details:
- Use thin black yarn to embroider eyebrows, nostrils, and mouth
- Add white sparkles to the edge of both eyes
- Create two tiny teeth with a few white stitches
- Fasten, cut, and hide all ends inside the head
- Creating the flame:
- Take orange, yellow, and red carded wool and split into thin strands
- Combine several strands of different colors
- Insert your hook into the tail end and pull the strands through evenly
- Prepare a second strand of mixed colors
- Insert the hook perpendicular to the first strand and pull through
- Cut the loops, comb out excess wool, and shape like a flame
Tips for Perfect Results
- Be precise with stitch counts to ensure proper shaping
- Take time with the color changes in the tail for a seamless transition
- When embroidering facial features, use reference images of Charmander for guidance
- For the flame, layering different colors creates a more realistic fire effect
- Work with tight tension throughout to maintain the small scale
Creative Variations
Once you’ve mastered the basic Charmander pattern, consider these variations:
- Create a Shiny Charmander by using black yarn instead of orange
- Make a larger version by using thicker yarn and a bigger hook
- Add a tiny Poké Ball accessory for display
- Create Charmeleon and Charizard to complete the evolution line
- Make a sleeping pose by modifying the body and limb positions
Display and Care
To preserve your Charmander amigurumi:
- Keep away from direct sunlight to prevent color fading
- Dust gently with a soft brush
- For spot cleaning, use a damp cloth with mild soap if needed
- Allow to air dry completely if it becomes wet
- Display on a shelf or in a small diorama with other Pokémon
Check this out :Crochet Kitten Anne Amigurumi Pattern
Conclusion
Creating this detailed Charmander amigurumi is a rewarding project that combines your love of Pokémon with the art of crochet. While the pattern requires attention to detail and patience, the result is a charming, pocketable version of this beloved fire starter that fans of all ages will appreciate.
The techniques used in this pattern—from creating the distinctive tail flame to the subtle color transitions—will enhance your amigurumi skills. Each completed Charmander carries not only the iconic character design but also the craftsmanship and care you’ve invested in bringing it to life.
Share your finished Charmander on social media by tagging @freeamigurumii on Instagram or Facebook to connect with fellow crafters and Pokémon enthusiasts. Happy crocheting, and may your Charmander’s flame burn bright!
