

Table of Contents
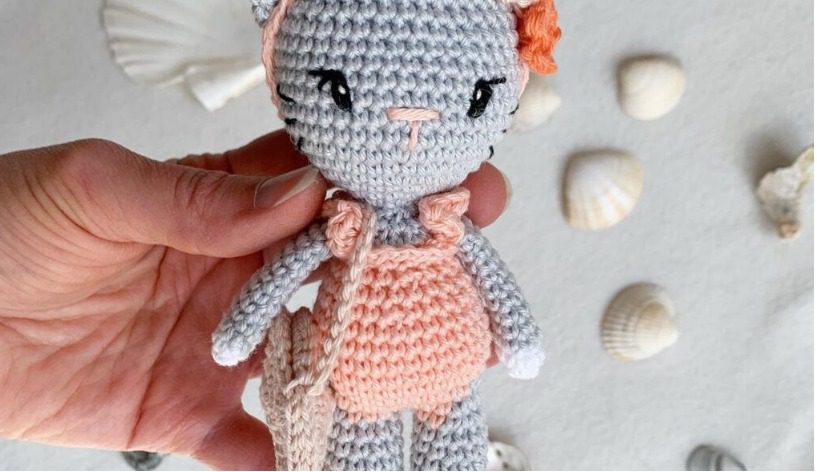
Amigurumi cats have charmed crafters worldwide with their adorable features and endless customization possibilities. Kitten Anne stands out as a particularly endearing project with her sweet expression, stylish outfit, and delightful personality. This detailed pattern guide walks you through creating your own crocheted companion that cat lovers of all ages will adore.
Essential Materials for Kitten Anne
Before starting your amigurumi journey, gather these materials:
- Natural Cotton Swan yarn (6 strands of Coats Chain) in:
- Lilac (for head and body)
- Purple (for accessories)
- Orange (for decorative trim)
- Natural Cotton Swan yarn (3 strands of Coats Chain) in:
- Black (for facial features)
- White (for details)
- Light gray (for limbs and details)
- 3.5 mm crochet hook
- Scissors
- Wool needle for assembly
- Silicone fleece or polyester fiberfill for stuffing
- Safety eyes (optional, can be embroidered instead)
Understanding the Crochet Terminology
Familiarize yourself with these terms before starting:
- MR: Magic Ring – A technique to begin crocheting in rounds with no hole in the center
- sc: Single crochet – The basic stitch used throughout most amigurumi projects
- inc: Increase – Two single crochets in one stitch
- dec: Decrease – Two stitches worked together as one
- BLO: Back Loop Only – Working through only the back loops of stitches
Creating Kitten Anne’s Head
The head forms the foundation of your amigurumi cat’s personality:
- Using lilac yarn and a 3.5 mm hook, create a magic ring.
- Round 1: Work 6 sc in the magic ring (6 stitches total)
- Round 2: Increase in each stitch (12 stitches)
- Round 3: [1 sc, 1 inc] repeat 6 times (18 stitches)
- Round 4: 1 sc in each stitch around (18 stitches)
- Round 5: [2 sc, 1 inc] repeat 6 times (24 stitches)
- Round 6: 1 sc in each stitch around (24 stitches)
- Round 7: [3 sc, 1 inc] repeat 6 times (30 stitches)
- Rounds 8-11: 1 sc in each stitch around (30 stitches)
- Round 12: 7 sc, 3 inc, 12 sc, 3 inc, 5 sc (36 stitches)
- Round 13: 7 sc, [1 sc, 1 inc] 3 times, 12 sc, [1 sc, 1 inc] 3 times, 5 sc (42 stitches)
- Rounds 14-16: 1 sc in each stitch around (42 stitches)
- Round 17: 7 sc, [1 sc, 1 dec] 3 times, 12 sc, [1 sc, 1 dec] 3 times, 5 sc (36 stitches)
- Round 18: 7 sc, 3 dec, 12 sc, 3 dec, 5 sc (30 stitches)
At this point, flatten the head on a surface, positioning the increases from round 12 to the sides. Place safety eyes between rounds 9 and 10, leaving 6 stitches of separation between them. Fill the head with stuffing before continuing to the body.
Shaping Kitten Anne’s Body
Continue with the lilac yarn to create the body:
- Round 19: 15 decreases (15 stitches)
- Round 20: Working in BLO, 14 sc, 1 inc (16 stitches)
- Round 21: 15 sc, 1 inc (17 stitches)
- Round 22: 16 sc, 1 inc (18 stitches)
- Round 23: 1 sc in each stitch around (18 stitches)
- Round 24: [2 sc, 1 inc] repeat 6 times (24 stitches)
- Rounds 25-27: 1 sc in each stitch around (24 stitches)
- Round 28: Working in BLO, 24 sc
- Rounds 29-30: 24 sc
Fill the body with stuffing for a plump, huggable kitten.
- Round 31: 12 decreases (12 stitches)
- Round 32: 6 decreases (6 stitches)
Close the opening by weaving through the front loops of the remaining stitches, pull tight, and secure. Hide the end of the yarn inside the body.
Creating Kitten Anne’s Legs
The white paws contrast beautifully with the gray legs:
- With white yarn, create a magic ring.
- Round 1: Work 6 sc in the magic ring (6 stitches)
- Round 2: Increase in each stitch (12 stitches)
- Round 3: Working in BLO, 1 sc in each stitch (12 stitches)
- Change to light gray yarn
- Round 4: Working in BLO, 1 sc in each stitch (12 stitches)
- Round 5: 2 sc, 4 dec, 2 sc (8 stitches)
- Rounds 6-10: 1 sc in each stitch (8 stitches)
Fill only the foot portion with stuffing. Close and leave a tail of yarn for sewing. When attaching the leg, position it so the decreases from round 5 face upward.
Forming Kitten Anne’s Arms
The arms are simple but important for the finished look:
- Using light gray yarn, create a magic ring.
- Round 1: Work 8 sc in the magic ring (8 stitches)
- Rounds 2-7: 1 sc in each stitch (8 stitches)
Fill with stuffing, close, and leave yarn for sewing to the body.
Adding Kitten Anne’s Ears and Tail
These details bring your kitten to life:
Ears (make 2)
- Using gray yarn, create a magic ring.
- Round 1: Work 5 sc in the magic ring (5 stitches)
- Round 2: 1 sc in each stitch (5 stitches)
- Round 3: Increase in each stitch (10 stitches)
- Round 4: 1 sc in each stitch (10 stitches)
Close and leave yarn for sewing to the head.
Tail
- Insert your hook into the lower center back of the body.
- Chain 11 stitches.
- Skip the first chain and starting from the second chain, work:
- 6 increases
- 4 sc
Close and weave in the end.
Creating Kitten Anne’s Accessories
The skirt and hat add personality and charm:
Skirt
- Using purple yarn, make a slip knot and attach it to the front loop of round 28.
- Chain 3, then work 5 double crochets together in each base stitch around.
- Change to orange yarn.
- Work [1 sc, chain 2] in each stitch around.
- Fasten off and weave in ends.
Hat
- Using purple yarn, create a magic ring.
- Round 1: Work 6 sc in the magic ring (6 stitches)
- Rounds 2-4: 1 sc in each stitch (6 stitches)
- Round 5: [1 sc, 1 inc] repeat 3 times (9 stitches)
- Rounds 6-8: 1 sc in each stitch (9 stitches)
- Round 9: [2 sc, 1 inc] repeat 3 times (12 stitches)
- Round 10: [3 sc, 1 inc] repeat 3 times (15 stitches)
- Round 11: [4 sc, 1 inc] repeat 3 times (18 stitches)
- Round 12: [5 sc, 1 inc] repeat 3 times (21 stitches)
- Round 13: [6 sc, 1 inc] repeat 3 times (24 stitches)
- Round 14: [7 sc, 1 inc] repeat 3 times (27 stitches)
- Round 15: Working in BLO, [8 sc, 1 inc] repeat 3 times (30 stitches)
- Round 16: [2 sc, 1 inc] repeat around
- Round 17: [3 sc, 1 inc] repeat around
- Change to orange yarn
- Round 18: Work [1 sc, chain 2] in each stitch around
Fasten off and weave in ends.
For decorative trim, using orange yarn, make a slip knot and attach it to round 14 of the hat. Work slip stitches all the way around, fasten off, and hide the ends.
Final Assembly and Details
Now it’s time to bring Kitten Anne to life:
- Sew the head to the body securely.
- Attach the arms to the sides of the upper body.
- Sew the legs to the bottom of the body, positioning them so the kitten can sit.
- Attach the ears to the top of the head.
- Embroider eyes and nose using black yarn if you didn’t use safety eyes.
- Add any additional facial details like whiskers or a smile.
- Position the hat on the head and secure with a few stitches if desired.
Creative Variations for Your Kitten Anne
Once you’ve mastered the basic pattern, consider these variations:
- Change the color scheme for a different look—perhaps a calico or tabby pattern
- Add a miniature crochet toy or accessory for your kitten to hold
- Create a family of kittens in different sizes by adjusting your hook size
- Make a bow tie instead of a skirt for a male version
- Add embroidered patterns to the skirt or hat for extra detail
Display and Care Tips
To keep your amigurumi kitten looking its best:
- Keep away from direct sunlight to prevent color fading
- Spot clean with a damp cloth as needed
- If washing becomes necessary, place in a mesh laundry bag and hand wash gently
- Reshape while damp and allow to air dry completely
- Display on a shelf or in a special spot where your kitten won’t be squished
Share Your Creation
When you’ve finished your Kitten Anne amigurumi, share your creation with the crafting community! Tag @freeamigurumii in your photos on Instagram or Facebook to join fellow crafters who’ve completed this adorable pattern.
Check this out :Creating Maya Baby Amigurumi Doll
Conclusion
Creating Kitten Anne is more than just following a pattern—it’s about bringing a charming character to life with your own hands. Each stitch contributes to her personality, from her sweet face to her stylish outfit. The beauty of amigurumi lies in both the crafting process and the joy of the finished creation.
This pattern combines basic techniques with clever shaping to create a kitten that’s both recognizable and full of character. Whether you’re making Kitten Anne for yourself, as a gift, or to practice your amigurumi skills, you’ll find satisfaction in completing this adorable project.
Remember that each handmade item carries something special—a bit of the creator’s time, skill, and care. Your Kitten Anne will be unique to you, a one-of-a-kind creation that reflects your crafting journey. Enjoy the process, celebrate the finished project, and let your amigurumi adventure continue to grow with each new creation!
