

Table of Contents
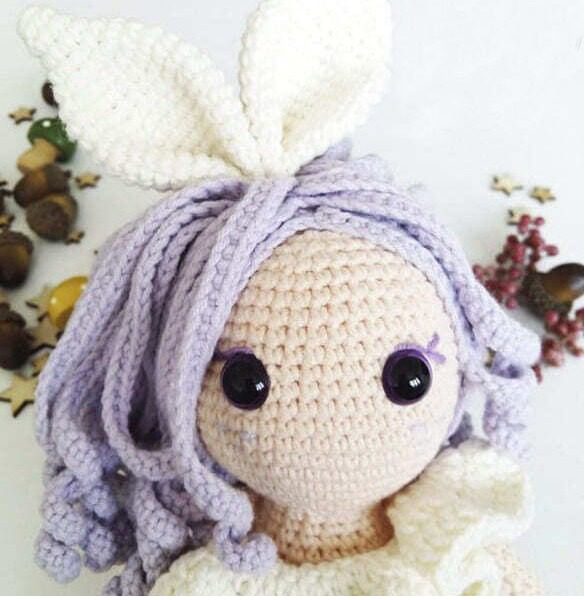
Create Bunny Girl Doll a charming and huggable bunny girl doll with this comprehensive amigurumi pattern. This delightful character features long floppy ears, a beautiful dress with decorative elements, and customizable details that make each finished doll unique. Perfect for gifts, decorations, or adding to your amigurumi collection, this bunny girl doll combines classic amigurumi techniques with creative embellishments for a truly special finished project.
Bunny Girl Doll Materials Needed
Before beginning your bunny girl doll, gather these materials:
- Yarn: YarnArt Jeans or similar weight yarn in:
- Skin color (color code 73)
- Lilac (color code 19)
- Cream (color code 03)
- Green (color code 11)
- Purple (color code 72)
- Safety eyes: 12mm in purple
- Stuffing: Polyester fiberfill
- Tools:
- 2.5mm crochet hook
- Tapestry needle for sewing
- Scissors
- Pins for positioning parts
Understanding Bunny Girl Doll Terminology
This pattern uses standard amigurumi abbreviations:
- sc: Single crochet
- inc: Increase (2 single crochets in one stitch)
- dec: Decrease (2 stitches worked together as one)
- tr: Treble/Triple stitch
- dc: Double crochet
- hdc: Half double crochet
- st/sts: Stitch/stitches
- DCinc: Double crochet increase
- sl-st: Slip stitch
- ch: Chain
- FLO: Front loops only
- BLO: Back loops only
- (…): Total number of stitches after the round/row
- (…) x … times: Repeat instructions in parentheses
Bunny Girl Doll Creating the Legs
Make 2 legs, starting with cream-colored yarn:
Round 1: 6 sc in magic ring (6) Round 2: Inc in each st around (12) Rounds 3-11: Sc in all 12 sts (12) Round 12: Dec twice, sc in next 3 sts, inc twice, sc in next 3 sts (12) Round 13: Sc in all 12 sts (12) Round 14: Dec twice, sc in next 3 sts, inc twice, sc in next 3 sts (12) Rounds 15-16: Sc in all 12 sts (12) Round 17: Sc in BLO around (12)
Switch to skin color yarn:
Rounds 18-24: Sc in all 12 sts (12)
Switch back to cream color yarn:
Rounds 25-26: Sc in all 12 sts (12)
Make the second leg the same way, but crochet 2 more sc after Round 26. DO NOT break the yarn. Stuff both legs firmly.
Bunny Girl Doll Forming the Body
Continue with cream-colored yarn:
Round 27: Ch 6. Hold legs together with toes pointing inward. Sc in next 12 sts around first leg, sc in all 6 ch, sc in next 12 sts around second leg, sc in opposite side of all 6 ch (36) Rounds 28-34: Sc in all 36 sts (36)
Switch to skin color:
Rounds 35-40: Sc in all 36 sts (36) Round 41: [Sc in next 4 sts, dec] repeat 6 times (30) Rounds 42-43: Sc in all 30 sts (30) Round 44: [Sc in next 3 sts, dec] repeat 6 times (24) Round 45: Sc in all 24 sts (24) Round 46: [Sc in next 2 sts, dec] repeat 6 times (18) Rounds 47-49: Sc in all 18 sts (18)
Do not break the yarn. Stuff the body firmly before continuing with the head.
Adding Sock Ruffles
Join yarn to the BLO stitches of Round 17 on each leg: [Ch 1, sc in next st] repeat 12 times (12). Repeat for both socks.
Bunny Girl Doll Shaping the Head
Continue from the body with skin-colored yarn:
Round 50: [Sc in next 2 sts, inc] repeat 6 times (24) Round 51: [Sc in next 3 sts, inc] repeat 6 times (30) Round 52: [Sc in next 4 sts, inc] repeat 6 times (36) Round 53: [Sc in next 5 sts, inc] repeat 6 times (42) Round 54: [Sc in next 6 sts, inc] repeat 6 times (48) Round 55: [Sc in next 7 sts, inc] repeat 6 times (54) Rounds 56-60: Sc in all 54 sts (54) Round 61: [Sc in next 7 sts, dec] repeat 6 times (48) Rounds 62-66: Sc in all 48 sts (48) Round 67: [Sc in next 6 sts, dec] repeat 6 times (42) Round 68: [Sc in next 5 sts, dec] repeat 6 times (36) Round 69: [Sc in next 4 sts, dec] repeat 6 times (30) Round 70: [Sc in next 3 sts, dec] repeat 6 times (24) Round 71: [Sc in next 2 sts, dec] repeat 6 times (18) Round 72: [Sc in next st, dec] repeat 6 times (12) Round 73: Dec 6 times (6)
Fasten off and weave in the end.
Bunny Girl Doll Creating the Arms
Make 2 arms using skin-colored yarn:
Round 1: 6 sc in magic ring (6) Round 2: Inc 5 times (10) Rounds 3-5: Sc in all 10 sts (10) Round 6: Dec, sc in next 6 sts, dec (8) Rounds 7-20: Sc in all 8 sts (8) Round 21: Dec 4 times (4)
Fasten off, leaving a long tail for sewing. Stuff the arms firmly. Sew the arms to the body where the neck section begins.
Bunny Girl Doll Facial Details
Insert the safety eyes between Rounds 60-61, approximately 6 stitches apart. Stuff the head firmly and close the remaining stitches.
Bunny Girl Doll Creating the Hair Cap
Use lilac-colored yarn:
Round 1: 6 sc in magic ring (6) Round 2: [Inc] in BLO around (12) Round 3: [Sc in next st, inc] in BLO, repeat 6 times (18) Round 4: [Sc in next 2 sts, inc] in BLO, repeat 6 times (24) Round 5: [Sc in next 3 sts, inc] in BLO, repeat 6 times (30) Round 6: [Sc in next 4 sts, inc] in BLO, repeat 6 times (36)
Break the yarn, leaving a long tail for sewing.
Bunny Girl Doll Adding Hair
Make 63 hair pieces total with lilac-colored yarn:
Join yarn into the first BLO stitch of Round 2 on the hair cap. [Ch 41, insert your hook into the second st from hook and sc in next 40 sts, sl-st in next 2 sts] repeat until you reach the last stitch on the hair cap.
After crocheting all hair pieces, sew the hair cap to the head. Pin the hair pieces before sewing them to create a natural look. Don’t fix all hair pieces to allow for natural movement.
Creating the Dress
Top of the Dress
Use cream-colored yarn:
Row 1: Ch 14, starting from the second st from hook, sc in next 13 sts (13) Rows 2-37: Ch 1, turn, sc in next 13 sts (13)
Hold the first and last rows next to each other and sew them to form a ring.
Collar
Join cream-colored yarn to the top stitches of the dress body:
Sc in all 36 sts around (36)
Separate the sleeves after the sc row:
- Sc in next 5 sts
- Ch 9, skip 5 sts and insert hook into the 6th st
- Sc in next 14 sts
- Ch 9, skip 5 sts and insert hook into the 6th st
- Sc in next 5 sts
Crochet the collar:
Round 1: Ch 2, turn, dc-inc in next 42 sts (84) Round 2: Ch 2, turn, [dc, dc-inc] repeat to end (126) Round 3: Ch 2, turn, dc in all 126 sts (126)
Skirt
Join cream-colored yarn to the bottom stitches of the dress body:
Sc in all 36 sts around (36)
Crochet the skirt with double crochets:
Round 1: Ch 2, turn, [dc, dc-inc] repeat to end (54) Round 2: Ch 2, turn, [dc in next 2 sts, dc-inc] repeat to end (72) Round 3: Ch 2, turn, [dc in next 3 sts, dc-inc] repeat to end (90)
Decorative Elements
Ivy (Green Leaves)
Make 15 leaves with green yarn:
Ch 8, turn, insert hook into second st from hook and sc in next 2 sts, [hdc in next st, dc in next st, hdc in next st, sc in next 2 sts] repeat 16 times.
Bobbles
Make 8 bobbles with purple yarn:
Ch 3 (first chain will form a circle, others count as first dc), 1 bobble stitch, ch 7.
After completing the ivy and bobbles, twist the bobbles among the leaves and sew them around the belly of your doll.
Creating the Ears
Make 2 ears with cream-colored yarn:
Round 1: 6 sc in magic ring (6) Round 2: Sc in all 6 sts (6) Round 3: [Sc in next 2 sts, inc] repeat twice (8) Round 4: [Sc in next 3 sts, inc] repeat twice (10) Round 5: [Sc in next 4 sts, inc] repeat twice (12) Round 6: [Sc in next st, inc] repeat 6 times (18) Rounds 7-8: Sc in all 18 sts (18) Round 9: [Sc in next 2 sts, inc] repeat 6 times (24) Round 10: [Sc in next 3 sts, inc] repeat 6 times (30) Rounds 11-15: Sc in all 30 sts (30) Round 16: [Sc in next 3 sts, dec] repeat 6 times (24) Round 17: [Sc in next 2 sts, dec] repeat 6 times (18) Round 18: Sc in all 18 sts (18)
Fasten off. Fold the ears and sew them. Then, sew the two ears together. Attach the ears to the head as shown in the pattern.
Making the Shoes
Make 2 shoes with purple yarn:
Round 1: 6 sc in magic ring (6) Round 2: Inc 6 times (12) Round 3: [Sc in next 3 sts, inc] repeat 3 times (15) Rounds 4-6: Sc in all 15 sts (15) Round 7: [Sc in next 4 sts, inc] repeat 3 times (18) Round 8: Sc in all 18 sts (18) Round 9: Ch 1, turn, sc in next st, hdc in next st, dc in next 12 sts, hdc in next st, sc in next st (18)
Fasten off and sew the shoes onto the feet.
Final Touches
- You can embroider eyelashes and freckles with purple yarn if desired
- Adjust the hair style by positioning the strands in different ways
- Ensure all parts are securely attached
- Add any personal embellishments to make your bunny girl unique
Variations and Customization Ideas
Once you’ve mastered the basic bunny girl pattern, consider these variations:
Color Options
- Try different color combinations for the dress, hair, and accessories
- Create a seasonal bunny with colors that match holidays or seasons
- Make a collection of bunny girls with coordinating outfits
Style Modifications
- Create different hairstyles by varying the length of hair strands
- Add a small backpack or purse as an accessory
- Create a tiny carrot or flower for her to hold
- Add a ribbon or bow to the dress or ears
Size Adjustments
- Use thicker yarn and a larger hook for a bigger bunny
- Try thinner yarn and a smaller hook for a mini version
- Create a family of bunnies in different sizes
Caring for Your Amigurumi
To keep your bunny girl looking her best:
- Dust gently with a soft brush
- For spot cleaning, use a damp cloth with mild soap
- Allow to air dry completely if it becomes wet
- Display away from direct sunlight to prevent color fading
- Store in a cool, dry place when not on display
Check this out :Crocheting a Spooky Zombie Pumpkin Mouse Amigurumi
Conclusion
Creating this adorable bunny girl doll combines various amigurumi techniques into one charming project. The detailed dress with its decorative elements, the expressive face, and the characteristic long ears all contribute to the bunny’s distinctive personality.
What makes this pattern special is the attention to detail – from the ruffled socks to the flowing hair and the embellished dress. These elements require a bit more patience but result in a truly unique character with a polished, professional appearance.
Whether you’re making this bunny girl as a gift, a decoration, or to expand your amigurumi skills, the finished doll will be a delightful creation that showcases your crochet talents. The techniques you’ll practice – creating jointed limbs, working with multiple colors, and adding decorative elements – will enhance your overall amigurumi expertise.
Don’t forget to share your finished bunny girl by tagging @freeamigurumii on Instagram or Facebook! Happy crocheting!
