

Table of Contents
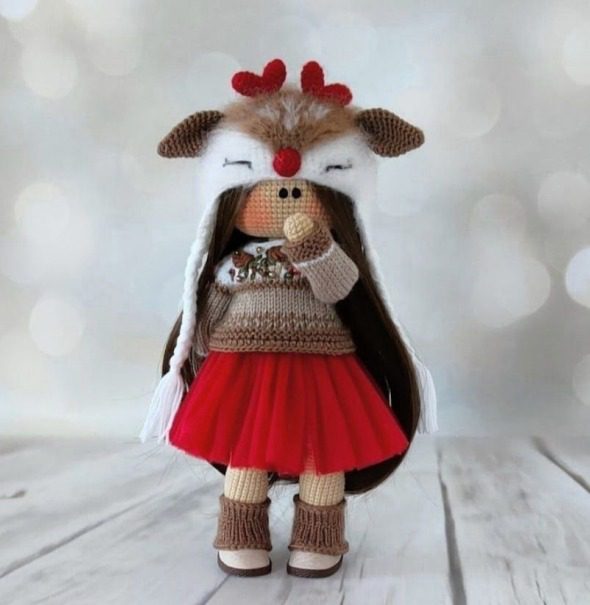
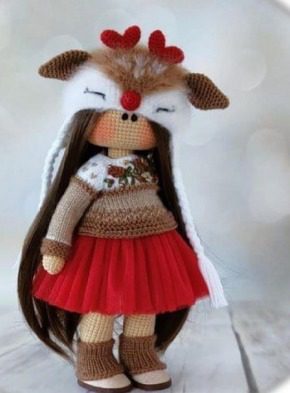
Creating handmade dolls brings joy not only to children but also to crafting enthusiasts who appreciate the art of crochet. Among the most charming creations in the amigurumi world are dolls with animal-themed accessories. This comprehensive guide will walk you through creating a beautiful crochet doll wearing a reindeer hat, perfect for holiday gifts or as a special addition to your handmade collection.
Essential Materials for Your Reindeer Hat Doll
Before beginning your Reindeer Hat crochet Reindeer Hat journey, gather these materials for the best results:
- Acrylic yarn in brown, white, and red colors (Children’s Novinka Pekhorka or similar quality acrylic yarn is recommended)
- Size 2 crochet hook
- Sewing needle for attaching components
- Stuffing material (available at craft stores, Wildberries, or similar retailers)
- Scissors
- Patience (perhaps the most important ingredient!)
Understanding Crochet Terminology
For beginners and as a refresher for experienced crocheters, here are the abbreviations used throughout this Reindeer Hat pattern:
- SC – single crochet without yarn over
- MA – amigurumi ring/magic ring
- SS – slip stitch
- CH – chain stitch
- INC – increase (2 SC in one loop)
- DEC – decrease (work through both half-loops)
Note that the hat shown in the photos may use different colors than suggested. Feel free to choose any colors that inspire you for your creation.
Reindeer Hat Creating the Red Nose
We’ll begin with the nose piece using the “cross-stitch” technique:
- Create a magic ring with 6 SC
- Work 6 increases (12 stitches)
- Complete 12 SC, then slip stitch to join
Cut the yarn, leaving a tail long enough for sewing the piece to the hat later.
Reindeer Hat Crafting the Brown Upper Ears
These distinctive ears are worked using the “birds” technique:
- Start with a magic ring containing 6 SC
- Crochet 6 SC
- Work pattern: (2 SC, INC)×2 (8 stitches)
- Work pattern: (3 SC, INC)×2 (10 stitches)
- Work pattern: (4 SC, INC)×2 (12 stitches)
- Work pattern: (5 SC, INC)×2 (14 stitches)
- Work pattern: (6 SC, INC)×2 (16 stitches)
- Work pattern: (7 SC, INC)×2 (18 stitches)
- Continue with 18 SC for rows 9-12
Fold the ear and work 9 SC through both layers. Fold the edges once more and work 4 SC through both layers. Cut yarn, leaving a tail for attaching to the hat.
Reindeer Hat Making the Red Antlers
Use the “cross-stitch” technique for these adorable details:
- Start with a magic ring containing 6 SC
- Work pattern: (1 SC, INC)×3 (9 stitches)
- Crochet 9 SC for rows 3-5
In the last row, create a slip stitch and cut the yarn, leaving a tail for attachment.
Create a second identical antler, but don’t cut the yarn. Instead, join both antler halves with a single crochet without yarn over. Then continue crocheting 8 SC on one side, move to the other half, and crochet 8 SC there. The two halves are now joined with 16 total stitches.
- Work pattern: (2 SC, DEC)×4 (12 stitches)
- Work 6 decreases and slip stitch
Cut the yarn, leaving a tail for attachment.
Crafting the Main Hat (Brown Color)
The main hat is worked using the “birds” technique. This method creates even stitches that will look neat when turned inside out at the end.
- Start with a magic ring containing 6 SC
- Work 6 increases (12 stitches)
- Work pattern: (1 SC, INC)×6 (18 stitches)
- Work pattern: (2 SC, INC)×6 (24 stitches)
- Work pattern: (3 SC, INC)×6 (30 stitches)
- Work pattern: (4 SC, INC)×6 (36 stitches)
- Work pattern: (5 SC, INC)×6 (42 stitches)
- Work pattern: (6 SC, INC)×6 (48 stitches)
- Work pattern: (7 SC, INC)×6 (54 stitches)
- Work pattern: (8 SC, INC)×6 (60 stitches)
- Work pattern: (9 SC, INC)×6 (66 stitches)
- Crochet 66 SC
- Work pattern: 10 SC, INC, 21 SC, INC, 21 SC, INC, 11 SC (69 stitches)
- Crochet 69 SC
- Work 27 SC, 16 SC in front loop only, 26 SC
- Crochet 69 SC, then cut the yarn as it won’t be needed further
Switch to white yarn:
17-25. Crochet 69 SC for 9 rows
Don’t cut the yarn.
Find the center front of the hat using the remaining half-loops from row 15. Count 12 stitches to each side from the center and place markers. These will indicate where the lower ears will be attached.
Continue crocheting with white yarn to the marker. In row 26, you’ll connect part of the hat (13 SC) and one ear (10 SC):
- Crochet 23 SC, chain stitch, turn work
Continue with decrease rows, working through only one loop and skipping the first stitch:
- 9 SC, chain stitch
- 8 SC, chain stitch
- 7 SC, chain stitch
- 6 SC, chain stitch
- 5 SC, chain stitch
- 4 SC, chain stitch
- 3 SC, chain stitch
- 2 SC, chain stitch
Cut the yarn and secure. Now begin crocheting the second ear the same way as the first, starting from row 27.
Don’t cut the yarn after finishing. Create a chain stitch, turn the work, and secure the hat with single crochets around the circumference, hiding all loose ends.
Reindeer Hat Creating the Nose Section (Brown Color)
Turn the hat with the bottom facing you. In row 15, find the half-loops and attach brown yarn to the first half-loop, then Reindeer Hat crochet your first stitch:
- Work 16 SC, chain stitch
- Work pattern: INC, 12 SC, INC, chain stitch (14 stitches)
- Work pattern: INC, 12 SC, chain stitch (13 stitches)
- Work pattern: INC, 9 SC, INC, chain stitch (11 stitches)
- Work pattern: 9 SC, INC, chain stitch (10 stitches)
- Work pattern: INC, 6 SC, INC, chain stitch (8 stitches)
- Work pattern: INC, 6 SC, chain stitch (7 stitches)
- Work pattern: INC, 5 SC, chain stitch (6 stitches)
- Work pattern: INC, 4 SC, chain stitch (5 stitches)
- Work pattern: INC, 3 SC, chain stitch (4 stitches)
- Work pattern: 2 SC, chain stitch (2 stitches)
- Decrease, chain stitch, cut yarn leaving a tail for attachment
Sew the nose section to the center of the hat.
Step 1: Gather Materials
- Acrylic yarn in brown, white, and red colors
- Size 2 crochet hook
- Sewing needle for attaching components
- Stuffing material
- Scissors
- Patience
Step 2: Create the Red Nose
- Create a magic ring with 6 SC
- Work 6 increases (12 stitches)
- Complete 12 SC, then slip stitch to join
- Cut the yarn, leaving a tail for sewing
Step 3: Craft the Brown Upper Ears
- Start with a magic ring containing 6 SC
- Crochet 6 SC
- Work pattern: (2 SC, INC)×2 (8 stitches)
- Work pattern: (3 SC, INC)×2 (10 stitches)
- Work pattern: (4 SC, INC)×2 (12 stitches)
- Work pattern: (5 SC, INC)×2 (14 stitches)
- Work pattern: (6 SC, INC)×2 (16 stitches)
- Work pattern: (7 SC, INC)×2 (18 stitches)
- Continue with 18 SC for rows 9-12
- Fold the ear and work 9 SC through both layers
- Fold again and work 4 SC through both layers
- Cut yarn, leaving a tail for attaching
Step 4: Make the Red Antlers
- Start with a magic ring containing 6 SC
- Work pattern: (1 SC, INC)×3 (9 stitches)
- Crochet 9 SC for rows 3-5
- For the first antler: slip stitch and cut yarn with a tail
- For the second antler: don’t cut yarn after slip stitch
- Join both antlers with a single crochet
- Crochet 8 SC on first side, 8 SC on second side (16 total)
- Work pattern: (2 SC, DEC)×4 (12 stitches)
- Work 6 decreases and slip stitch
- Cut yarn, leaving a tail
Step 5: Craft the Main Hat (Brown)
- Start with a magic ring containing 6 SC
- Work 6 increases (12 stitches)
- Work pattern: (1 SC, INC)×6 (18 stitches)
- Work pattern: (2 SC, INC)×6 (24 stitches)
- Work pattern: (3 SC, INC)×6 (30 stitches)
- Work pattern: (4 SC, INC)×6 (36 stitches)
- Work pattern: (5 SC, INC)×6 (42 stitches)
- Work pattern: (6 SC, INC)×6 (48 stitches)
- Work pattern: (7 SC, INC)×6 (54 stitches)
- Work pattern: (8 SC, INC)×6 (60 stitches)
- Work pattern: (9 SC, INC)×6 (66 stitches)
- Crochet 66 SC
- Work pattern: 10 SC, INC, 21 SC, INC, 21 SC, INC, 11 SC (69 stitches)
- Crochet 69 SC
- Work 27 SC, 16 SC in front loop only, 26 SC
- Crochet 69 SC, then cut yarn
Step 6: Continue Hat with White Yarn
- Switch to white yarn
- Crochet 69 SC for rows 17-25
- Don’t cut the yarn
- Find center front of hat using half-loops from row 15
- Count 12 stitches to each side from center and place markers for lower ears
Step 7: Create Lower Ears
- Crochet with white yarn to the marker
- In row 26: crochet 23 SC, chain stitch, turn work
- Row 27: 9 SC, chain stitch
- Row 28: 8 SC, chain stitch
- Row 29: 7 SC, chain stitch
- Row 30: 6 SC, chain stitch
- Row 31: 5 SC, chain stitch
- Row 32: 4 SC, chain stitch
- Row 33: 3 SC, chain stitch
- Row 34: 2 SC, chain stitch
- Cut yarn and secure
- Repeat steps 1-11 for second ear
- After second ear, don’t cut yarn
- Create chain stitch, turn work
- Secure hat with single crochets around the circumference
Step 8: Create Nose Section (Brown)
- Turn hat with bottom facing you
- Find half-loops in row 15
- Attach brown yarn to first half-loop
- Row 1: Work 16 SC, chain stitch
- Row 2: INC, 12 SC, INC, chain stitch (14 stitches)
- Row 3: INC, 12 SC, chain stitch (13 stitches)
- Row 4: INC, 9 SC, INC, chain stitch (11 stitches)
- Row 5: 9 SC, INC, chain stitch (10 stitches)
- Row 6: INC, 6 SC, INC, chain stitch (8 stitches)
- Row 7: INC, 6 SC, chain stitch (7 stitches)
- Row 8: INC, 5 SC, chain stitch (6 stitches)
- Row 9: INC, 4 SC, chain stitch (5 stitches)
- Row 10: INC, 3 SC, chain stitch (4 stitches)
- Row 11: 2 SC, chain stitch (2 stitches)
- Row 12: Decrease, chain stitch, cut yarn with tail
Step 9: Final Assembly
- Stuff hat with filling material
- Sew nose section to center of hat
- Attach upper ears, antlers, and nose
- Embroider eyes on nose section
- Optional: add white spots for snowflake effect
Step 10: Create Ear Ties
- Cut six 40cm strands of yarn
- Thread through lower ear using hook
- Even out edges
- Separate into groups of four strands
- Braid to desired length
- Tie off and trim ends evenly with scissors
Reindeer Hat Final Assembly Steps
At this stage, stuff the hat with filling material and then attach:
- Upper ears
- Antlers
- Nose
Embroider the eyes on the nose section. You can add white spots to make them look like snowflakes once the hat is filled.
For the ear ties, cut six 40cm strands of yarn. Thread them through the lower ear using your hook. Even out the edges, separate into groups of four strands each, and braid to the desired length. Tie off and trim the ends evenly with scissors.
Your adorable reindeer hat amigurumi doll is now complete! This charming handmade creation makes a perfect gift for children, a delightful Christmas decoration, or a wonderful addition to your crochet collection.
Reindeer Hat Why Crochet Amigurumi Dolls Are Worth Your Time
Handcrafted amigurumi dolls offer several benefits beyond their obvious charm:
- They provide a creative outlet that improves focus and patience
- Each doll becomes a unique creation with personality
- They make meaningful, personalized gifts that recipients cherish
- Creating amigurumi helps preserve traditional handicraft techniques
- The repetitive motion of crocheting can be meditative and stress-reducing
Whether you’re a beginner or experienced crocheter, this reindeer hat doll pattern offers a delightful project that will bring joy to creators and recipients alike. The combination of different techniques and components makes it an engaging project that yields a truly charming result.
Check this out :Crochet a Spider-Man Keychain Amigurumi
Conclusion
Your reindeer hat amigurumi doll is now complete and ready to charm everyone who sees it. This delightful creation combines various crochet techniques to produce a character full of personality and whimsy. The attention to detail—from the expressive face to the earflaps and antlers—makes this doll stand out as a special handcrafted item.
This project is perfect for intermediate crocheters looking to enhance their skills or adventurous beginners willing to take on a detailed pattern. The finished doll makes an excellent holiday decoration, a thoughtful handmade gift, or a cherished addition to any amigurumi collection.
Remember that each handmade doll carries the unique imprint of its creator. Your tension, yarn choices, and personal touches ensure that no two dolls are exactly alike, even when following the same pattern. This individuality is what makes handcrafted items so special and meaningful.
Whether you created this doll for yourself, as a gift, or to sell, it represents the joy and satisfaction that comes from transforming simple materials into something magical with your own hands. The skills you’ve practiced in this project—from creating three-dimensional shapes to assembly techniques—will serve you well in future crochet adventures.
Thank you for following along with this pattern. May your reindeer hat doll bring as much joy to its recipient as it did to you during its creation!
Happy crocheting!
