

Table of Contents
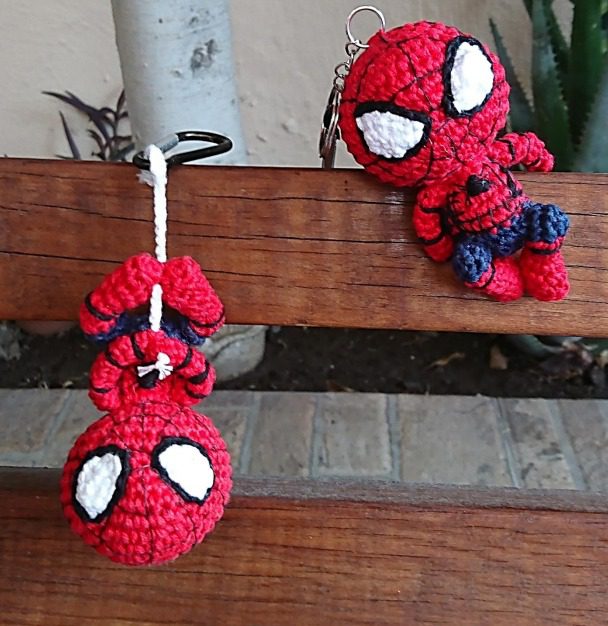
Creating your own Spider-Man amigurumi keychain is a fun and rewarding project for crochet enthusiasts. This adorable superhero keychain measures approximately 8cm tall when completed, making it the perfect portable companion for backpacks, keychains, or as a collectible display piece. Whether you’re a Marvel fan or just love creating cute characters, this project combines simple crochet techniques with iconic design elements.
Spider-Man Materials Needed
To create your Spider-Man amigurumi, you’ll need:
- Yarn in red, navy blue/dark blue, white, and black
- 2mm crochet hook
- Black sewing thread
- Stitch marker
- Stuffing material
- Scissors
- Pins
- Yarn needle
- Tapestry needle for assembly
- Keychain hardware
Crochet Terminology
Before starting, familiarize yourself with these terms:
- Round (R): Numbered round
- Magic Ring (MR): Creates a tight center for crocheting in the round
- Increase (inc): Adding a stitch
- Decrease (dec): Reducing stitches
- Chain (ch): Creates a foundation or turning chain
- Slip Stitch (sl st): Used to join rounds or create flat seams
- Single Crochet (sc): The main stitch used throughout this pattern
Head and Body Instructions: Round by Round
The Spider-Man amigurumi starts with the head and continues into the body as one continuous piece, creating a seamless design:
Head (in red yarn)
Round 1: Create a magic ring with 6 sc (6) Round 2: Increase in each stitch around (12) Round 3: [1 sc, 1 inc] repeat 6 times around (18) Round 4: [2 sc, 1 inc] repeat 6 times around (24) Round 5: [3 sc, 1 inc] repeat 6 times around (30) Round 6: [4 sc, 1 inc] repeat 6 times around (36) Rounds 7-12: 36 sc around for six rounds (36) Round 13: [4 sc, 1 dec] repeat 6 times around (30) Round 14: 15 decreases around (15) Round 15: [1 sc, 1 dec] repeat 5 times around (10)
At this point, stuff the head firmly but not too tightly
Body
Round 16: Increase in each stitch around (20) Round 17: Work in color pattern: 4 red sc + 11 blue sc + 5 red sc (20) Round 18: Work in color pattern: 3 red sc + 11 blue sc + 6 red sc (20) Round 19: Work all 20 stitches in red (20) Round 20: Work in color pattern: 2 red sc + 18 blue sc (20) Round 21: Work all 20 stitches in blue (20) Round 22: 10 decreases around (10) Round 23: Fasten off and weave in end
Add more stuffing to the body before closing completely
Arms: Row by Row Instructions (Make 2)
Using red yarn and working in rows: Row 1: Chain 8, then add 1 turning chain Row 2: Starting in second chain from hook, work 1 sc in each chain across (8) Row 3: Chain 1 (turning chain), 8 sc across (8) Row 4: Chain 1 (turning chain), 8 sc across (8) Fasten off, leaving a long tail (approximately 8-10 inches) for sewing.
Fold the piece in half to create a tube shape. Using the tapestry needle and the long tail, sew sides 1 and 2 together (the long edges), leaving the short edge at the top open for attaching to the body.
Thighs: Round by Round Instructions (Make 2)
Using blue yarn: Round 1: Create a magic ring with 6 sc (6) Round 2: [2 sc, 1 inc] repeat 2 times around (8) Round 3: 8 sc around (8) Fasten off, leaving a long tail for sewing to the body.
Legs: Detailed Instructions (Make 2)
Using red yarn: Row 1: Chain 3, then add 1 turning chain Row 2: Starting from the second chain from hook, work around the foundation chain:
- 1 sc in second chain from hook
- 1 sc in next chain
- 3 sc in the last chain (this creates the curve for the foot)
- Working on the opposite side of the foundation chain:
- 1 sc in next stitch
- 2 sc in last stitch
- 1 sc in same stitch as first sc (9 total)
- Chain 1 as turning chain
Row 3: Working in back loops only, 1 sc in each stitch around (10) Row 4: 2 decreases, 6 sc (8) Row 5: 1 decrease, 4 sc, 1 decrease (6) Row 6: Work only 2 sc (leaving remaining stitches unworked) Row 7: Chain 1, turn work, work 5 sc across Fasten off, leaving a long tail for sewing.
Eyes: Row by Row Instructions (Make 2)
Using white yarn: Row 1: Chain 5, then add 1 turning chain Row 2: 1 sc in each chain across (5), turn Row 3: 1 decrease, 3 sc (4), turn Row 4: 1 decrease using sc, 1 decrease using slip stitch (results in 1 sc and 1 slip stitch) Fasten off, leaving a long tail for sewing to the head.
Step-by-Step Assembly Guide
- Attaching the Thighs:
- Position the blue thighs at the bottom of the body, at the blue section.
- For forward-facing legs: Leave approximately 4 stitches between the thighs.
- For backward-facing legs: Leave approximately 3 stitches between the thighs.
- Use the long tails from the thighs to sew them securely to the body.
- Connecting Legs to Thighs:
- Determine the desired pose for your Spider-Man (swinging or standing).
- Align the open end of each leg with its corresponding thigh.
- Using the long tail from each leg, sew the legs to the thighs.
- Make sure the feet are properly positioned – pointing forward for a standing pose or backward for a swinging pose.
- Attaching Arms:
- Position the arms on either side of the body at approximately the red-blue border.
- For forward-reaching arms: Attach them pointing slightly forward.
- For backward-reaching arms: Attach them pointing toward the back.
- Use the long tails from the arms to sew them securely to the body.
- Positioning the Eyes:
- Place the eyes on the front of the head, using the center of where the web pattern will be as a reference.
- The eyes should be slightly angled, wider at the outer edges.
- Carefully sew the eyes in place, shaping them as you go to achieve Spider-Man’s characteristic eye shape.
- Adding Web Pattern and Details:
- Using black yarn, embroider the spider symbol on the chest.
- With black yarn, add the basic web lines on the face, radiating from the center.
- For a more detailed look, use black sewing thread to add additional web lines connecting the main lines.
- Embroider around the eyes with black yarn to create contrast and definition.
- Keychain Attachment:
- For Spider-Man with backward-facing legs: Sew the keyring directly to the top of the head.
- For Spider-Man in a swinging pose: Thread yarn through the hands and feet, leaving a section to simulate web-swinging. Attach the keyring to this “web” thread.
Finishing Touches
- Make sure all pieces are firmly attached and securely sewn.
- Check that the stuffing provides a good shape but isn’t overfilled.
- Trim any excess yarn ends and hide them inside the amigurumi.
- Add any final details like additional web patterns if desired.
Tips for Success
- Use stitch markers to keep track of your rounds, especially for the head and body.
- The color changes in the body create Spider-Man’s classic costume design. Be careful when switching colors to maintain neat stitches.
- When embroidering the web pattern, work from the center outward to create a symmetrical design.
- Take your time with the eyes, as they give Spider-Man his distinctive look.
- For a more durable keychain, consider reinforcing attachment points with extra stitching.
Check this out :Create the Adorable Bia Amigurumi Doll
Conclusion
Congratulations on completing your Spider-Man amigurumi keychain! This small but detailed project combines basic crochet techniques with character design to create a charming pocket-sized superhero that’s perfect for Marvel fans of all ages. At approximately 8cm tall, this little Spider-Man packs a lot of personality into a compact size.
What makes this project special is the attention to those iconic Spider-Man details – from the distinctive eye shapes to the web pattern and color placement that instantly identify the character. Though small, this amigurumi allows for creative interpretation through the positioning of the arms and legs, letting you decide if your Spider-Man is in mid-swing, climbing a wall, or ready for action.
The versatility of this pattern also makes it perfect for customization. Once you master the basic technique, you can experiment with different yarn weights to change the size, create multiple Spider-Men with varied poses, or even adapt the pattern to create different Spider-Verse characters like Miles Morales or Spider-Gwen by changing the color scheme.
These small amigurumi keychains make wonderful gifts for Marvel enthusiasts, comic book fans, or as party favors for a superhero-themed celebration. They’re also quick enough to make that you can create several in a weekend, building your own miniature Spider-Verse collection.
If this is your first amigurumi project, congratulations on taking on character design! If you’re an experienced crocheter, we hope you enjoyed this quick and satisfying project. Either way, your handmade Spider-Man is ready to swing into action and bring some superhero charm to your keys, backpack, or display shelf.
Remember, in the world of crochet as in the Spider-Verse: with great yarn comes great responsibility! Happy crocheting, and may your Spider-Man amigurumi inspire many more creative projects to come!
