

Table of Contents
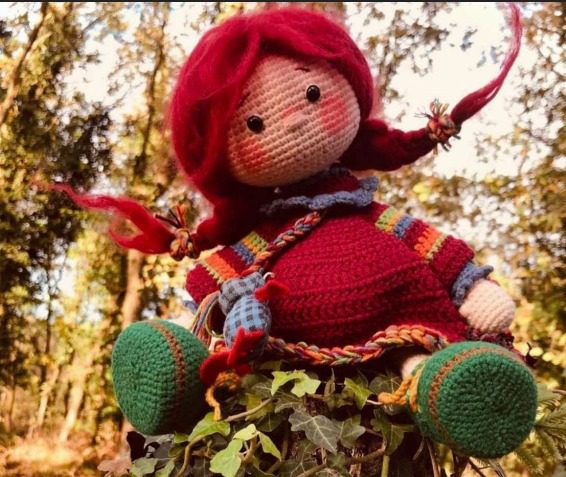
Creating beautiful Red-Haired Amigurumi handmade dolls has become increasingly popular among craft enthusiasts worldwide. Amigurumi, the Japanese art of crocheting small stuffed toys, offers crafters endless possibilities to express their creativity. Today, we’ll walk through the complete process of making an adorable red-haired doll with distinctive green boots that will charm children and adults alike.
Materials for Red-Haired Amigurumi
- Yarn in the following colors:
- Flesh/skin tone (for head, neck, and hands)
- Red (for dress and hair)
- Green (for boots)
- Blue and multi-colored yarn (for collar and trim details)
- Yellow/mustard (for boot trim)
- Size 2 crochet hook
- 8mm safety eyes
- Yarn needle
- Stuffing material
- Scissors
- Stitch markers
Getting Started with Your Red-Haired Amigurumi
Before diving into the pattern, gather all necessary materials. For this project, you’ll need yarn in skin tone, red, green, blue, and yellow colors. Additionally, prepare size 2 crochet hooks, 8mm safety eyes, fiberfill stuffing, yarn needle, and scissors. The beauty of this project lies in its versatility – you can easily customize colors to create your unique doll.
The pattern uses standard amigurumi techniques including single crochet, increases, decreases, and working in continuous rounds. If you’re new to amigurumi, don’t worry – this pattern is suitable for intermediate beginners who understand basic crochet terminology.
Red-Haired Amigurumi Creating the Head and Face
The head begins with a magic ring and gradually increases to form a spherical shape. Work approximately 72 stitches around for the widest part of the head, then maintain this circumference for several rounds before beginning decreases. Position the safety eyes between rounds 18 and 19, leaving approximately 9 stitches between them.
For facial features, use small amounts of embroidery thread to create eyebrows and a simple mouth. Add small circles of pink yarn or fabric for rosy cheeks. Remember to stuff the head firmly as you decrease to maintain its shape.
Red-Haired Amigurumi Crafting the Body
The body follows a similar construction method starting with 8 stitches in a magic ring. Increase gradually until you reach 48 stitches at the widest point. The pattern incorporates color changes to create a distinctive red dress with decorative trim in contrasting colors. The dress design features multicolored stripes at the sleeves and bottom hem, adding a playful touch to the doll.
Remember to stuff the body before closing it off, ensuring it’s firm enough to support the head but still has a soft, huggable quality.
Red-Haired Amigurumi Detailed Arms and Legs Construction
For the arms, create two matching limbs beginning with 6 stitches in a magic ring. Work in skin tone for the hands, then switch to red for the sleeves with decorative trim matching the dress accents. Keep the arms relatively slim with approximately 16-18 stitches around at their widest point.
The legs require more detailed work, especially for the distinctive green boots. Start with skin tone for the upper portions, then switch to green for the boots. Create a foot shape by working in flat rows then joining them together. Add a decorative yellow trim around the top of each boot to complement the overall design.
Red-Haired Amigurumi Detailed Round Instructions
Red-Haired Amigurumi Head
- 6 single crochet (sc) in magic ring
- Increase in each stitch (12 stitches)
- [1 sc, increase] repeat 6 times (18 stitches)
- [2 sc, increase] repeat 6 times (24 stitches)
- [3 sc, increase] repeat 6 times (30 stitches)
- [4 sc, increase] repeat 6 times (36 stitches)
- [5 sc, increase] repeat 6 times (42 stitches)
- [6 sc, increase] repeat 6 times (48 stitches)
- [7 sc, increase] repeat 6 times (54 stitches)
- [8 sc, increase] repeat 6 times (60 stitches)
- [9 sc, increase] repeat 6 times (66 stitches)
- [10 sc, increase] repeat 6 times (72 stitches) 13-25. 72 sc (maintain same stitch count for shape)
Place safety eyes between rounds 18-19, approximately 9 stitches apart.
Begin decreases: 26. [5 sc, decrease, 10 sc, decrease] repeat 5 times (66 stitches) 27. [9 sc, decrease] repeat 6 times (60 stitches) 28. [4 sc, decrease, 8 sc, decrease] repeat 5 times (54 stitches) 29. [7 sc, decrease] repeat 6 times (48 stitches) 30. [3 sc, decrease, 6 sc, decrease] repeat 5 times (42 stitches) 31. [5 sc, decrease] repeat 6 times (36 stitches) 32. [2 sc, decrease, 4 sc, decrease] repeat 5 times (30 stitches) 33. [3 sc, decrease] repeat 6 times (24 stitches) 34. [1 sc, decrease, 2 sc, decrease] repeat 5 times (18 stitches)
Stuff head firmly before closing. Finish off, leaving long tail for attaching to body.
Body
- 8 sc in magic ring
- 8 increases (16 stitches) 3-10. Work 16 sc in each round for 8 rounds (keep same count)
- [3 sc, increase] repeat 4 times (20 stitches)
- 20 sc (maintain count)
- [1 sc, increase, (4 sc, increase) repeat 3 times, 3 sc] (24 stitches)
- 24 sc
- [3 sc, increase] repeat 6 times (30 stitches)
- 30 sc
- [1 sc, increase, (4 sc, increase) repeat 5 times, 3 sc] (36 stitches)
- 36 sc
- [1 sc, increase] repeat 6 times (42 stitches)
- 42 sc
- [5 sc, increase, 6 sc, increase] repeat 5 times, then 1 sc (48 stitches) 22-32. Work 48 sc for 11 rounds (maintain same count)
Switch to blue yarn: 33-41. Work 48 sc for 9 rounds
Begin decreases: 42. [6 sc, decrease] repeat 6 times (42 stitches) 43. [2 sc, decrease, 5 sc, decrease] repeat 5 times (36 stitches) 44. [4 sc, decrease] repeat 6 times (30 stitches) 45. [1 sc, decrease, 3 sc, decrease] repeat 5 times (24 stitches) 46. [2 sc, decrease] repeat 6 times (18 stitches) 47. [1 sc, decrease] repeat 6 times (12 stitches) 48. 6 decreases (6 stitches)
Stuff body firmly before closing.
Arms (make 2)
- 6 sc in magic ring
- 6 increases (12 stitches)
- [1 sc, increase] repeat 6 times (18 stitches) 4-8. 18 sc for 5 rounds (maintain same count)
For sleeve (switch to red yarn): 9. 18 sc 10-25. Continue with 15 sc per round
Work multicolored stripes at sleeve edge as shown in the pattern.
Boots/Feet (make 2)
- 6 sc in magic ring
- 6 increases (12 stitches)
- [1 sc, increase, 1 sc, increase] repeat 3 times (18 stitches) 4-6. 18 sc for 3 rounds
For boot (switch to green yarn): 7. 42 sc in first round of boot 8-9. 42 sc for next 2 rounds 10. 24 sc per round for 5 rounds, adding yellow trim at top
Work edges of boot with 26 sc on each side. Create laces with yellow yarn following image reference.
Dress/Collar
- Begin with 34 sc in red yarn working in half double crochet (hdc)
- 34 hdc
- Work 4 hdc in each gap to create ruffle edge
Create colorful trim at collar edge with blue yarn details.
Hair
Create strands of red yarn double the length of desired hair. Attach at center of head and arrange for braided pigtails. Secure ends with small pieces of yarn.
Assembling Your Doll
Assembly is where your creation truly comes to life. Securely attach the head to the body using strong thread or yarn. Position the arms and legs symmetrically, sewing them firmly in place. The doll’s distinctive hairstyle features vibrant red yarn divided into two braids. Attach the yarn starting from the top of the head, then divide into sections for braiding. Secure the ends with small pieces of matching yarn or thread.
Adding Final Touches
What makes this doll special is the attention to detail. Consider adding accessories like a small bag made from fabric scraps or felt. You might also create a tiny scarf from colorful yarn to complement the outfit. These little extras add personality and charm to your finished creation.
Once complete, your red-haired amigurumi doll will stand approximately 10-12 inches tall, perfect for play or display. The combination of the bright red dress, distinctive green boots, and charming facial features creates an irresistible character with timeless appeal.
Why Handmade Dolls Matter
In today’s digital world, handcrafted toys offer something special. Each stitch represents time, care, and creativity invested in making something unique. Children naturally connect with these handmade treasures, often developing special attachments that mass-produced toys rarely inspire.
Creating amigurumi dolls also provides crafters with therapeutic benefits. The repetitive nature of crochet promotes relaxation and mindfulness, while completing a project delivers tremendous satisfaction. Many crafters find joy in giving these dolls as heartfelt gifts or preserving cultural stories through their creations.
Whether you’re making this doll for a special child, adding to your collection, or starting a small handcraft business, this pattern offers the perfect blend of charm, skill-building, and creative expression. With patience and attention to detail, your red-haired amigurumi doll will become a cherished creation to be enjoyed for years to come.
Check this out :Crochet Adorable Farm Cow Amigurumi
Conclusion
Creating this charming red-haired amigurumi doll brings the joy of handcrafting to life. While following these rounds might seem intricate at first, each completed section builds toward a truly special creation. The combination of vibrant red dress, distinctive green boots, and expressive features results in a doll that carries personality in every stitch.
Remember that amigurumi is as much art as craft – don’t be afraid to make small adjustments to suit your personal style. The most important aspects are maintaining even tension and stuffing firmly to ensure your doll keeps its shape. If you’re new to amigurumi, take your time with each section, marking your rounds carefully to avoid counting errors.
Once complete, your doll will bring smiles whether given as a gift or displayed as a testament to your crafting skill. The traditional folklore-inspired character design connects modern craft with timeless storytelling, making this more than just a toy – it’s a handmade treasure with heart and history woven into every fiber
