

Table of Contents
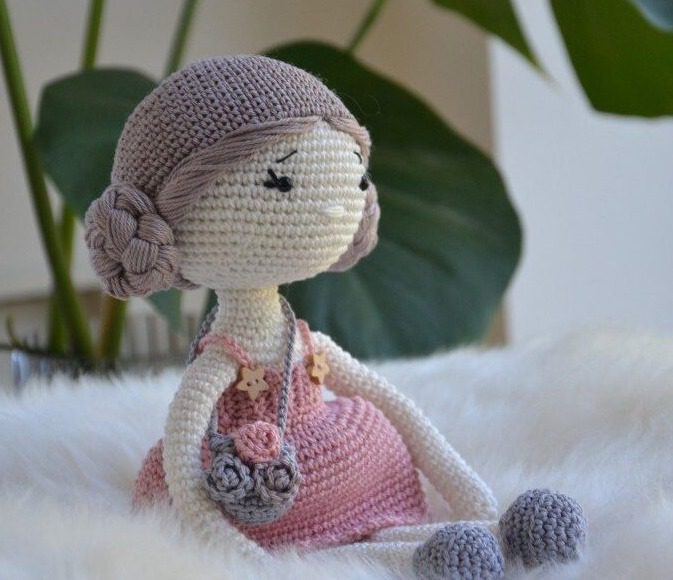
Looking to create Miv Doll a beautiful, huggable crochet doll with personality and style? This detailed amigurumi pattern will guide you through making the charming Miv doll, complete with braided hair, a lovely pink dress, and her own little handbag. Standing approximately 30 cm (12 inches) tall, this sweet doll is perfect for gifting to a child or adding to your amigurumi collection. The Miv doll is designed to inspire imaginative play while showcasing your crochet skills.
Materials Needed for Your Miv Doll
Before beginning your doll project, gather these supplies:
- Rainbow Cotton 8/4 yarn in:
- Natural White (002) – 2 skeins (for body, head, arms, and legs)
- Rose (044) – 1 skein (for dress and decorative rose)
- Light Brown (006) – 1 skein (for hair/hood and decorative rose)
- Light Gray (016) – 1 skein (for shoes, bag, and decorative rose)
- Crochet hook size 2.5 mm
- Black scrap yarn (for facial features)
- Polyester fiberfill for stuffing
- Two 5 mm safety eyes
- Two 12 mm wooden buttons (for dress straps)
- Pins for placement
- Tapestry needle for assembly
- Scissors
Understanding Miv DollTerminology
Familiarize yourself with these standard abbreviations used throughout the pattern:
- mr = magic ring
- ch = chain
- sc = single crochet
- sl st = slip stitch
- dc = double crochet
- tbl = through back loop
- tfl = through front loop
- inc = increase (work 2 stitches in the same stitch)
- dec = decrease (work 2 stitches together)
- BO = bind off
- (xx) = number of stitches after completed round
Miv Doll Important Tips Before Starting
- Stuff the head and body firmly for better shape retention
- Add extra stuffing between the head and body during assembly to prevent the head from slouching
- Work stitches tightly to eliminate gaps between them
- Use stitch markers to keep track of your rounds
- Pin pieces in place before sewing for more accurate placement
Creating Your Miv Doll Step by Step
Arms (Make 2)
Using Natural White yarn:
- Create a magic ring and work 6 sc into it (6)
- [1 sc, increase] repeat 3 times (9) 3-27. Work 1 sc in each stitch for 25 rounds (9)
Bind off. Do not stuff the arms.
Miv Doll Legs (Make 2)
Using Natural White yarn:
- Create a magic ring and work 6 sc into it (6)
- Increase in each stitch around (12)
- [3 sc, increase] repeat 3 times (15)
- Work 1 sc through back loop in each stitch (15)
- Work 1 sc in each stitch (15)
- Decrease 2 times, 11 sc (13)
- Decrease once, 11 sc (12)
Begin stuffing the legs as you work. 8-31. Work 1 sc in each stitch for 24 rounds (12) 32. End with 3 sc, which brings you to the side of the leg.
Make a second leg following the same pattern, but do not break the yarn when finished with the second leg. You’ll continue from there to create the body.
Miv Doll Body
Continue working from the second leg:
- Chain 6 and join the legs, ensuring the toes point in the same direction.
- 12 sc around one leg, 6 sc on one side of your chain-6, 12 sc around the other leg, 6 sc on the other side of your chain-6 (36)
Stuff the body as you continue. 3-13. Work 1 sc in each stitch for 11 rounds (36) 14. [4 sc, decrease] repeat 6 times (30) 15-18. Work 1 sc in each stitch for 4 rounds (30) 19. [3 sc, decrease] repeat 6 times (24) 20-21. Work 1 sc in each stitch for 2 rounds (24)
Now attach the arms to the body: 22. Pin both arms to the body, one on each side. Work 6 sc (bringing you to the side of the body), 3 sc through arm and body, 9 sc, 3 sc through arm and body, 3 sc (24)
Continue with the shoulders: 23. 5 sc, 6 sc across the shoulder, 9 sc, 6 sc across shoulder, 4 sc (30) 24. Work 1 sc in each stitch (30) 25. [3 sc, decrease] repeat 6 times (24) 26. [2 sc, decrease] repeat 6 times (18) 27. [4 sc, decrease] repeat 3 times (15) 28-30. Work 1 sc in each stitch for 3 rounds (15)
Create the neck support that will go inside the head: 31. [4 sc, increase] repeat 3 times (18) 32. [2 sc, increase] repeat 6 times (24) 33-34. Work 1 sc in each stitch for 2 rounds (24) 35. [2 sc, decrease] repeat 6 times (18) 36. [4 sc, decrease] repeat 3 times (15)
Continue stuffing as you go. 37. [3 sc, decrease] repeat 3 times (12) 38. [2 sc, decrease] repeat 3 times (9)
Bind off, leaving a long tail for closing. Use a tapestry needle to join the 9 stitches through the front loops and pull tight to close neatly.
Miv Doll Head
Using Natural White yarn:
- Create a magic ring and work 6 sc into it (6)
- Increase in each stitch around (12)
- [1 sc, increase] repeat 6 times (18)
- [2 sc, increase] repeat 6 times (24)
- [3 sc, increase] repeat 6 times (30)
- [4 sc, increase] repeat 6 times (36)
- [5 sc, increase] repeat 6 times (42)
- [6 sc, increase] repeat 6 times (48)
- [7 sc, increase] repeat 6 times (54)
- [8 sc, increase] repeat 6 times (60) 11-21. Work 1 sc in each stitch for 11 rounds (60)
Attach the safety eyes between rounds 16-17, with 10 sc between them. Stuff the head firmly as you continue.
- [8 sc, decrease] repeat 6 times (54)
- [7 sc, decrease] repeat 6 times (48)
- [6 sc, decrease] repeat 6 times (42)
- [5 sc, decrease] repeat 6 times (36)
- [4 sc, decrease] repeat 6 times (30)
- [3 sc, decrease] repeat 6 times (24)
- [2 sc, decrease] repeat 6 times (18)
- [4 sc, decrease] repeat 3 times (15)
Bind off, leaving a long tail for assembly.
Hood/Hair
Using Light Brown yarn:
- Create a magic ring and work 6 sc into it (6)
- Increase in each stitch around (12)
- [1 sc, increase] repeat 6 times (18)
- [2 sc, increase] repeat 6 times (24)
- [3 sc, increase] repeat 6 times (30)
- [4 sc, increase] repeat 6 times (36)
- [5 sc, increase] repeat 6 times (42)
- [6 sc, increase] repeat 6 times (48)
- [7 sc, increase] repeat 6 times (54)
- [8 sc, increase] repeat 6 times (60) 11-21. Work 1 sc in each stitch for 11 rounds (60)
Bind off, leaving a long tail for sewing to the head.
For the hair, cut 60 strands of Light Brown yarn approximately 45 cm (18 inches) long. Fold each strand in half and secure one in each stitch of the final round of the hood. Divide the hair into two parts and braid each section.
Dress
Using Rose yarn, start with the ribbing at the top:
- Chain 6
- Starting in the 2nd chain from the hook, work 4 sc through back loop, chain 1, turn (4) 3-21. Work 4 sc through back loop, chain 1, turn for 19 more rows (4)
- Fold to form a circle and join the short edges with 4 sc.
Continue without breaking yarn: 23. Work 24 sc evenly along the edge (1 sc in each row) (24) 24. [3 sc, increase] repeat 6 times (30) 25. [4 sc, increase] repeat 6 times (36) 26. [5 sc, increase] repeat 6 times (42) 27. [1 sc, increase] repeat around (63) 28-39. Work 1 sc in each stitch for 12 rounds (63)
Create a decorative edge at the bottom: 40. Chain 2, 1 sc, skip 1 sc, [1 sc, chain 2, 1 sc in same stitch] repeat to end of round.
Bind off.
Bag
Using Light Gray yarn:
- Create a magic ring and work 6 sc into it (6)
- Increase in each stitch around (12)
- [1 sc, increase] repeat 6 times (18)
- Work 1 sc through back loop in each stitch (18)
Bind off. Make a second identical piece, but do not break the yarn after finishing. Place both pieces with wrong sides facing and crochet them together, working through front loop of the circle closest to you and back loop of the other circle (working only in the outer loops), with 1 sc in each stitch.
Chain 46 for the strap and secure the end to the opposite side of the bag.
Decorative Roses (Make 3)
Make one each in Light Gray, Light Brown, and Rose:
- Chain 15
- Starting in the 2nd chain from the hook, work 13 sc (13)
Bind off, leaving a long tail for sewing. Roll the chain to form a rose shape.
Shoes (Make 2)
Using Light Gray yarn:
- Create a magic ring and work 6 sc into it (6)
- Increase in each stitch around (12)
- [3 sc, increase] repeat 3 times (15)
- [4 sc, increase] repeat 3 times (18)
- Work 1 sc through back loop in each stitch (18) 6-7. Work 1 sc in each stitch for 2 rounds (18)
- Chain 8 for the buckle, skip 9 sc, and slip stitch into the 10th stitch.
Remember to place the foot in the shoe before closing the buckle, as you won’t be able to do so afterward. Sew the shoe onto the foot.
Final Assembly
- Head and Hood: Place the hood on the head. Roll the braids around and hide the ends under the hood. Secure with pins and sew in place.
- Dress: Put the dress on the body and chain 14 on each side for the straps. Fasten the straps with a button on each side.
- Bag: Position the bag across the body and secure.
- Head and Body: Join the head and body by placing the neck support (pointed part of the body) inside the head. Sew them together at round 30 of the body to match the 15 stitches at the bound-off edge of the head. Use very small stitches, one for each single crochet, and pull tight for the best result.
- Facial Features: Embroider eyelashes and eyebrows as shown in the reference pictures. Create the nose with 4 stitches between rounds 18-19.
Customization Ideas
While this pattern creates a charming doll with brown braided hair and a pink dress, consider these creative variations:
- Hair Color: Change the hair color to blonde, red, black, or any shade that matches your vision
- Dress Options: Create multiple outfits in different colors and styles
- Accessory Additions: Make additional accessories like a hat, scarf, or extra bags
- Facial Expressions: Vary the placement and style of the embroidered features for different expressions
- Size Adjustments: Use thicker yarn and a larger hook for a bigger doll, or thinner yarn and a smaller hook for a mini version
Perfect as a Gift
This Miv doll makes an excellent present for:
- Children who love imaginative play
- Doll collectors of any age
- Nursery or child’s room decor
- Special occasions like birthdays or holidays
- Baby showers (for when the child is old enough for toys with small parts)
Care Instructions
To keep your Miv doll looking her best:
- Spot clean with mild soap and water
- Air dry completely
- Brush hair gently to maintain the braids
- Avoid direct sunlight to prevent color fading
- If safety eyes are used, remember the doll is not suitable for very young children
Check this out :Crafty Panda Amigurumi Crochet Pattern
Conclusion
Creating the Miv doll allows you to craft a unique, personalized toy with charming details and accessories. The combination of her sweet facial features, braided hair, pretty dress, and little handbag results in a truly special amigurumi that’s full of character. Whether you’re making her for yourself or as a gift, this pattern provides a rewarding crochet experience and a lovable finished doll that’s ready for adventure.
Happy crocheting!
This pattern has been adapted for clarity and SEO purposes while maintaining the original design’s integrity.
