

Table of Contents
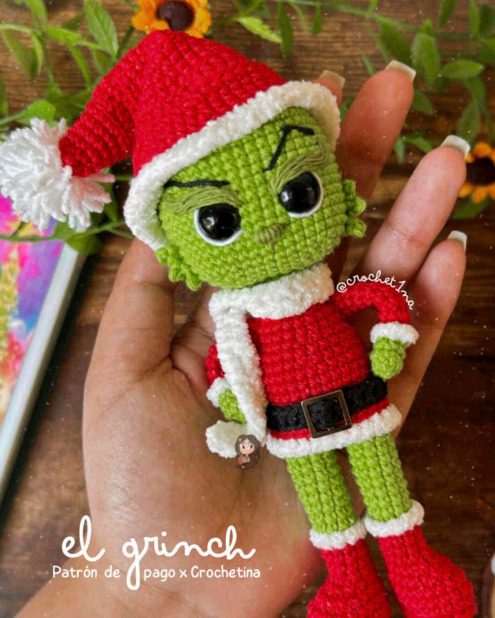
Creating a festive Grinch amigurumi doll is a perfect holiday crochet project for those looking to add a unique handmade touch to their Christmas decorations. This adorable character, with his distinctive green color and Santa outfit, combines the charm of a beloved holiday character with the satisfaction of handcrafted amigurumi work.
Understanding The Grinch Amigurumi Pattern
This pattern allows you to create a detailed Grinch figure wearing a classic Santa outfit complete with hat, coat, and accessories. The finished doll stands approximately 18-20cm tall when made with the recommended materials. The pattern includes comprehensive instructions for creating each component of the doll, from his expressive face to his recognizable green skin and festive attire.
The project is designed for intermediate crocheters who are comfortable with basic techniques including single crochet, increases, decreases, and working in rounds. The detailed step-by-step instructions guide you through each component, making it accessible even for those newer to amigurumi projects.
Essential Materials for Your Grinch Doll
To create your Grinch amigurumi doll, you’ll need the following materials:
- 12mm safety eyes
- Pins for assembly
- Tapestry needle
- Scissors
- Size 2 crochet hook
- Stitch markers
- Polyester fiberfill stuffing
- Wire (0.89mm or 1mm) for optional articulation
- Yarn in the following colors:
- Light green (for the Grinch’s skin)
- Red (for Santa outfit and hat)
- White (for trim and pompom)
- Black (for embroidery details and belt)
- Dark green (for hair details)
The doll’s final size may vary depending on your tension and the specific materials used, but with the recommended supplies, it should measure between 18-20cm tall.
Understanding the Pattern Abbreviations
Before starting, familiarize yourself with these key abbreviations used throughout the pattern:
- V: Round
- Am: Magic ring
- Cdn: Chain
- Pde: Slip stitch
- Pb: Single crochet
- Pm: Half double crochet
- Pa: Double crochet
- XHI: Back loop only
- XHe: Front loop only
- **: Work all stitches into same stitch
- Aupb: Single crochet increase
- Dism: Decrease
- Dispb: Single crochet decrease
- P: Piece
Creating the Grinch’s Head
The head forms the foundation of your amigurumi doll. Start with light green yarn:
- Begin with 8 single crochet in a magic ring
- Increase to 16 stitches in round 2
- Continue increasing systematically: (1 pb, 1 aupb) × 8 in round 3, (2 pb, 1 aupb) × 8 in round 4, and so on
- Maintain 48 stitches for rounds 7-20
- Begin decreasing from rounds 21-25
- For rounds 26-30, maintain 12 stitches to form the neck
After completing the basic head structure, use a tapestry needle to close the opening securely. To ensure the head can move or be removed if desired, stuff the rounds 26-30 inside the head to create space for the neck.
Adding Facial Details and Hair
The distinctive features of the Grinch come to life through careful embroidery and additional crocheted pieces:
Hair and Side Tufts
- For the hair, create a piece in dark green yarn using chains and slip stitches
- For the side tufts, make two identical pieces in light green with the same technique
- Attach the hair between rounds 1-2 of the head
- Attach the side tufts about 5 stitches away from the eyes
Facial Features
- Place the safety eyes between rounds 15-16, separated by 6 stitches
- Add white embroidery beneath the eyes for highlights
- Embroider the nose between rounds 17-18, spanning 2 stitches
- Create expressive eyebrows using black thread – one straight brow (5 stitches long × 2 stitches high) and one arched brow (5 stitches long × 3 stitches high)
- Use dark green yarn to create furrowed brow lines above the eyes for the classic “disgruntled” Grinch expression
For best results, use a super-fine tapestry needle for embroidery to ensure clean, precise details without distorting the stitches.
Crafting the Body and Outfit
The body starts from the feet and works upward:
Legs and Torso
- Begin with red yarn for the feet and legs
- Create a foundation of 6 chains and work in rounds to form the base of the legs
- Follow the pattern to create the body, switching between light green and red yarn as indicated
- For the red boots, work in red yarn along the available loops in rounds 1-2
- Add white trim to the boots using available loops in round 11
Santa Coat
- Create the lower part of the coat in red yarn using available loops from round 24
- Add white trim to the bottom of the coat
- For the upper body, continue in red yarn with white collar detail
Arms
- Make two arms starting with light green yarn for the hands
- Change to red yarn for the sleeves
- Add white trim to the cuffs
- Attach the arms between rounds 33-34 of the body
- Optionally insert wire to make them posable
Making the Santa Hat and Accessories
The Santa hat is essential for the Christmas theme:
- Start with red yarn in a magic ring and work 6 single crochet
- Increase gradually through rounds to create the conical shape
- Add white trim at the base and a white pompom at the tip
Belt and Scarf
- For the black belt, make a foundation of 28 chains and work half double crochet across
- Optionally add a small metal buckle or embroider one with colored thread
- For the white scarf, create a foundation of 46 chains and work across both sides
Final Assembly and Finishing Touches
Once all pieces are complete:
- Attach the head to the body, ensuring it sits properly on the neck
- Sew the arms to the body between rounds 33-34
- Position and attach the Santa hat
- Wrap and secure the scarf around the neck
- Add the belt around the waist
- Make any final embroidery adjustments or detail enhancements
When stuffing your doll, add the filling gradually, especially in the neck area, to maintain the proper shape without distorting the stitches.
Check this out :Crochet Halloween Cocktails and Candy Corn
Conclusion
Your Grinch amigurumi doll combines traditional crochet techniques with festive design elements to create a charming holiday character. The detailed instructions in this pattern guide you through each step of the process, from creating the basic head structure to adding the distinctive features and festive Santa outfit.
The finished doll makes a wonderful handmade gift, a unique addition to your holiday decor collection, or a special project to enjoy during the Christmas season. The combination of the character’s unmistakable green complexion with the iconic Santa outfit creates a whimsical piece that captures the playful spirit of the holidays.
Remember that amigurumi projects require patience and attention to detail, but the result is a one-of-a-kind creation that will bring holiday cheer to your home or make a thoughtful handmade gift. With careful work and by following the pattern closely, you’ll create a charming Grinch doll that’s perfect for the Christmas season.
