

Table of Contents
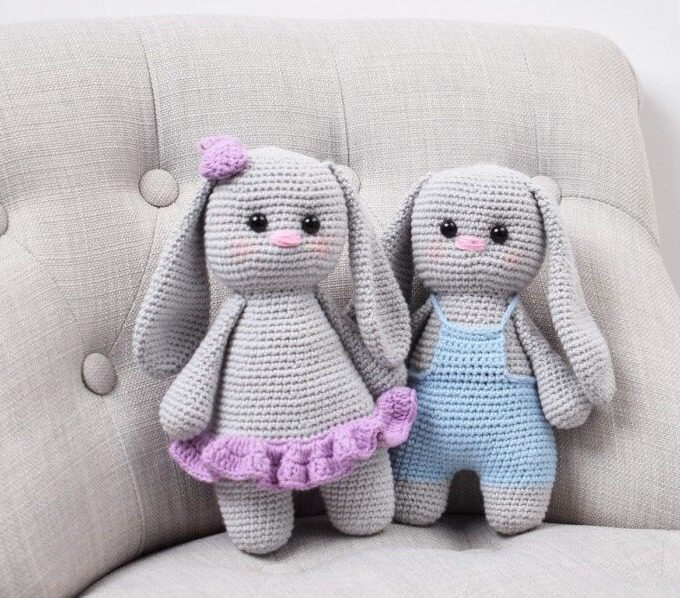
Create Baby Bunny a charming amigurumi baby bunny with this detailed crochet pattern. Standing approximately 19 centimeters tall, this adorable rabbit features a cute skirt, long floppy ears, and an endearing expression. Perfect for beginners and experienced crocheters alike, this bunny makes an excellent gift for children, a delightful Easter decoration, or a sweet addition to your amigurumi collection.
Materials Needed for Your Amigurumi Bunny
Before starting your crochet journey, gather these essential supplies:
- Rainbow Cotton 8/4 yarn in two colors:
- Color A (main body color): approximately 55 grams
- Color B (skirt color): approximately 15 grams
- A small amount of pink yarn for the nose
- 2.5 mm crochet hook
- One pair of safety eyes (9 mm)
- Fiberfill stuffing
- Tapestry needle for assembly
Understanding Baby Bunny Terminology
To follow this pattern successfully, familiarize yourself with these terms:
- Magic Ring (MR): The starting point for crocheting in the round
- Chain (ch): The foundation stitch for starting rows
- Single Crochet (sc): The basic stitch used throughout most of the pattern
- Double Crochet (dc): A taller stitch used for certain details
- Half Double Crochet (hdc): A medium-height stitch
- Through Back Loop (tbl): Working through only the back loop of a stitch
- Together (tog): Working two stitches together to decrease
- Slip Stitch (sl st): Used to join rounds
Creating Baby Bunny Legs
Make two legs using Color A:
Round 1: Create a magic ring and work 6 single crochet stitches into it [6 stitches] Round 2: Work 2 single crochet in each stitch around [12 stitches] Round 3: Work 1 single crochet, then 2 single crochet in the next stitch repeat around [18 stitches] Round 4: Work 1 single crochet in the first 2 stitches, then 2 single crochet in the next stitch repeat around [24 stitches] Rounds 5-11: Work 1 single crochet in each stitch for 7 rounds [24 stitches]
For the first leg, fasten off and weave in the end. For the second leg, do not fasten off as you will continue working to form the body.
Forming Baby Bunny Body
Continue from the second leg:
Round 1: Chain 3, then work 1 single crochet into each stitch of the first leg [24 stitches]. Work 1 single crochet into each of the 3 chain stitches, then work 1 single crochet into each stitch of the second leg [24 stitches]. Work 1 single crochet into the other side of the 3 chain stitches [54 stitches total] Round 2: Work 1 single crochet in the first 8 stitches, then 2 single crochet in the next stitch repeat around [60 stitches] Rounds 3-9: Work 1 single crochet in each stitch for 7 rounds [60 stitches] Round 10: Work 1 single crochet through the back loop only of each stitch around [60 stitches] Round 11: Work 1 single crochet in the first 8 stitches, then decrease once repeat around [54 stitches] Rounds 12-14: Work 1 single crochet in each stitch for 3 rounds [54 stitches] Round 15: Work 1 single crochet in the first 7 stitches, then decrease once repeat around [48 stitches] Rounds 16-17: Work 1 single crochet in each stitch for 2 rounds [48 stitches] Round 18: Work 1 single crochet in the first 6 stitches, then decrease once repeat around [42 stitches] Rounds 19-20: Work 1 single crochet in each stitch for 2 rounds [42 stitches] Round 21: Work 1 single crochet in the first 5 stitches, then decrease once repeat around [36 stitches] Rounds 22-23: Work 1 single crochet in each stitch for 2 rounds [36 stitches] Round 24: Work 1 single crochet in the first 4 stitches, then decrease once repeat around [30 stitches] Rounds 25-26: Work 1 single crochet in each stitch for 2 rounds [30 stitches] Round 27: Work 1 single crochet in the first 3 stitches, then decrease once repeat around [24 stitches] Round 28: Work 1 single crochet in each stitch [24 stitches]
At this point, stuff the body and legs firmly with fiberfill.
Creating Baby Bunny Head
Continue from the body:
Round 29: Work 2 single crochet in each stitch around [48 stitches] Round 30: Work 1 single crochet in the first 7 stitches, then 2 single crochet in the next stitch repeat around [54 stitches] Round 31: Work 1 single crochet in the first 8 stitches, then 2 single crochet in the next stitch repeat around [60 stitches] Rounds 32-41: Work 1 single crochet in each stitch for 10 rounds [60 stitches] Round 42: Work 1 single crochet in the first 8 stitches, then decrease once repeat around [54 stitches] Round 43: Work 1 single crochet in each stitch [54 stitches] Round 44: Work 1 single crochet in the first 7 stitches, then decrease once repeat around [48 stitches] Round 45: Work 1 single crochet in the first 6 stitches, then decrease once repeat around [42 stitches]
At this point, attach the safety eyes between rounds 37 and 38, with approximately 6-7 stitches between them.
Round 46: Work 1 single crochet in the first 5 stitches, then decrease once repeat around [36 stitches] Round 47: Work 1 single crochet in the first 4 stitches, then decrease once repeat around [30 stitches] Round 48: Work 1 single crochet in the first 3 stitches, then decrease once repeat around [24 stitches]
Stuff the head firmly with fiberfill before continuing with the final decreases.
Round 49: Work 1 single crochet in the first 2 stitches, then decrease once repeat around [18 stitches] Round 50: Work 1 single crochet, then decrease once repeat around [12 stitches] Round 51: Decrease 6 times [6 stitches]
Fasten off, leaving a tail. Use the tail to sew the remaining hole closed.
Baby Bunny Adding Facial Details
Using Color A yarn:
- Pull a thread through the head and out on the right side of one eye
- Thread the needle back into the head on the left side of the same eye and pull gently to create a small dip
- Pull the thread up on the right side of the other eye
- Thread down again on the left side of that eye
- Tighten slightly so both eyes are pulled in a bit, giving the bunny a cute expression
Using pink yarn, embroider a small nose across 4-5 stitches as shown in the pattern pictures.
Creating Baby Bunny Skirt
Using Color B:
- Turn the bunny so the head faces you
- Pull a loop of yarn through the line of stitches where you worked through the back loop only (Round 10 of the body)
- Work 1 single crochet in each stitch around the belly of the bunny [60 stitches]
- Join the round with a slip stitch into the first stitch
- Chain 1, then work 2 double crochet in each stitch around [120 stitches]
- Join the round with a slip stitch
- Chain 1, then work 1 double crochet in the first stitch, 2 double crochet in the next stitch repeat around [180 stitches]
- Join round with a slip stitch into the first stitch
Fasten off and weave in the ends.
Baby Bunny Making the Arms
Make two arms using Color A:
Round 1: Create a magic ring and work 6 single crochet stitches into it [6 stitches] Round 2: Work 2 single crochet in each stitch around [12 stitches] Round 3: Work 1 single crochet, then 2 single crochet in the next stitch repeat around [18 stitches] Round 4: Work 1 single crochet in the first 2 stitches, then 2 single crochet in the next stitch repeat around [24 stitches] Rounds 5-6: Work 1 single crochet in each stitch for 2 rounds [24 stitches] Round 7: Work 1 single crochet in the first 2 stitches, then decrease once repeat around [18 stitches] Rounds 8-9: Work 1 single crochet in each stitch for 2 rounds [18 stitches] Round 10: Work 1 single crochet in the first 4 stitches, then decrease once repeat around [15 stitches] Rounds 11-12: Work 1 single crochet in each stitch for 2 rounds [15 stitches] Round 13: Work 1 single crochet in the first 3 stitches, then decrease once repeat around [12 stitches] Rounds 14-24: Work 1 single crochet in each stitch for 11 rounds [12 stitches]
Add a small amount of stuffing to the hand and part of the arm. Fold the top of the arm flat and close it by working 6 single crochet through both layers. Leave a long tail for sewing the arm to the body.
Sew the arms to the sides of the body, positioning them at an angle that looks natural.
Baby Bunny Crafting the Ears
Make two ears using Color A:
Round 1: Create a magic ring and work 6 single crochet stitches into it [6 stitches] Round 2: Work 2 single crochet in each stitch around [12 stitches] Round 3: Work 1 single crochet, then 2 single crochet in the next stitch repeat around [18 stitches] Round 4: Work 1 single crochet in each stitch [18 stitches] Round 5: Work 1 single crochet in the first 2 stitches, then 2 single crochet in the next stitch repeat around [24 stitches] Round 6: Work 1 single crochet in each stitch [24 stitches] Round 7: Work 1 single crochet in the first 3 stitches, then 2 single crochet in the next stitch repeat around [30 stitches] Rounds 8-10: Work 1 single crochet in each stitch for 3 rounds [30 stitches] Round 11: Work 1 single crochet in the first 8 stitches, then decrease once repeat around [27 stitches] Rounds 12-13: Work 1 single crochet in each stitch for 2 rounds [27 stitches] Round 14: Work 1 single crochet in the first 7 stitches, then decrease once repeat around [24 stitches] Rounds 15-16: Work 1 single crochet in each stitch for 2 rounds [24 stitches] Round 17: Work 1 single crochet in the first 6 stitches, then decrease once repeat around [21 stitches] Rounds 18-19: Work 1 single crochet in each stitch for 2 rounds [21 stitches] Round 20: Work 1 single crochet in the first 5 stitches, then decrease once repeat around [18 stitches] Round 21: Work 1 single crochet in each stitch [18 stitches] Round 22: Work 1 single crochet in the first 4 stitches, then decrease once repeat around [15 stitches] Round 23: Work 1 single crochet in each stitch [15 stitches] Round 24: Work 1 single crochet in the first 3 stitches, then decrease once repeat around [12 stitches] Rounds 25-33: Work 1 single crochet in each stitch for 9 rounds [12 stitches]
Fold the ear flat and close it by working 6 single crochet through both layers. Leave a long tail for sewing the ear to the head.
Sew the ears onto the head, one on each side, positioning them to give your bunny character.
Baby Bunny Adding a Decorative Bow
Using Color B:
- Chain 20 and join into a ring with a slip stitch
- Chain 1 and work 1 half double crochet into each stitch of the circle
- Join with a slip stitch
- Chain 1 and work 1 half double crochet into each stitch of the circle again
- Join with a slip stitch
- Chain 1 and work 1 half double crochet into each stitch of the circle for a third time
- Join with a slip stitch
Fasten off, leaving a long tail. Wind a piece of yarn around the middle of the circle to create the bow shape. Sew the bow onto the head near one of the bunny’s ears for a charming finishing touch.
Final Touches and Assembly Tips
Your amigurumi baby bunny is now complete! Here are some tips to ensure your finished project looks its best:
- Make sure all parts are stuffed firmly but evenly for the best shape
- Take care when positioning the eyes to achieve the perfect expression
- The facial indentations around the eyes give your bunny character—adjust the tension for the desired look
- Position the ears slightly forward or to the sides depending on the look you want
- The skirt should flare out naturally; fluff it gently for the best appearance
- Consider adding small embellishments like a tiny pompom tail if desired
Check this out :Crochet Amigurumi Girl Doll Pattern
Caring for Your Amigurumi Bunny
To keep your handcrafted bunny looking its best:
- Store in a clean, dry place away from direct sunlight to prevent color fading
- If the bunny becomes dusty, gently spot clean with a slightly damp cloth
- Ensure all parts are securely attached before giving to children
- Consider creating multiple bunnies in different color combinations for a charming display
This baby bunny amigurumi combines simple crochet techniques with adorable details. The combination of the skirt, long ears, and sweet expression creates a character full of personality that will delight crafters and recipients alike.
Whether you’re creating this bunny for Easter celebrations, as a gift for a special child, or as an addition to your amigurumi collection, the finished piece represents your crafting skill and attention to detail. Each stitch contributes to a delightful handmade treasure that brings joy to creator and recipient alike.
Happy crocheting, and may your amigurumi baby bunny bring smiles to all who see it!
